Radishes And Mache

by A.J. Coltrane

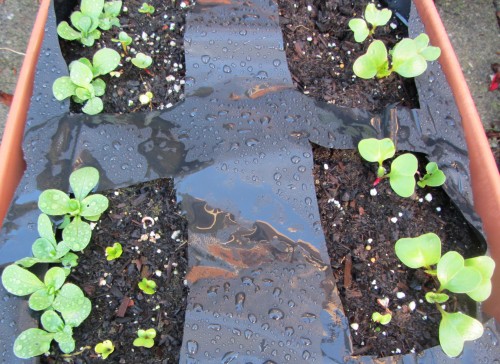
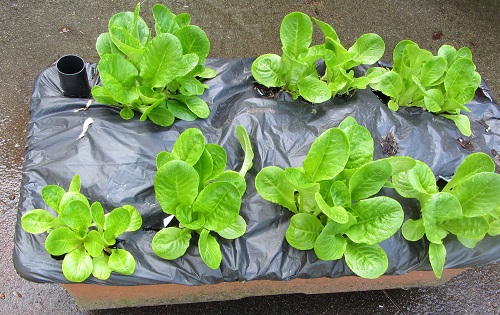
Mache and two types of radishes – “Cherry Bell” and “French Breakfast”:

042114 radish and mache

The Mache was direct seeded on January 5. I doubt that the super-early planting produced something much earlier than if I’d just waited another 4-6 weeks. It’s listed as a 50-day maturity, and we’re eating the last of them about 100 days later. The correct answer is (probably) to plant Mache in September-October or late February. Still, it was a good exercise to see what Mache would tolerate, and it survived the cold weather just fine.

The “Cherry Belle” radishes were direct seeded on February 10. In theory they can be ready to harvest in as little as 22 days (at 3/4″ – 1″ in diameter). It took closer to two months. They definitely didn’t like being at all cramped in the EarthBox. I think this variety is likely better suited for a container that offers more elbow room.

The “French Breakfast” radishes were direct seeded on March 7. They’re supposed to take 25-30 days to get 3-4″ long and 1/2″ in diameter. They took a couple of weeks longer than that, which I’d guess was to be expected. The nice thing about this variety is that they grow downward like carrots, rather than expanding much in width. My suspicion is that these are the better variety for limited-space situations.

If anyone has a good recipe for radish leaves I’m all ears. It looks like people either eat them raw or saute them with aromatics..
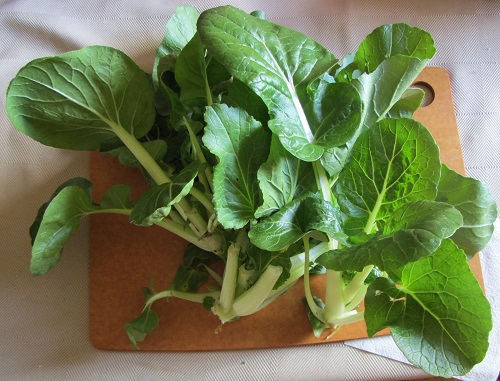
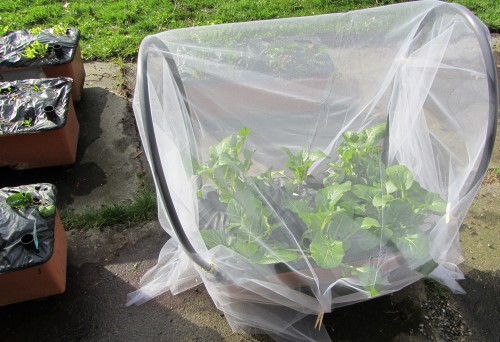
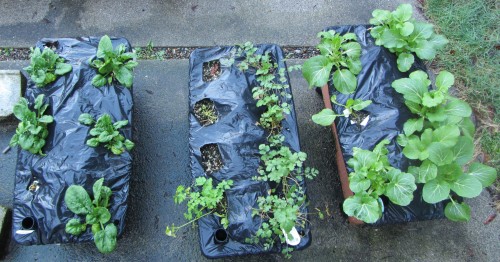
The Cold Frame, And Other Stuff

by A.J. Coltrane

The cold frame is finally finished. (I think. There are four screws left over.) It should be a good home anytime something needs a little more warmth. The lid can be adjusted to multiple positions. For reference the box is 4′ long by 2′ wide by 18″ high:

140418 cold frame

Next is a new trellis for the raspberry plants. It’s actually a remesh sheet (for concrete reinforcement.) Seven bucks at Home Depot. While I was trying to bend this into a circle it snapped back and got me in the face. I’d recommend eye protection if you decide to do this:

140418 raspberry

It’s secured with cable ties.

Pictured below is just under one ounce of romaine. It’s about 20-25 leaves — it makes for a nice little lunch salad. It’s amazing just how little leafy greens weigh. Three pounds of lettuce would make 50 of these salads:

140418 romaine winter density

That’s the “Winter Density” romaine. It was started indoors from seed on February 5 and transplanted outdoors on February 24. It’s still going strong, though I may start interplanting new seed around it soon.

Below is the “Little Gem” romaine. Started indoors February 16 and transplanted to the EarthBox on March 8. It’s just now starting to get up a head of steam, though it’s been in a relatively shady location in the back yard most of the time. I believe it’s supposed to have a fairly compact growing habit anyway.

140418 romaine little gem

Finally, a bonus boy cat pic:

140418 boy cat

Growing and Bolting

by A.J. Coltrane

We planted winter-hardy vegetables in late October. Mache was direct seeded on January 5. Cherry Belle Radishes were direct seeded on February 10. Super Sugar Snap Peas were transplanted outside on February 16. Romaine “Winter Density” seedlings followed them on February 24.

But nothing really did a whole lot, until this week. This week we’d go into the backyard and the vegetables would be perceptibly bigger than they were the day before. About half of the Bok Choi bolted a few days ago, so it got harvested before it could get bitter. More bolted today — it got cut out too. Altogether it came out to around two pounds of Bok Choi. Pictured below is today’s 3/4 lb – about 3 decent-sized heads:

140411 bok choi

That’ll be a stir-fry with garlic, sesame seeds, and Sriracha.

I *think* I read that cabbages planted in the fall will bolt more quickly in the spring. That may be what is going on here. I’m not sure though — that’s something that needs additional reading.

The peas are doing well. Here’s February 14:

Ultimato stakes with garden twine.

And today:

140411 peas

No output from the peas yet, I’m guessing that’ll happen soon(?)

Finally, the romaine lettuce:

140411 romaine winter density

At least so far the front yard seems to be the better location for cool-season vegetables. It faces east, and doesn’t get sun during the hottest part of the day. We’ll see how it goes when it gets hot outside — it may require shade cloth to slow the bolting… Though the early results are encouraging.

Tulle

by A.J. Coltrane

Last year we had no idea that those white moths lay eggs on the bok choi and brussels sprouts (both members of the cabbage family). The eggs turn into voracious caterpillars.

Which is very uncool.

So for this year I purchased tulle. (Link here. I paid $46 at the time. It now says $54.96. There may be a better deal out there.)

I used the hoop house idea again, but this time I made the hoops larger. I cut the dowels to two at 10″ and two at 14″, rather than all four at 12″. The dowels sit a little more even in the EarthBox that way. Below, there are clamps on the corners and clothespins on all four sides – the clothespins keep it tidier and add weight to the bottom of the cover.

140331 tulle

Pictured is the Pak Choi that was started from transplants on October 22. It’s come a long way.

Along about May I’m going to try basically the same setup, but with shade cloth for the lettuces/parsley/cilantro/dill/ anything else that bolts.

If you’re one of my neighbors and want some tulle, let me know. 50 yards is a lot of fabric.

Overwintered

by A.J. Coltrane

I had tried planting some winter-hardy vegetables in late November as an experiment. Here’s a pic from right before Christmas:

New growth in December. [L-R - Pac Choi, Parsley, Cilantro, Spinanch]. The new leaves look happier than the leaves that were on the plants at the time of transplanting.
New growth in December. [L-R – Pac Choi, Parsley, Cilantro, Spinanch]. The new leaves look happier than the leaves that were on the plants at the time of transplanting.
And March 17:


(L-R) Spinach, Parsley, Cilantro, Pak Choi

I think to some degree the Pak Choi smothered the Parsley in the crowded confines of the mini green house. (The three mostly empty cells.) Also, Thanksgiving was too late to start — September would have been better. Next year we’ll probably try hoop houses and cold frames for plant protection  — the mini green house worked just “ok”. Overall it was too cramped and too wet inside. The Pak Choi was attacked by slugs all winter. The Spinach received some slug abuse too, though to a much lesser degree.  Still, the overwintered veg are *way* ahead of the Mache and Radishes in the front yard:

140317 mache and radish

On the far left is Mache, planted January 5. On the right are Cherry Belle Radishes, planted February 10. The tiny plants in the middle are French Breakfast Radishes (March 7.)

Next winter we’ll try to focus on stuff that the slugs don’t love to eat.

The Lighting Rig

by A.J. Coltrane

Approximate dimensions are 26″ long by 22″ high:

140302 lighting

The photo was taken with the window closed and the lights off — otherwise it would have been a big glare of light. The frame is probably a little taller than it needs to be, but that’s a simple fix if desired. The red power switches on the sides are easy to access, and the clamps make it super painless to slide the lamps up and down independently.

It’s two of this clamp lamp, which were ~$12 each at Home Depot.

and

A 1/2 pack of a 4 bulb “daylight” (5k) package. The four-pack was about $9.

So maybe $30 in total. Looking around the internet at T5 packages, there seemed to be a lot of “proprietary bulbs” and “cheap construction”, such as this. Most were in the $50+ range.

Anyhow, I’m pretty happy with it. The price was right, and it’s very well built. Gratuitous boy cat pic/closeup of the lighting rig:

140302 closeup


More Containers

by A.J. Coltrane

It seems to me that while the EarthBoxes are great for most of the plants that we want to grow, they’re less than ideal for tasks like succession planting herbs, lettuces, and anything else that might normally be “broadcast”.

So we picked up four resin whiskey barrels at a big box store last week. Last night, peas that had been started indoors got their first full evening outside. After “sunset” the wind blew and it rained like crazy. I figured I’d go outside this morning and see pea plants that had been mashed flat by the elements.

Yesterday late-morning it was sunny and mild:

Ultimato stakes with garden twine.

And after a hard night…

*drumroll*

As it turns out, there’s no reason for an “after” picture. The peas look the same, only wet.

The Super Sugar Snap Peas are listed as having a 58 day maturity. But:  “Days to maturity are calculated from the date of direct seeding. Note: In areas with mild winters such as the maritime Northwest, where peas can be planted in February, add 35-40 days.”

Given that we started them indoors on February 5th — I’m guessing April sometime? (I was thinking very early April, now I’m not so sure.)

In retrospect, the EarthBoxes would have worked well for peas. I think next attempt at peas will need to use the EarthBoxes in order to save the big containers for lettuces/ spinach/ mache/ etc.

Whatever, I was just pleased we had something left this morning..

Onions Are Durable

by A.J. Coltrane

Stir fry ingredients ready to go. Bunch onions from the backyard and King of the North peppers from the freezer:

140210 veg

That’s about 1/4 pound of cleaned onions.

Here are the same bunch onions in July. Tiny!

070713 new plants

What’s remarkable is that yesterday the neighborhood looked like this:

Cold oak.
Cold oak.

There’s still snow on the ground today. I’d never have guessed it was possible to harvest during snow season, but there it is.

In retrospect, the onions could use more elbow room this fall. I took the “bunch” in “bunch onions” too literally. I’m guessing the right answer is to wait until the basil is done for the year and spread out the onion through the entire box.

Seed Germination Temperatures and Times. Days to Maturity. And Plant Minimum Temperatures. NW Edition.

by A.J. Coltrane

A couple of spreadsheets with seed germination times and temperatures, days to maturity, and the minimum temperature that the adult plants will tolerate.

The spreadsheets only contain the plants that:

1.  Do well in the Pacific Northwest. That’s where we are.

2.  Do well in containers. That’s how we’re gardening.

and

3.  Represent plants we’ll potentially eat.

I’ll likely add more plants at a later date, either because I overlooked the plant on the first pass, or because somebody else asks for the info. As it was, I made more manageable spreadsheets (and saved work) by not including most of the root vegetables, as well as the veggies that we’re unlikely to consume.

Much of the information is from the Territorial Seed website. The balance was drawn from various online, reasonably reputable sources (other seed houses, edu sites, etc.)

The first spreadsheet is sorted alphabetically:

Continue reading “Seed Germination Temperatures and Times. Days to Maturity. And Plant Minimum Temperatures. NW Edition.”

An Inexpensive EarthBox Hoop House

by A.J. Coltrane

SeattleAuthor brought over Mâche seeds the other day, so it seemed like a good time to make a hoop house to keep the rain off of the seedlings. The hoop house was intended for the front yard, so it had to look decent. I was also targeting the minimum cost that would still allow for a “sound” end result. The finished cost was about $4.

140714 hoop house

Bill of Materials

~8 feet of 1/2″ pvc (black, flexible). Cut into two 4′ pieces. (Of a 100′ roll @ $16. An 8′ length should be comparable in price.)

5′ x 5′  of 4 mil clear plastic sheeting (Of a larger roll. It won’t last forever anyway.)

4 pvc clamps (sold as a bag of 5 for ~$1.60, similar to these)

7/16″ dowel x 4′, cut into 2 @ 10″ and 2 @ 14″. (The EarthBox is shallower on the watering tube side.)

2 clothespins

Assembly

1.  Cut the dowel into four pieces. Cut two ~4′ sections of pvc pipe.

2.  Insert the dowels into each corner of the EarthBox. Slide the pvc lengths over the dowels.

3.  Cover with the plastic sheet and clamp. Pin the extra plastic on the ends with a clothespin. The clothespins can also be used to hold the plastic doors on the ends open.

Done!

—–

The postmortem and assorted thoughts:

I think that there must be a better answer for the clamps, though I didn’t want to spend ~$1 each for good spring clamps. I want something that can easily be moved around, so something like spring clamps would be desirable. Still working on the right answer.

The cost could have been lower — My first thought was to build a wooden frame and attach the pvc to it using clamps. That’s the “normal” way to do it. But then I thought, hey, I can just push the pvc into the soil in each corner of the EarthBox. *Then* I did some looking around online — it appears that toxins from the pvc could potentially (likely?) release into the soil. How to deal with that?

I chose to do something similar to the buried rebar — I purchased some 3/8″ dowels, cut them to 1′ length, and buried the dowels in the corners of the box. I then slid the pvc over the dowels, leaving the pvc above the soil. In retrospect that was a no-brainer, but I was so fixated on the wooden frame/external support idea that it never occurred to me use the area within the EarthBox to anchor the pvc tubing.

I think it’s interesting that if you were to stick wagon wheels on the sides of the hoop house would look a lot like a covered wagon.

covered wagon

That may mean that it was the right way to do it — form follows function, and both the EarthBox and covered wagon have a similar functions.

Or it’s just a coincidence.

———–

I learned something new. The french “a” thingy is alt and numpad 0226.