Two Cold Season Gardening Links

by A.J. Coltrane

A couple of links I would have liked to have found a few months ago–


Tilth.org:  “Fall and Winter Gardening in the Pacific Northwest”  (2001, PNW 548)

Includes planting dates for winter/spring harvest, minimum plant temperatures, recommended varieties, and other useful tips and resources.


Fourseasonfarm.com – Eliot Coleman:  “A Garden For All Seasons”, or, “Gardening On The Back Side Of The Calendar”. (PDF, Issue 178, February/March 2000)

Contains a cross-section of the information from Coleman’s 1999 book “A Four Season Harvest“. Minus much of the fluff. (And minus a good bit of the information, to be fair.) Still, it’s a good start if you’re interested to see where Coleman is coming from.


As it is, the first Spring Seed catalogs arrived in the Wednesday mail. Time to start planning for summer.

Ming Tsai’s Shallot Pancakes Revisited

by A.J. Coltrane

It’s been a while since we’ve had Ming Tsai’s Shallot Pancakes. (a.k.a. Hot Water Dough. Original Ming Tsai recipe here.)

It must be a “cold weather dish” — the last CSE Shallot Pancake post was dated January 12.

Photos from tonight’s attempt:

141228 hot water dough

Note the dough lamination. Layers of sesame oil, canola oil, and shallots create the air pockets:

141228 hot water dough 2

One key is to make sure that the final product is somewhat thin, so that it cooks through reasonably quickly over medium heat.

We’ll have to make this again sooner than later. I think I’ve had focaccia and other rustic breads on the brain.

Finally, the first test photo on the new memory card:

141228 girl cat

Pizza alla DiGiorno

by A.J. Coltrane

We had guests last night and I figured I’d make what might be most strongly identified as “normal pizza”.

Actually, two pizzas. The recipe:

Ingredient Measure Baker’s %
Bread Flour 600g
Water 318g 53
White Wine 60g 10
Salt 15g 2.5
Sugar 1 TBP
Instant Yeast ½ TBP
Olive Oil 15g 2.5

Directions:

1.  Mix all ingredients on low speed for 10 minutes. Cover and let rise two hours.

2.  Divide the dough and shape into two balls. Cover and let rise one hour.

3.  30 minutes into the 2nd rise, place a baking stone in oven and preheat for 30 minutes at 500F.

4.  Lightly coat a baking peel with semolina. Shape the dough, and place onto the peel. Top the dough (sauce, then cheese, then pepperoni).

5.  Bake the pizza for 12 minutes.

Pizza one:

141221 pizza 1

Pizza one crumb:

141221 pizza 1 crumb

Pizza two:

141221 pizza 2

Pizza two crumb:

141221 pizza 2 crumb

Pepperoni, shredded mozzarella, home made red sauce made from home grown tomatoes (with garlic, oregano, minced onion, salt. And butter! Ssshh! Thanks, Marcella Hazen!)

Overall they were nice, light pizzas. The cornicione (crusts) were especially airy, with large pockets running through the perimeter of each. (The blackened areas show the location of the air pockets.) The first pizza came out somewhat wet. The liquid had been exuded by the cheese. We corrected that, and the (drier) 2nd pizza had much more concentrated flavors, in addition to not being wet, so… double bonus. In the future we’ll do a more thorough job of drying the mozzarella on paper towels.

From a technique standpoint, the biggest change is the use of the baking stone. I think that a long time ago I had trouble transferring the dough from the peel to the baking stone and then avoided using the peel for years.

I think that’ll be a new “thing” for a while.


A Couple Of Not-Pretty Baguettes

by A.J. Coltrane

A twist on a classic dough — 60% hydration, 2% salt. (300g bread flour, a scant 1/4 tsp instant yeast, overnight rise.)

141213 baguette

It’s really visible on the top loaf — I didn’t try to shape the dough much, I just divided it, rolled out the pieces on the counter, and laid them baguette pan. They got a 20 minute rise in the pan, then were slashed before they went into the oven. The bread blew out at every seam.

141213 baguette2

The bottoms expanded more than the tops. Still, they were nicely caramelized and tasty.

(450F oven, a few minutes of steam created by a small amount of water in a loaf pan in the bottom of the oven. 12 minutes, rotate 180 degrees and bake another 12 minutes.)

[Two previous attempts here. Including a cute cat pic.]

Pizza Shaping

by A.J. Coltrane

I think the weakest part of my pizza-making process is the last part — shaping the final dough. Here’s the last one:

141213 pizza

It’s a 62% hydration bread flour dough with peppers from the garden, onions, goat cheese, and a jarred marinara. (300g bread flour. 62% water, 4% oil, 2.3% salt. Baked on a perforated pizza pan.)

In this case I floured the counter and patted/stretched out the dough, never lifting it from the surface. The crust came out crisp and crusty. The cornicione (edge) was only slightly poofier than the rest of the crust.

My suspicion is that after patting the dough out on the counter it might benefit from being picked up and stretched.

Which is a good excuse to make another pizza.

Container Garden Update — December 13, 2014

by A.J. Coltrane

We had set up the EarthBoxes with winter greens under the deck.

Unfortunately, the planting happened really late in the year, then we were blasted by 20 degree temperatures at night.

Stuff was recovering somewhat, but it’s all basically stalled. As it turns out, that location seems to receive too little sunlight. The back of the house faces vaguely northwest, when combined with the lower angle of the sun and shortened days there’s not enough sunlight for the plants to do better than break-even at best.

The front of the house faces a little bit to the southeast. The morning sun means that the containers in the front are doing this:

141213 mache

That’s mostly Mache, with some iffy-looking Romaine in the middle and small Cilantro plants in the back.

They’re doing tons better, so we moved the four best (most salvageable) EarthBoxes to the front yard for more sun goodness:

141213 containers

The remaining boxes under the deck have been rolled out to a more open location on the back patio. We’ll see how it all shakes out. Right now I’m thinking that the struggling boxes in the back yard will get interplanted with fast-growing cool-weather greens and vegetables in late February or early March. We’ll let the front-yard boxes go until it’s tomato season again.

I don’t think it could have gone a whole lot worse during our first real season of winter gardening, but we’re still getting something. Hopefully it’s up, up, and away from here.

The plant mix definitely needs some work. More on that later.

No Knead Bread — AP vs Bread Flour

by A.J. Coltrane

Last week I had an excuse to make two loaves of No Knead Bread at the same time. I thought it would be interesting to try one loaf using all AP flour, and one loaf using all Bread flour. Furthermore, I’d bake the AP loaf in a smallish dutch oven (4-1/2 quarts), and the Bread loaf in a somewhat oversized dutch oven (7 quarts). In theory the Bread flour loaf would have a stronger gluten network, have more room to expand, and end up as the bigger loaf while possessing a more open crumb.

That’s not what happened. But I did learn a couple of things along the way.

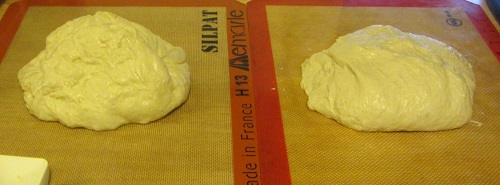
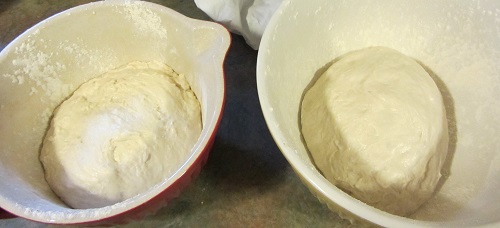
The AP flour is on the left in each photo.

Here they are after an overnight rise, the stretch and fold, and the 15 minutes of rest before they’re to go into the bowls for the final rise. Note how much shaggier the left-hand (AP) loaf looks:

AP Bread Flour 141128

I’ve read that bread flour absorbs more water than AP flour. In this case it meant that the AP dough was stickier and that handling it meant more tearing and abuse. Ultimately it led to the shaggier appearance on the left.

I think it’s pretty neat seeing the difference in absorption illustrated like that — it had always been a somewhat abstract concept to me, but there it is in practice.

That shagginess stuck around after the two-hour rise in the bowls. It looks like the Bread flour dough just wants to be more organized — it’s almost like the increased gluten in Bread flour means that it’s naturally more structured:

AP Bread Flour2 141128

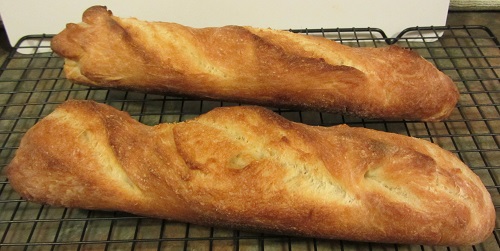
The bowls were then inverted into preheated dutch ovens. I was surprised by the end result:

AP Bread Flour3 141128

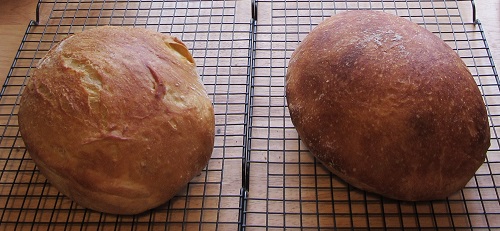
The Bread flour loaf wound up much darker. That’s because it spent the uncovered part of the baking time in the hotter part of the oven. In the future I’ll want to rotate the loaves half-way through the uncovered portion of the process (instead of right after removing the lids.)

The finished loaves wound up more or less the same size. The irregularties in the AP dough manifested themselves in the final bread, allowing the loaf to expand in the oven. The Bread flour loaf was *too* regular — the crust never split on its own. In retrospect, it should have been slashed. I thought about it, but didn’t because I wanted a completely equal trial.

I’d gone to a fair amount of care to have two distinct end products. It didn’t work out that way at all, but that’s ok because I learned more in one shot than I’ve learned in a while.

[Recipe link. Or just click on the No Knead tab at the top of this page.]


Two Microclimates Part 2 — The Unhappy Campers A Little While Later

by A.J. Coltrane

[Eleven days ago it got really cold.]

The Romaine then:

141116 romaine3

The Romaine today:

141128 Romaine

It’s not all the way back, but it’s looking way perkier. I removed a few dead or rotted leaves, but not many. The picture is a good representation of what pulled through.

The Pak Choi then:

141116 pak choi

The Pak Choi today:

141128 Pak Choi

Some of the leaves are still a little “fried” looking. Overall the Pak Choi is somewhat more cold tolerant, and it shows.

I’ve been trying to determine the appropriate planting dates for winter veg. As of right now my best guess is:

October 14 – ((Average Germination Days) + (Days To Maturity))

In other words, everything should be done growing on October 14. That might be a week or two earlier than necessary, unfortunately it can’t be tested until next year. If we start with the assumption (this post) of an average of 10 Days To Germination and 50 Days To Maturity, it gives an August 14 planting date for the winter vegetables.

Which means direct seeding everything may be out of the question, since the summer vegetables are still going strong at that date.

I see seedling flats in my future.

The Best Zucchini Bread

by A.J. Coltrane

A recipe we got from a former co-worker of mine. It came with the title: The Best Zucchini Bread. I’ve never had better, so I’m fine with calling it that.

The software:

Bread Ingredient Measure
AP Flour 3 cup
Eggs 3
Canola/Vegetable Oil 1 cup
Brown Sugar 2 cup
Zucchini (grated) 3 cup
Chopped Nuts (optional) ½ cup
Salt 1 tsp
Baking Soda 1 tsp
Baking Powder ½ tsp
Cinnamon 3 tsp
Nutmeg ½ tsp
Vanilla 3 tsp
Topping Ingredient Measure
AP Flour 1/3 cup
Sugar 2 TBP
Brown Sugar 2 TBP
Cinnamon ½ tsp
Butter (softened) ¼ cup

The Steps:

1.  Preheat oven to 325F.

2.  Butter and flour two loaf pans.

3.  Mix the bread ingredients. Divide into the pans.

4.  Using your fingers, combine the topping ingredients. Sprinkle on the batter. Try to cover as much of the surface as possible.

5.  Bake 1 hour. The bread is done when a toothpick comes out clean.

zucchini bread

The First Pass At Crispy Breadsticks

by A.J. Coltrane

Crispy Breadsticks:

Ingredient Measure Baker’s %
Bread Flour 300g
Water 180g 60
Salt 7g 2.3
Instant Yeast ¼ tsp
Olive Oil 12g 4

1.  Mix all ingredients at low speed for 10 minutes.

2.  Let rise overnight.  (This was intended for an overnight rise on the kitchen counter. It rose too quickly for that, so after 6 hours it got a light workout and went into the refrigerator to hang out until after work the next day.)

3.  Roll out the dough into a loose square about 1/4″ thick.

4.  Cut long thin strips with a pizza cutter or dough scraper. Twist the strips and place on a Silpat lined sheet tray.

5.  Bake 1 hour at 300F, turning halfway through.

6.  I sprinkled these with parmesan after they came out of the oven. It wasn’t sticking well, so I put the sheet tray back into the oven for 3-5 minutes, which sort of helped.

7.  Cool on a wire rack.

Notes:

This recipe is an aggregate of a few online recipes, combined with the overnight rise idea for better flavor. (This one was one of the big jumping off points, pictured below.)

141120 breadstick

The result wasn’t as brown as the picture, but the taste and texture were good. I’d guess the fact that I baked two sheet trays at the same time contributed to the light color. Also, they could have been 20% crunchier to be closer to what I’d visualized — both issues possibly sharing the same root cause.

All in all though, a good start, a tasty result, and a very easy recipe.