Peter Reinhart’s Challah

by A.J. Coltrane

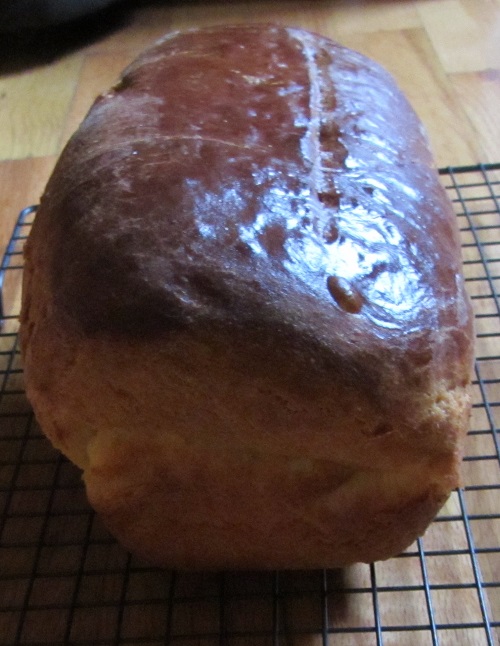
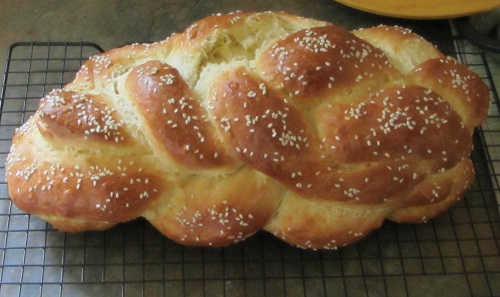
Easter called for another Challah, this time I tried Peter Reinhart’s, from his book Artisan Breads Every Day. (Last year was his “Double Celebration Challah“. For comparison, here is my 2nd attempt at Rose Levy Beranbaum’s Brioche, a recipe which I found to be a pain to parse.)

This year’s Challah was fairly simple and easy — combine all ingredients, knead, cover, then put it in the refrigerator overnight (or up to three days). The dough is then shaped into braids, braided, covered with egg wash, allowed to rise, covered with egg wash (again) and sesame seeds, allowed to rise (again), then baked:

160329 challah

The recipe is here, on Michael Ruhlman’s website. Note that I halved all of the ingredients — I didn’t need to make two loaves. I don’t know why Reinhart often writes recipes for two (or four, or eleventytwelve) doughs. Though at least this time he used grams, so I didn’t have to mess with figuring out what a one-third portion of 7-1/4 cups of flour computes to.

I like this recipe better than either of the other two that I referenced at the start of this post. The Double Celebration Challah calls for an indeterminate amount of water, 10.5 to 12 ounces — that’s a big range! The Beranbaum Brioche recipe is very poorly worded, and I feel like the recipe is broken into more steps than is necessary.

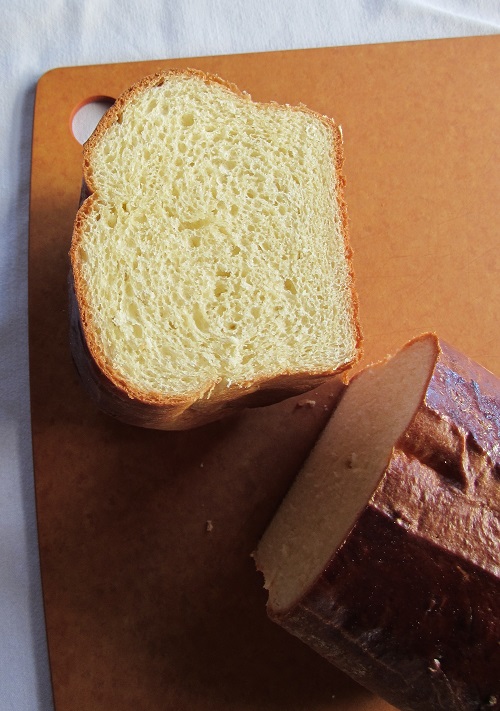
From a taste standpoint, this Challah was better 2015’s. It may be that including the optional vanilla extract made a difference, though no one mentioned that they detected it. I also think the salt level was very close to correct this time, in contrast to the 2015 bread which seemed to be lacking salt.

Other notes:

  1.  This Challah called for coating the dough with egg wash twice, at one hour intervals. The dough rests uncovered the entire time. It sounds really odd, but it worked.
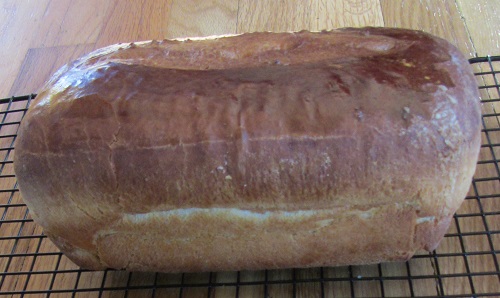
  2.  Last year’s Challah split — almost exploded. I read somewhere that splitting tends to happen if the braiding is too tight, which definitely could have been the case.
  3.  When it came to the “knead on the counter until the dough is tacky but not sticky” — at least this time the dough was very wet and shaggy at the start of the kneading, and it took a fair amount of flour to get to “tacky”. Maybe it was just humid(?)

Overall it’s a low-hassle, nice tasting bread, and it’s attractive too. I can see making this again even if it isn’t a special occasion.


What I Had In Mind Focaccia

by A.J. Coltrane

A two-hour focaccia:

150117 focaccia

I feel like this may have been the best “quick” focaccia yet.

The Tweaks:

  1.  3% olive oil in the dough. That’s lower than in oil than most of the focaccias I’ve made in the past. The crumb was lighter than in past attempts, and the bread got a lot more “lift”.
  2.  The dough was allowed to rest for 30 minutes before it was moved to the pan. I think this also improved the finished crumb structure.
  3.  A 450F oven. (Rather than 425F.)  The crust came out quite a bit browner and crisper as a result.

It made a terrific dinner with a bit of cheese and SeattleAuthor’s charcuterie:

150117 charcuterie

The formula:  400 grams Bread Flour, 280 grams room-temperature water (70% hydration), 12 grams olive oil (3%), 9 grams kosher salt (2.25%), 1 teaspoon instant yeast.

  1.  Combine ingredients in the mixer and mix on low speed for 10 minutes.
  2.  Lightly coat the dough and bowl with oil, cover, and let rest 30 minutes.
  3.  Line a 9 x 13 pan with parchment. Lightly oil the parchment.
  4.  Transfer the dough to the oiled parchment, pulling it gently to the edges of the pan.
  5.  Cover and let rise ~1.5 hours.
  6.  Drizzle the top with olive oil. I used a rosemary-oregano olive oil that we received as a holiday gift.
  7.  Oil your fingers and dimple the top.
  8.  Bake 22 minutes at 450F.  Remove to a cooling rack when done.


For comparison, here’s a 100% hydration, 6% olive oil focaccia from 2014. It couldn’t be dimpled because it was already collapsing under its own weight. It was baked at 425F and even with the higher oil content it was a lot lighter in color. Here’s another that was baked at 425F. And another. None of them are all that brown.


Beranbaum’s Bread Bible Basic Brioche — Take Two

by A.J. Coltrane

A brioche for the Pet Store Guy:

151213 brioche

What’s interesting is that one side expanded more than the other side. Again:

151213 brioche2

The slash was down the middle when I made it — that’s how far the “center” shifted as the bread expanded.

So why did one side rise more than the other?

My first thought would be that the pan needs a lot of butter — any “dry” spots catch on the sides and imbalance the loaf. But it’s happened two tries in a row…

It could be that if any egg wash touches the sides of the pan it makes for an uneven rise…

Alternately, I may be misinterpreting the directions. I’m folding such that the seams run lengthwise inside the loaf. It may be that if I fold so that the seams are crosswise… I’d bet that the same “problem” would persist, only one end would rise more than the other instead…

Of course it could be as simple as “stuff happens”. I thought the first bread was slashed well, but it looks like the slash could have been deeper on the 2nd bread.

I don’t know. It could be different combinations of factors in each loaf.

———

Parting thoughts:

I’m going to have to try more recipes from the Beranbaum book. My feeling is that this particular recipe could be worded better. I think I did everything right, but I spent a whole bunch more time than usual reading the recipe. I think bits and pieces of the recipe are spread around somewhat, and the ingredients are lumped together in a non-intuitive way. I wound up annotating in the book for future reference, which I something I don’t like to do. However, I really like the fact that the measurements are available as metric weights.

All in all, this brioche represents a two day process involving five hours of “work” each day, handling the dough every 1-2 hours. As a flat guess I was “hands on” for more than an hour each day.

In the future:  I’d like to hope it’s possible to get a comparable result without that many steps, but for special occasions, it’s a nice bread.


Beranbaum’s Bread Bible Basic Brioche

by A.J. Coltrane

For Thanksgiving I thought I’d try baking Beranbaum’s Bread Bible Basic Brioche.

The recipe is here on Epicurious. The process involves many steps, and I had to re-read it multiple times to parse what she really meant and to make sure that I had the timing right. (For the “loaf”, use Steps 1-6, then skip down to Step 7 in “variations”. Plan to start 1-2 days ahead of when you intend to bake the bread.)

I thought it came out well. Here’s the crumb. (Note the white tablecloth… it was a “nice” dinner):

151126 brioche crumb

The loaf prior to slicing. The far side didn’t rise quite as much as the near side:

151126 brioche

I used the “optional” eggwash, which is why the top is so shiny.

The recipe makes one 8-1/2″ x 4-1/2″ x 4-1/2″ loaf. That gave me a chance to use a smallish loaf pan that I’ve had forever, but only ever used for marinading or mixing things:

151126 pan

I’ve had that pan so long that I have no idea where it came from. I think I might have inherited it from one of a zillion previous roommates.

As a bonus, the No Knead breads decided to be cooperative too. I used half AP flour, and half Bread flour. One of the breads split along the slashes, the other was very craggy… rustic!

151126 no knead


Thanks for Iron Chef Leftovers for the invite and the terrific dinner, and to everyone for the great Thanksgiving company.

Bring Your Baguette Dough To Work Day

by A.J. Coltrane

Earlier this week we came into possession of a goodly amount of Chanterelles. As in previous years, that meant we’d pass them along to Iron Chef Leftovers, and he’d cook dinner for us. (More on that later.)

We needed something to sop up sauce, and a regular No-Knead Bread wasn’t going to fit into the schedule, time-wise. I chose instead to go with overnight-rise baguettes. The recipe was a fairly standard french bread dough:  450 grams bread flour, 270 grams water (60% hydration), 10 grams salt (2.2%), and 1/4 teaspoon instant yeast (the same amount of yeast as is in the “regular” No Knead Bread.)

The thing was, I also chose not to do an initial knead.

In the morning the dough wasn’t looking promising. There was very little sign of fermentation, and the dough was nowhere near evenly hydrated — there were clumps of almost dry flour.

151006 dough

So I brought the dough to work with me. About every 90 minutes I did a few stretch and folds on the dough and tried to pinch out the really dry parts, then I snuck off to the washroom to rinse the bits of sticky dough off of my hand. (I needed to keep a non-doughy hand for the restroom door, right?)

By the time I got home, the dough was ready to be shaped. To do that:

1.  On a lightly floured counter, cut the dough mass into three mostly equal pieces, then spread the pieces out into rectangles about 8″ x 6″ x 1/2″

2.  Roll up the rectangles, leaving an 8″ long tube.

3.  Use your hands to roll/stretch the doughs on the counter until they are just shorter than a baguette pan. (Start from the centers and work outward.)

4.  Line the baguette pan with floured linen, place the doughs into the linen, then cover with more linen and let rise for 30 minutes.

5.  While the doughs are doing their final rise, put 3 cups of water into a large dutch oven. (No lid) Place the dutch oven on the bottom shelf of the oven. Preheat the oven to 450F.

6.  When the oven is really steamy, remove the linen from the baguette pan, score the doughs, and bake them for 10 minutes.

7.  After 10 minutes, remove the dutch oven, turn the baguette pan around, and bake for another 7-10 minutes.

151006 loaves

——–

For years, I’ve been messing with different ways of producing steam in the oven. I think I’ve finally found a method that I’m happy and comfortable with — I don’t want to spray the sides of my oven, and the other techniques that I’ve tried haven’t made adequate steam.

But three cups of water in a 7 quart dutch oven seems to work pretty slick. Learning!

151006 slices2

Also, 450F is warmer than I’ve historically baked baguettes. I think the crust came out better than usual, so my current plan is stick with that temperature going forward, or perhaps try an even hotter oven.

————-

The bread was an accompaniment to best Best. Dinner. Evar. Iron Chef Leftovers totally topped himself, and I can say with all honesty that I’ve never had a better meal.

151006 dinner

[Smoked Pork Loin with Chanterelle Cognac Cream Sauce. Chanterelle and Saffron Rissoto.]

———————

I feel like I’m finally starting to get a “system” of steps for baguettes. There’s still a lot of room for improvement, but I feel like I’ve now worked out enough variables that progress should be easier to quantify — I won’t be stabbing in the dark quite as much as I have been.

And as always, failure is an option, but the end results taste good regardless.


Tomato Bread

by A.J. Coltrane

We had company the other night, and I wanted to make a short-notice bread.  Lacking the time for the flavor to develop on its own, I decided to use tomato puree from the freezer in place of some of the water.

I went for a slightly higher “hydration” bread, with the expectation that the puree wasn’t 100% water. So:

400g bread flour, 166g puree, 94g water. (65% hydration). 8g salt. 1 tsp instant yeast. The dough was mixed for 10 minutes on low speed, followed by a 90 minute rise.

A dutch oven was preheated to 425F. The dough got 22 minutes covered and 15 minutes uncovered. (A longer time uncovered might have created a super dark bread, due to the sugars in the tomato puree.)

150416 tomato bread

The picture makes it look smaller than it really was, though it didn’t rise or spring as much as I would have anticipated, and the crumb was relatively tight.

I’m of the suspicion that the actual water content was around 50% or so. Next time I’ll look at the dough rather than just doing the math and walking away — even 25 grams of water might have made a big difference.

Still, it was attractive and it tasted good. Another lesson learned.

Peter Reinhart’s Double Celebration Challah

by A.J. Coltrane

150406 challah2

From the Bread Baker’s Apprentice — Peter Reinhart’s Double Celebration Challah. The “Double Celebration” indicates a double-decker of braided dough — a smaller braid sits on a larger braid. I increased the recipe by 1.5x because we were feeding a crowd:

Ingredient Measure Baker’s %
Bread Flour 27 oz 100
Sugar 3 TBP 5.5
Salt 1.5 tsp 1.4
Instant Yeast 2 tsp 0.85
Vegetable Oil 3 TBP 5.5
Eggs, beaten 3 large 18
Egg Yolks 3 7
Egg Whites, whisked until frothy 3 7
Water (approx) 10.5-12 oz 45

and Sesame Seeds for garnish.

1.  Stir together flour, sugar, salt, and yeast. In a separate (mixing) bowl combine oil, eggs, yolks, and 10.5 oz water. Slowly add the dry mixture to the wet and mix on low speed until the ingredients gather and form a ball. Add the remaining water, if needed.

2.  Mix on medium low speed for 6 minutes, adding more flour if needed to make a dough that is not sticky.

3.  Lightly oil a large bowl. Form the dough into a ball, coat with oil, and let rest one hour, covered.

4.  Remove the dough from the bowl and knead 2 minutes to degas. Return the dough to the bowl and let rest 1 hour.

5.  2/3rds of the dough becomes the big braid, and 1/3rd becomes the small braid. Each of those portions are divided into 3rds again, and rolled out into ropes which are smaller at the ends and larger in the center. The ropes are then braided, tucking the ends underneath. Watch this for help on how to braid. Transfer the big braided portion to a parchment lined baking sheet, top with the smaller braided portion.

6.  Brush the loaf with egg wash, spray with oil, loosely cover with plastic wrap, and let rest 60-75 minutes until the the dough has grown to 1.5x its original size.

150406 challah1

7.  Preheat the oven to 325F. Brush the loaf again with egg wash and sprinkle with sesame seeds. Bake on the center rack for 20 minutes, then turn and bake another 20-45 minutes. The bread is done when golden brown and an instant thermometer reads 190F. (The pictured loaf took 25 minutes after turning.)

8.  Transfer to a cooling rack and wait at least an hour to eat.

———————

The picture at the top of this post is the pretty side. Here’s the other side. The oven spring was so violent that it tore the braids:

150406 challah3

I’ve never seen anything spring like that. I was really surprised at the “time to turn” point — the bread had basically exploded.

The only complication that I ran into was self-induced:  I combined the flour with the minimum (7 oz) quantity of water and let it hang out in the refrigerator for three days before continuing with the recipe. In theory this would allow more flavor to develop. In reality it wasn’t enough water, and the flour became a brick. After a lot of work with a wooden spoon and the KitchenAid I was able to rehydrate the dough with the eggs and the rest of the water. For much of the process I thought the end product might have clumps of under-hydrated dough.

As far as taste — the recipe calls for oil out of respect for Passover. I think next time I’ll use butter. The finished product also needed a little more salt. I’m guessing the issues that I had with hydration resulted in the addition of too much flour, which threw the salt balance out of whack.

All in all though, it wasn’t a bad first attempt, and there’s plenty of room for it to get better.

More Baguettes

by A.J. Coltrane

I’m finally getting comfortable enough with the baguettes to bring them places and introduce them to friends.

150305 breads

That’s a No Knead on the left that I lightly slashed a couple of times. It wound being a fairly attractive example of the type.

I made six baguettes altogether, in two batches of three. The pictured breads are the from the first batch. The 2nd batch was more irregular and was quietly sliced and served in baskets.

I used a “poolish” when making the baguettes — 200 grams of water and 200 grams of bread flour were combined a day ahead of time and allowed to sit at room temperature. That’s done to allow enzymes time to break starches down into sugars, and in theory it helps the structure of the finished product.

The next day I added the poolish to the mixer, along with an additional 200 grams of bread flour, 52 grams of water, 8 grams of kosher salt, and one teaspoon of instant yeast. (That’s 63% hydration, 2% salt, and a normal amount of yeast for a 2-hour rise. Pretty standard.)

The dough was allowed to rise for an hour,  then was divided and shaped into baguette shapes. After another 45 minutes of rising the doughs went into a preheated 450F oven for 22 minutes. I tried adding steam but I don’t think that I used enough water/surface area to have much impact — there wasn’t much steam going on. Overall the whole structure of the baguettes wasn’t very “open”.

Still, the breads were well received, and I got at the three relatively photogenic baguettes out of the deal, so I’ll call that a win.

I think the next real breakthrough will come when I get a better handle on the steam thing.

Encouraging A Better Rise For The Big Sandwich Bread

by A.J. Coltrane

When we’re feeding a crowd I’ll make a big-*ssed sandwich — it’s basically the same size as a sheet tray (18″ x 13″). For the last GNOIF it was … either a ciabatta with a little bit of oil in the dough, or a focaccia with no oil on top and no dimples. It wasn’t the platonic ideal of either, but I’m calling it a ciabatta this time around.

Ingredient Measure Baker’s %
AP Flour 300g 50
Bread Flour 300g 50
Water 420g 70
Salt 15g 2.5
Instant Yeast 1 tsp
Olive Oil 24g 4

I wanted to encourage a lighter bread than the usual focaccia. The changes were:

1.  The incorporation of bread flour into the formula.

2.  I chose not to top the dough with oil before it went into the oven. Also, no dimpling the surface.

3.  Before kneading, the flour, water, and 1/8 tsp of yeast were combined and allowed to rest for an hour. This is called an “autolyse.” It allows for the gluten strands to start setting up, and yeast doesn’t have to compete with salt for the available water.

Very foreshortened. It's 13" wide and 18" long.
Very foreshortened. It’s 13″ wide and 18″ long.

4.  Normally when I proof the bread I’ll do it directly in a parchment-lined sheet tray. I’ll cover that with another inverted sheet tray. It dawned on me that the rise might be improved by using steam in the oven, which is how I’ve been baking baguettes… But then why not just leave the inverted sheet tray as a cover for the first 10 minutes of baking, similar to the No-Knead Bread dutch oven technique?

I mean really, why did that take so long to occur to me?

The finished bread was 2-3″ tall, which is about half again as tall as the focaccias have been. It was lighter and less oily too.

I think it’s a variation with potential.

Closer To The Truth Baguettes

by A.J. Coltrane

The middle of December saw the Not-Pretty Baguettes.

Tonight’s are much more photogenic:

150106 baguettes

The crumb was decent but not exceptional. This may be to be expected given the relatively small diameter of the breads:

150106 crumb

Notice how the open spaces are directly down the center — the area that was slashed.


It’s basically a classic baguette formula:  100 parts bread flour, 60 parts water, 2 parts salt:

1.  Before I left for work I combined 200g bread flour and 200g water with ~1/16 tsp of instant yeast.

2.  When I got home I combined the preferment in the KitchenAid with an additional 130g flour, 7 grams of kosher salt, and 2/3 tsp of instant yeast. The combined dough was mixed for 8 minutes on low speed.

3.  The dough was allowed to rise for 30 minutes, then divided, shaped, and placed into a towel-lined (and covered) baguette pan. The doughs were allowed to rise in the baguette pan for 30 minutes..

4.   A loaf pan with 1/4″ of water was preheated in a 450F oven for 15 minutes. (45 minutes of rise time in the baguette pan for the doughs, total.) The breads were then baked for 22 minutes. At the 11 minute mark the loaf pan (with remaining water) was removed, and the baguette pan was rotated 180 degrees.

Progress!

—-

I recently received a copy of Advanced Bread and Pastry. It confirmed something that I suspected. (Paraphrasing) “High protein flours brown more readily than low protein flours.”

I’ll need to look for the exact quote again.