A Post-Holiday Pizza

by A.J. Coltrane

The holidays are past, and that means one thing:  It’s now time to empty out the refrigerator before stuff turns.

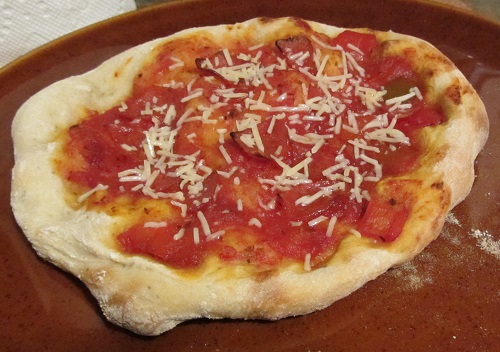
A very fast weeknight pizza:

160111 pizza

The dough:  400 grams bread flour, 120 grams water, 120 grams beer (the beer was a holiday gift — for reference, the water and beer combine to create a very normal ~60% hydration in total, if you don’t count the beer solids), 1 tablespoon dry oregano, 1 tablespoon sugar, 1 tablespoon “garlic infused olive oil” (another holiday gift), 8 grams kosher salt, 1 tsp instant yeast. Mix on low speed for 10 minutes, lightly coat the bowl and dough with oil, cover, and let rise for up to two hours. I only let it go an hour since we were hungry.

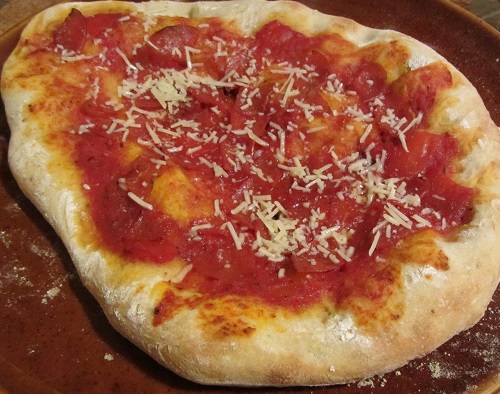
The Topping Ingredients:  Garlic olive oil (that same gift as above), TJ’s “Bruschetta” sauce (mostly tomatoes and garlic), SeaStack cheese, herbed goat cheese (both cheeses left over from entertaining guests), diced Boar’s Head salami (another gift), crumbled cooked bacon (we bought too much bacon for guests). The outer crust got Penzy’s “Brady Street Cheese Sprinkle” (another gift — finely grated dried romano cheese with dried garlic, dried basil, and green peppercorns.)

The Process:  

  1.  Preheat a pizza stone to 500F
  2.  Lightly oil a pizza pan. Form the dough on the pan, leaving a lip around the perimeter.
  3.  Lightly oil the entire top of the pizza, including the rim. Spread ~1 cup of the “Bruschetta sauce” on the dough.  Top with diced salami. Dust the “Cheese Sprinkle” around the crust.
  4.  Combine the cheeses and bacon, set aside in a bowl.
  5.  Bake for 10 minutes.
  6.  Top with the cheese and bacon.
  7.  Bake 4 minutes.

There are a few good “weeknight cheats” this time. Substituting beer for the water creates flavor when there’s not enough time for flavor to happen naturally. The addition of sugar adds flavor, somewhat helps the dough rise, and promotes browning. The flavored oil can be thrown around liberally, and that helps too.

The ingredients were excellent. The Penzy’s Sprinkle and flavored oil both added interest to the crust. I’m sure the Penzy’s thing is overpriced, but it’s really good. Romano cheese on the crust may be my new not-so-secret weapon.

Finally… bacon.

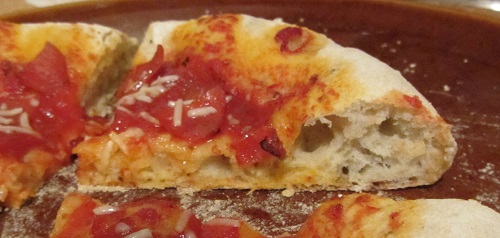
Everything exuded some liquid, so the pizza wasn’t crisp. Still, it was very tasty, and made for a good way to Use Things Up.

I’d be ok with eating like that all the time.

A Low-Oil Focaccia

by A.J. Coltrane

A low-oil focaccia to go with stew:

151227 focaccia

I think it’s still technically a focaccia, with oil in the dough and oil on top.

The formula:  400 g bread flour, 280 g water (70%), 12 g olive oil (3%), 10 g kosher salt (2.5%), 1 tsp instant yeast. Mix at low speed for 2 minutes, then next-to-low speed for 10 minutes. Let rest one hour, then stretch and fold. Move the dough to a parchment-lined and oiled pan, gently stretching the dough to the edges of the pan. Cover and let rest until almost doubled. Top with oil and dimple the surface. Bake at 425F for 20 minutes.

The rise was better than usual, partly because of the lowish oil content, and also because I did a stretch and fold on the dough after an hour, before moving it to the focaccia pan.

It’s a good bread for soaking up stew, whether it’s a focaccia or something else again.

—————————–

Pictured is the boy cat in a basket that was to be loaded with bread for transport. Behind him is the “mobile cutting board”. Room temperature butter is balanced on the back left corner of the basket:

151227 boy cat

He had other ideas.

Jeffrey Hamelman’s Sesame Bread Sticks, Mostly

by A.J. Coltrane

They’re only “mostly” Jeffrey Hamelman’s Sesame Bread Sticks because I didn’t have malt syrup in the house, so I substituted honey.

Up close:

151222 bread stick 2

The (scaled) Recipe:  240 g bread flour, 134 g water (56% hydration), 14 g extra virgin olive oil (6%), 7 g honey (3%), 5 g kosher salt (2%). I used 3/4 tsp instant yeast. There are a couple of slight rounding errors, but the percentages are very close to the original formula.

The Process:  Mix all ingredients except the sesame seeds on low speed for 3 minutes, then raise the speed one notch and mix another 5 minutes. Let rest one hour. Portion the dough into “1.33 oz” (~37 gram) pieces and roll each out to 14-16 inches in length. Roll each piece in a moistened cloth, then roll in a tray of sesame seeds to coat. (I wound up with 10 pieces from the 406 gram recipe.)

Bake at 380F for 20 minutes. If at that point the breadsticks aren’t brown and totally crispy, return to the oven at 350F until completely baked.

151222 bread stick

For me, “crispy” took another 10 minutes at 350F. I think that happened because I’d only rolled the breadsticks out to around 12-14″ — I’m guessing they were a little thicker than they were supposed to be.

As for the color:  The photographs make the breadsticks look a bit lighter than they came out in reality. Using malt would have created a darker end product. Sticking with 380F for longer than 20 minutes might have helped too.

Overall the recipe (in Hamelman’s book “Bread”) is very clear and concise. Right now I’m leaning towards continuing with “Bread” as my main resource for a while.

Beranbaum’s Bread Bible Basic Brioche — Take Two

by A.J. Coltrane

A brioche for the Pet Store Guy:

151213 brioche

What’s interesting is that one side expanded more than the other side. Again:

151213 brioche2

The slash was down the middle when I made it — that’s how far the “center” shifted as the bread expanded.

So why did one side rise more than the other?

My first thought would be that the pan needs a lot of butter — any “dry” spots catch on the sides and imbalance the loaf. But it’s happened two tries in a row…

It could be that if any egg wash touches the sides of the pan it makes for an uneven rise…

Alternately, I may be misinterpreting the directions. I’m folding such that the seams run lengthwise inside the loaf. It may be that if I fold so that the seams are crosswise… I’d bet that the same “problem” would persist, only one end would rise more than the other instead…

Of course it could be as simple as “stuff happens”. I thought the first bread was slashed well, but it looks like the slash could have been deeper on the 2nd bread.

I don’t know. It could be different combinations of factors in each loaf.

———

Parting thoughts:

I’m going to have to try more recipes from the Beranbaum book. My feeling is that this particular recipe could be worded better. I think I did everything right, but I spent a whole bunch more time than usual reading the recipe. I think bits and pieces of the recipe are spread around somewhat, and the ingredients are lumped together in a non-intuitive way. I wound up annotating in the book for future reference, which I something I don’t like to do. However, I really like the fact that the measurements are available as metric weights.

All in all, this brioche represents a two day process involving five hours of “work” each day, handling the dough every 1-2 hours. As a flat guess I was “hands on” for more than an hour each day.

In the future:  I’d like to hope it’s possible to get a comparable result without that many steps, but for special occasions, it’s a nice bread.


Recommended Food TV: BBQ With Franklin

by A.J. Coltrane

I recently “found” a new show — BBQ With Franklin. Hosted by Texas pitmaster Aaron Franklin, the show covers topics such as:

  1.  The different varieties of wood and selecting the appropriate piece for the application.
  2.  Making sausage.
  3.  Comparing different types of smokers, and how to build one from scratch.
  4.  Brisket. Chicken. Pork. Other cuts of cow.
  5.  “Cowboy” style (direct heat) cooking.
  6.  Sauces.
  7.  Competition BBQ.
  8.  Lots more.

As an example, here’s a piece focused on smoking sausage:

I think he has a nice, low-key presentation style. The information given is clear and concise, and he often includes nuances that aren’t all that obvious without experience in the subject. When watching I’ve had many “Oh.. That’s why it’s done that way!” moments.

It airs locally on CreateTV.  Episodes are available on the web here. YouTube channel is here.

Highly recommended viewing!


Calzones Of Unusual Size

by A.J. Coltrane

I may have slightly overestimated how much dough was required for two largish calzones.

I used 600 grams of bread flour (300 grams for each calzone). That may have been at least 100 grams more than necessary.

The Recipe:  600g bread flour, 348g water (58% hydration), 30g olive oil (5%), 12g sugar (2%), 15g kosher salt (2.5%), 1 tsp instant yeast. Knead on low speed for 10 minutes. Let rise 1.5 hours. Divide, shape into balls, and let rise another 30 minutes. Roll out. Preheat oven to 375F. Bake for 30 minutes on a sheet tray, turning halfway through.

A picture right out of the oven:

151205 two calzones

The filling included pepperoni, meatballs, minced (and sauteed) onion, diced (and sauteed) crimini mushrooms, an aged gruyere grated on the small holes of a box grater, and a roma tomato sauce with diced red peppers, garlic, and herbs.

Here’s one of the two calzones dominating a regular-sized dinner plate:

151205 calzone one

The filling was well received. The calzone “bread” was fairly light — for as massive as the calzones were, they didn’t “eat” like a giant meal.

Still, add a salad and they’d easily feed a family of four.

I thought they were the best calzones I’ve made so far. I think going light on the oil, adding sugar, and being patient with the rise combined to give better results than in the past. (And just like in this grilled calzone post from 2012 — red sauce on the side would have been welcome. Oh well.)


Beranbaum’s Bread Bible Basic Brioche

by A.J. Coltrane

For Thanksgiving I thought I’d try baking Beranbaum’s Bread Bible Basic Brioche.

The recipe is here on Epicurious. The process involves many steps, and I had to re-read it multiple times to parse what she really meant and to make sure that I had the timing right. (For the “loaf”, use Steps 1-6, then skip down to Step 7 in “variations”. Plan to start 1-2 days ahead of when you intend to bake the bread.)

I thought it came out well. Here’s the crumb. (Note the white tablecloth… it was a “nice” dinner):

151126 brioche crumb

The loaf prior to slicing. The far side didn’t rise quite as much as the near side:

151126 brioche

I used the “optional” eggwash, which is why the top is so shiny.

The recipe makes one 8-1/2″ x 4-1/2″ x 4-1/2″ loaf. That gave me a chance to use a smallish loaf pan that I’ve had forever, but only ever used for marinading or mixing things:

151126 pan

I’ve had that pan so long that I have no idea where it came from. I think I might have inherited it from one of a zillion previous roommates.

As a bonus, the No Knead breads decided to be cooperative too. I used half AP flour, and half Bread flour. One of the breads split along the slashes, the other was very craggy… rustic!

151126 no knead


Thanks for Iron Chef Leftovers for the invite and the terrific dinner, and to everyone for the great Thanksgiving company.

A Tale Of Three Pizzas

by A.J. Coltrane

I recently received a Baking Steel as an early holiday gift. The Steel is 16″ x 14″. It *just* fits in our undersized oven:

151119 baking steel

It’s pretty tight against the top of the oven too — the directions call for placing the Steel on the 2nd rack from the top.

I wanted to start with some small, simple, and very manageable pizzas to get a feel for how everything was going to behave, and to ideally introduce as few variables as possible. I was targeting pizzas 8-10″ in diameter to keep things from getting too interesting.

The Recipe:  450 grams AP Flour, 270g water (60%), 11g kosher salt (2.4%), 9g olive oil (2%), 1 TBP of “Italian Seasoning”, and 1 tsp instant yeast. Combine all ingredients and mix on low speed for 10 minutes. Lightly oil the bowl and dough ball, cover and let rise 1.5 hours. Divide the dough into 3 roughly equal pieces, shape into balls, cover with a towel, and let rise 30-45 minutes or until “poofy”.

I stretched each dough out by hand, trying to take care to preserve the gas bubbles around the edges. (The remaining doughs hid under the towel until it was their turn for shaping and baking.) The pizzas were topped with pepperoni and a Roma tomato sauce from the garden that was doctored up with garlic, onions, “Italian Seasoning”, diced bell peppers (from the garden again), and kosher salt. I used a floured peel to slide the pizza onto the Baking Steel, in an oven heated to 500F. The Baking Steel instructions call for a 9-minute bake. I went 9 minutes on the first pizza, 10 minutes on the 2nd, and I-don’t-know-because-I-failed-to-set-the-timer on the 3rd.

Some cheap pre-shredded parmesan was tossed on top of the pizzas shortly after they came out of the oven.

The Results:

Pizza One:

151119 pizza1

Pizza One Crumb:

151119 pizza1 crumb

Pizza Two:

151119 pizza2

Pizza Two Crumb:

151119 pizza2 crumb

Pizza Three:

151119 pizza3

Pizza Three’s crumb wasn’t “all that”, so I didn’t bother with a picture.

———-

I selected AP Flour because I wanted to use some up. I think the color and structure would have been better had I used Bread Flour instead. Alternately a little bit of sugar might have been a good addition.

Even so, the pizzas were all fairly airy, especially so considering the AP Flour. They were really easy to eat without realizing how much had been eaten — the small, savory slices went away fast.

Conclusion: The Baking Steel seems to perform as advertised. It’s definitely an improvement over the pizza stone, and as an added bonus it’s basically indestructible. At $80, it’s not a cheap toy, but I’ll think we’ll get years of value out of it. It might be the right answer would have been to spend $100 and get the unit that’s 3/8″ thick, rather than the 1/4″ of the regular version, but $100 seemed like too much to throw at something that I wasn’t totally sure about.

Still, I’m happy with it.

(I think Pizza Two was the most attractive.)

Salad Table Update — November 15, 2015

by A.J. Coltrane

No frost yet, though though the forecast yesterday called for ‘up to 3″ of rain’. It doesn’t often dump that much rain here. The salad table took it in stride. The excellent drainage is a big bonus — the front lawn is totally squishy. We harvested a big bowl of greens today:

151115 salad bowl

Which didn’t really make much of a dent in the contents of the salad table. The romaine lettuces and spinach are doing “ok”, the dill and cilantro are starting to look tired:

151115 salad table


A few of the Miner’s lettuce leaves don’t look so good. Does anyone recognize this as a sign of something specific? I’m assuming it’s most likely bugs:

151115 leaf

If I’d have known it was this easy to have fresh greens during the winter I would have done a salad table years ago..

—————–

Visit Dave at Ourhappyacres, host of Harvest Monday.

Container Garden Update — November 8, 2015

by A.J. Coltrane

Squirrels have been digging in any “unclaimed” dirt in the containers. I thought I could stop the digging by laying bird netting over the dirt. That seemed to work for a while, until a really determined squirrel pulled on the netting. The netting dragged across the seedlings, uprooting a few and damaging a few more. So:

back yard 151108

It’s what I should have done in the first place — I added galvanized hoops that we had left over from last year’s Row Cover Experiment. The pictured seedlings are tiny – they were all planted way too late for a winter harvest.

The boxes pictured below were planted early/mid September, which is still too late for a winter harvest (L-R – Dragon radish, mache, carrots, mache again with bunch onions scattered through all the boxes):back yard2 151108


Next year we need to start seeds in mid-August at the latest, even if it means transplanting things that aren’t traditionally transplanted. we’ll also use bird netting and hoops over everything — I’d guess the squirrels destroyed up to 20% of the seedlings, and that’s just not cool.

—————–

Visit Dave at Ourhappyacres, host of Harvest Monday.