The newest formula is getting closer. The mouthfeel and taste are good. The crumb is still just a bit more crumbly than I’d prefer. An early morning picture of the top of today’s turkey sandwich:
It’s 250g AP flour and 250g fresh-milled whole wheat flour (heritage Turkey Red berries), (500g flour weight total). 375g water (75% hydration). 25g honey (5%), 15g olive oil (3%), and 50g (10%) powdered milk. 10g kosher salt (2% of the flour weight), 2 tsp instant (not rapid-rise) yeast.
Knead on low speed for 10 minutes. Cover and bulk rise until doubled. Flour the bench, the dough will be sticky. Pre-shape the loaf then move it to the Pullman pan. Cover and let rise until 1/2″ from the top of the pan. Bake at 350F, covered for 30 minutes then remove the cover and bake for another 25 minutes or until the loaf reaches 195-200F.
As for changes relative to the first attempts — I upped the milk powder and yeast and decreased the olive oil and honey. The increased milk powder is giving a better mouthfeel. The yeast is making the process a lot faster. The decreased honey is softening the crust, which is an improvement. I’ve decreased the oil and I haven’t missed it, so I left the quantity lower than the original 8% of flour weight.
I think the final piece of the puzzle may be either:
Combining the ingredients briefly, then letting the dough rest before mixing again — letting the fresh milled wheat hydrate before the actual kneading.
Kneading for a shorter time, about 4 minutes, then doing a series of folds in the bowl to promote gluten formation more gently than the mixer will do it.
I think the recipe part of the equation is very close. Now it’s the handling technique that needs to be better. That’s part of the fun of bread baking though — figuring out solutions. Which of course never ends.
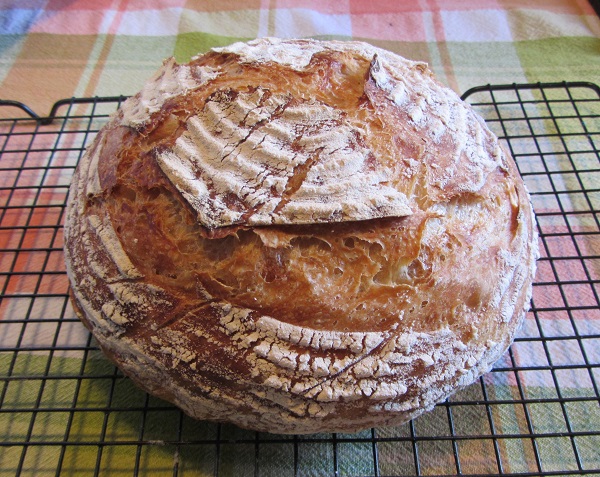
First a picture of Sunday’s No Knead bread then a little background.
I’ve owned a banneton for at least eight years. I know that because I have a blog post from 2016 that talks about me baking with two of them. Somehow I never got the message that they’re supposed to be seasoned to prevent sticking. The ones I purchased didn’t come with instructions. I just happened to be reading about a banneton related topic and a very small light bulb went off in my head. So I thought I’d see what banneton care and feeding was supposed to be.
Bannetons are supposed to be seasoned. The method is:
Spritz the banneton with oil or water. (I lightly rinsed mine in water then shook it out well — I didn’t want oil going rancid at some point.)
Sprinkle some AP flour or rice flour or a combo of the two into the banneton and angle it around until the flour coats the inside. Shake out the excess flour.
Use a little more flour with every bake.
Air dry the banneton after every use, preferably in the sun to prevent any unwanted molds from populating the flour.
Store the banneton in an airtight bag or container to keep bugs from taking up residence.
If too much flour builds up then sweep it out with a stiff brush.
That’s it. Any crevices or tiny cracks in the banneton are now basically non-stick.
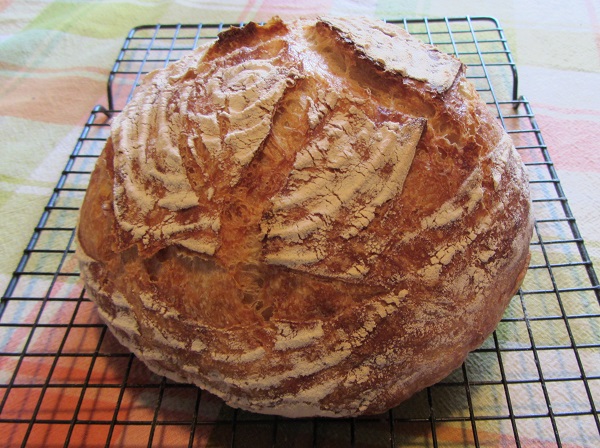
Below is another picture of that same bread because I couldn’t decide which I liked better. The light is from the back rather than the side.
The bread is 75% hydration with no additional “handling flour” added to the dough itself and it didn’t stick at all. (Recipe here. Or use the Menu above to go to the No Knead page.)
Other notes — I’ve stopped using bench flour or a Silpat when preparing a No Knead — I use a tablespoon or two of oil on the counter and spread it around with a paper towel. If the dough tries to stick to the counter I just lift the dough with a bench scraper, though generally it doesn’t stick.
The other advantage of using oil on the counter is that I can then used the oiled paper towel to rub a bit of sheen on any other tools that are coming into contact with the dough. I rub a little on a spatula to help remove the dough from the mixing bowl to the counter. I rub a little on a serrated bread knife for any slashes that I want to make on the dough prior to baking. In the picture above I used five slashes around the “waist” of the dough, the splits on top were caused the dough naturally expanding where the seams were gathered up as the dough was placed into the banneton. I also used a Le Creuset bread oven rather than a traditional dutch oven for this bake — that made it so I could easily get to the sides of the dough after it was removed from the banneton.
I’ve gone years of using bannetons with some trepidation and drama for no real reason. Here’s celebrating finally learning something, even if it was mostly by chance.
600 grams of flour was too much. 400 grams of flour was not enough. This bake uses 500 grams of flour and adjusts the other secondary ratios somewhat.
The recipe uses 250g AP flour and 250g fresh-milled whole wheat flour, (500g flour weight total). 375g water (75% hydration). This time around I cut back on the “other stuff”: it uses 30g each of honey, olive oil, and powdered milk (all are 6% of the total flour weight, the old amounts had been 8%). 10g kosher salt (2% of the flour weight), 1 tsp instant (not rapid-rise) yeast. Bulk rise until doubled then move to the Pullman pan, cover and let rise until 1/2″ from the top of the pan. Bake at 350F, covered for 30 minutes then remove the cover and bake for another 25 minutes or until the loaf reaches 195-200F.
It’s sort of based on King Arthur’s A Smaller Pain De Mie. Or at least it was at the beginning of tinkering.
The newest version uses relatively less honey, olive oil, milk powder, and yeast. This is intended to make the end of the rise a little more predictable and controllable — with the earlier versions there wasn’t a ton of activity for the first 60 to 90 minutes, then things started to happen fast after that.
It should be more manageable but we’ll see how it tastes and ages after a few days. It may be the correct answer will be to restore “other stuff” to the original 8% and just cut back on the yeast and expect the whole pre-bake process to go slower and longer. I feel like it’s getting close to where it should be.
This time I used a total of 400 grams of flour and let the bread continue to proof to see how high it would rise. It never made it near the top of the Pullman pan and the bread wound up overproofed. It was otherwise tasty and fine, just not pretty. I’m still adjusting the quantity of flour and proofing time.
The formula is (again) based on King Arthur’s A Smaller Pain De Mie. (With some extensive modifications.) 200g AP flour, 200g whole wheat flour, (400g flour weight total). 300g water (75% hydration). 32g each honey, olive oil, and powdered milk (all are 8% of the total flour weight). 8g kosher salt (2% of the flour weight), 1 tsp instant (not rapid-rise) yeast. Bulk rise until doubled then move to the Pullman pan, cover and let rise until 1/2″ from the top of the pan. Bake at 350F, covered for 25 minutes then remove the cover and bake for another 22 minutes or until the loaf reaches 195-200F.
The baking times are longer than in the original recipe but that seems to be how long it takes.
The next bakes will center on 450-500 grams of flour. Hopefully that’s the “sweet spot”.
Many of years of blogging and this is my first post on a February 29th.
I recently purchased a pair of 9 x 4 x 4 Pullman Loaf Pans with the idea that I’d make sandwich loaves for lunches at work. The Pullman pans are good for other breads too but sandwich loaves were the main impetus for the purchase. Coincidentally.. on January 12 Dave at HappyAcresBlog posted about his year of bread baking and mentioned that in 2010 they’d decided to bake all of their own bread for the year and they’ve kept it up since then.
Which made me think, why not us? We have the materials and knowledge and it’s not really that time consuming. It would mean redirecting energy (or lack of energy) on Sundays but we’d gain the benefit of fresh baked healthy breads. It’d give me a reason to bake something with fresh milled wheat berries more regularly.
As of right now I’ve settled on a sandwich loaf with 50% AP flour and 50% fresh milled wheat. Today’s bread utilizes a Hard Red Spring wheat:
The small crack along the top is where I slashed the dough. As it turns out the bread doesn’t need a slash and won’t receive one next time.
The jumping off point for today’s formula is King Arthur’s A Smaller Pain De Mie. (With some extensive modifications.) 300g AP flour, 300g whole wheat flour, (600g flour weight total). Then to make it easy to remember: 450g water (75% hydration). 48g each honey, olive oil, and powdered milk (all are 8% of the total flour weight). 12g kosher salt (2% of the flour weight), 2 tsp instant (not rapid-rise) yeast. Bulk rise until doubled then move to the Pullman pan, cover and let rise until 1/2″ from the top of the pan. Bake at 350F, covered for 25 minutes then remove the cover and bake for another 15 minutes or until the loaf reaches 195-200F.
This is my 3rd or 4th attempt using these pans and it’s the first time the finished bread has gone all the way to the top of the lid. My feeling is that the previous attempts used too little flour, or I didn’t proof the dough long enough given that the house temperature sits in the high 60’s this time of year. This time I let the dough rise in a warm part of the kitchen near a heater vent and that seemed to help out quite a bit.
As for the upcoming iterations: It may be that closer to 500g of total flour will make a better loaf. I’ve also seen orange juice recommended for a small percentage of the water which is supposed to cut the “wheaty taste”, so that might be something to try just to see. How long to leave the bread covered in the oven will be another variable that needs to be looked at, the water needs to evaporate out, especially at the high hydration that I used on this bake.
Overall: Success with room for growth.
Late edit, February 24: 600 grams of flour is defintely too much. This week the dough rose much more than usual and it expanded in the oven so much that the dough extruded in a thin sheet about a foot long out of one end of the pullman pan. Which fortunately didn’t make a mess or catch on fire. 400-500 grams of flour is more the correct.
—-
The loaf pans are manufactured by USA Pan. They receive good reviews everywhere I’ve looked and they’re working well for us so far. The pans were sold as one for $42 or a pair for $45. We now own two pans.
Pigs In A Blanket, using a slightly modified pizza dough recipe for the blanket:
The dough: 250 grams AP flour, 150 grams water (60% hydration by flour weight), 5 grams honey (2%), 30 grams olive oil (10%), 5 grams kosher salt (2%), 1 teaspoon instant yeast.
Mix for 8 minutes on low speed.
Cover and let rise one hour.
My four hot dogs were 6″ long, so I rolled the dough into a rectangle 24″ long. Lay the hotdogs lengthwise into the rectangle, roll them up, then cut the hot dogs into quarters. I used a serrated knife and a light touch.
Set the Pigs In A Blanket on end in a Silpat-lined baking sheet, cover with an inverted baking sheet, and let rise one hour.
Note: I set them on end because I thought it would allow the dough to rise more evenly around the hot dogs. What wound up happening in reality is that the dough slumped down around the hot dogs and only part of that height was regained with baking oven spring. For more traditional Pigs In A Blanket the hot dogs should be laid on their sides. (However, the rise was nice and even around the hot dogs, so that was good.)
Preheat the oven and bake at 375F for 15-20 minutes or until lightly golden and the dough gives resistance when poked.
Thoughts:
Basically every recipe online calls for opening a can of dough, cutting the dough into triangles, wrapping that around the protein, then baking for 12-15 minutes. And that’s fine. I think comparing the total hands-on time between “the can” and “from scratch” it’s not dramatically different. Assembling the ingredients from scratch takes an extra few minutes but by the time we’ve fiddled around with wrapping hot dogs in dough — what’s an extra five minutes or so?
As with all Pigs In A Blanket, these were devoured in short order.
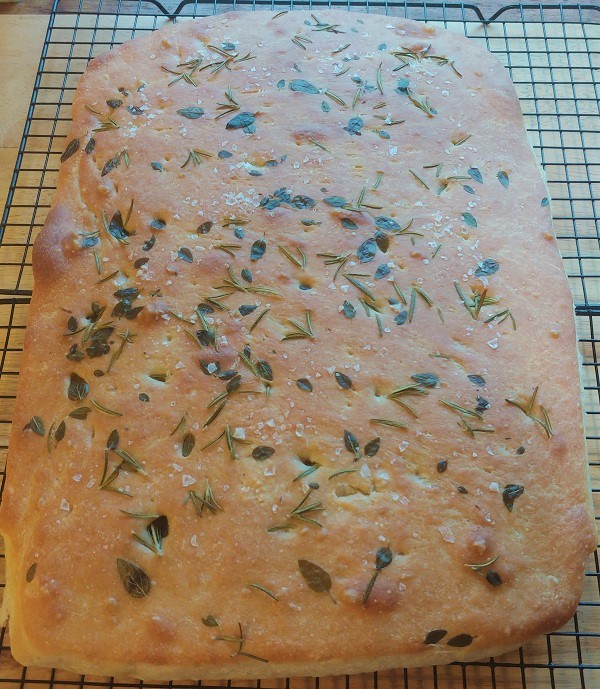
One of our holiday traditions is attending a pot luck / lasagna party hosted by a good friend of ours. I’ll typically make some sort of bread. (Search the bottom of the webpage for “epi”, “focaccia” or “fougasse” for some examples.) This year it was a festive herbed focaccia created using a room-temperature overnight poolish as the base:
One day ahead I started the poolish: 800 grams of bread flour. 800 grams cool water. A few grains of Instant (not fast-acting) Dry Yeast, about 1/16 teaspoon. Mix thoroughly, cover tightly, and let sit on the counter overnight.
The next steps need to start at least 6-8 hours before consumption. Most of it is hands-off, but all up it comes out to over four hours of preparation + cooling.
In the bowl of a stand mixer combine 200 grams of bread flour, 2 teaspoons of Instant Dry Yeast, 30 grams olive oil, 20 grams kosher salt. Mix that briefly then add the poolish and mix on low speed for 8 minutes. Cover.
The total baker’s percentage formula comes out to 1000g flour, 800 grams water (80% hydration), 30 grams olive oil (3% of the flour weight), 20 grams kosher salt (2% of the flour weight), yeast.
Bulk rise until doubled in volume – this will take 1 – 2+ hours depending upon the temperature of the house.
Once doubled transfer the dough to a parchment-lined-and-oiled 18 x 13 sheet tray.
Lightly coat the top of the dough with olive oil.
Using your fingers, poke the dough all over down to the base.
Sprinkle on fresh herbs of your choice. I used rosemary and thyme from our raised garden beds. Which were buried under snow, so that took a couple of extra minutes to pick through for good stuff.
Cover the dough and start the oven preheating to 450F.
Let rise one hour. Sprinkle the dough with flakey (Maldon’s) salt.
Bake for 25-35 minutes or until the internal temperature is at least 200F and the bread is pleasantly browned.
Another cell phone pic taken at the event. I cut it into squares to make self-serving easy.
Notes:
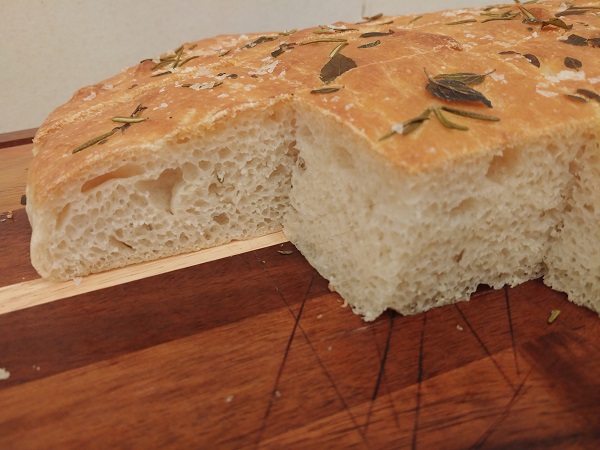
I accidently let the bulk rise much more than double. Between that and the starter poolish the dough was extremely loose and extensible. I sort of had to wrestle it into shape using a generous amount of oil to keep it from sticking to everything. Given a more correct rise time the dough should have been much more manageable.
I liked the festive appearance and the focaccia got nice feedback. I can see making this one again, though I think I may use a biga next time with the idea that it may make the dough more manageable in the shaping stage.
We were recently invited to a dinner party that involved dishes from a variety of cultures and places, sort of focused on North Africa and the Fertile Crescent. We brought naan. Pictured is a triple recipe to generously serve ten people:
The white girl kitty inspecting the naan.
I’ve made naan or naan-like things a number of times and basically winged it with decent-to-good results. This bake was for a discerning crowd so I wanted to use an actual recipe as a starting point to help ensure things didn’t go too far off the rails.
Ultimately I chose between Kenji’s Grilled Naan recipe on Serious Eats and a King Arthur website recipe. Kenji’s recipe calls for using an outdoor grill, so I mostly went with the King Arthur recipe because we were cooking on a grill pan instead of live fire. I used Kenji’s recommendation of bread flour instead of a mix of flours.
First, the King Arthur formula as written:
180g King Arthur AP Flour, 90g King Arthur Bread Flour, 142g warm water, 71g Full-Fat Greek Yogurt, 28g melted ghee or butter, 1-1/2 teaspoons Active Instant Dry Yeast, 1 teaspoon granulated sugar, 1 teaspoon salt. Full recipe here. …After baking brush with butter and top with nigella seeds and cilantro.
My slight modification that includes honey and uses Baker’s Percentages:
270g King Arthur Bread Flour, 142g warm water (52% of flour weight), 71g Full-Fat Greek Yogurt (26%), 28g melted ghee (10%), 1-1/2 teaspoons Active Instant Dry Yeast, 2/3 teaspoon honey, 5g (scant 2%) salt. Combine all in a mixer for 6 minutes on low speed.
Cover and let rise until doubled, about 60 minutes.
Divide into ~100g balls. (The original recipe calls for 65g, which I felt were too small for that event.) Let the dough balls rest 20-30 minutes.
Preheat grill pan to medium/medium-high.
Very lightly oil a work surface roll out a dough ball to 8-10″ long. Then roll the next ball as the one on the stove is cooking. Resist the urge to roll out very thinly — the center may burn instead of bubbling.
Bake the first side about 45 seconds — until it the dough bubbles, then flip and bake another 45 seconds or until the naan is just cooked through. (Cooking them too long makes them tough.)
After baking brush with ghee and top with minced chives.
For transport we put a cooling rack on the bottom of a sheet tray, then piled on layers of naan with each level separated by parchment paper. We wrapped the entire thing in foil. Shortly before dinner the naan was reheated in a low oven while still wrapped in the foil.
Thoughts:
I’d never made ghee, but it’s super easy. There are tons of recipes online but basically you just heat butter until warm/very warm, skim the surface until the solids drop out, strain. Done. We heated a couple of smashed garlic cloves in the finished ghee for a little background sense of garlic.
The naan was well received at dinner, so that part went well. I think the King Arthur recipe calls for too much liquid — I wound up adding a few tablespoons of flour and then a pinch of salt to keep the balance. If I had it to do over again I would have held back about 1/3 of the water initially to see how the dough shaped up.
I sort of feel like that’s not-uncommon in bread baking and recipe writing — too much liquid in the formula that then combines with generous amounts of bench flour to compensate. As a rule I try to do the opposite and incorporate as little raw flour as possible, which then also helps maintain the balance of the recipe. That’s why in Step #4 it calls for a lightly oiled surface, rather than floured or heavily floured.
Ten people ate twelve of the fifteen naan. Little or No Leftovers = Successful Recipe. I’ll use this one again.
The weather has been unusually warm so the arugula decided it was time to bolt. We enjoy arugula on pizzas and in salads. Friday night was a pizza / flatbread with blue cheese, arugula, pine nuts, and thinly sliced steak. What I thought was more interesting was Monday’s Pizza Pinwheels:
Pizza pinwheels with finely chopped pepperoni, shredded mozzarella, and minced arugula
We served these with a red sauce made from last year’s tomatoes. The dough recipe is very easy:
300 grams AP flour, 50 grams greek honey yogurt, 165 grams water, 6 grams kosher salt, and 1 tsp instant yeast. Let the dough rise for an hour and do one or two stretch and folds (optional). Let the dough rise for another two hours. Preheat the oven to 375F. Roll the dough out thinly into a rectangle about 12″ x 8″. Sprinkle on chopped pepperoni, shredded mozzarella, and any other finely chopped herbs/aromatics that you like. (Don’t go overboard on fillings because it still needs to be able to roll up. ) Roll up the dough so that you have a tube 12″ long. Cut into 3/4″ to 1″ pieces and place on parchment or a Silpat. Bake for 15-20 minutes rotating the tray halfway through baking.
Soups are a great meal since they don’t generally require a ton of ingredients, are easy to make in a large quantity, are easy to make from a technical standpoint and don’t require a ton of attention. One of the simplest and most delicious soups I have ever come across is the creamy nettle soup at the old Le Gourmand space in Ballard. This soup was so good that I think it might actually be the best thing that I ever had there. Unfortunately the restaurant is long gone, but the chef, the great Bruce Naftaly, still runs cooking classes and shows you dishes that he served in the restaurant. Since we are approaching the tail end of nettle season, I figured that this would be a good one to put out there, especially considering the somewhat unpredictable Northwest spring weather. Not sure where to get nettles? Try Foraged and Found – they are at the U-District Farmer’s Market on Saturdays and Ballard on Sundays. You probably only have 1 or 2 weeks left in nettle season though, so you many want to hurry.
The Software
1 tablespoon of unsalted butter
1 medium leek, dark green part removed, quartered and rinsed and cut into ½ inch pieces, about 8 oz.
½ yellow onion cut into 6 parts, about 8 oz.
2 shallots peeled and quartered, about 4 oz.
1 Yukon gold potato, quartered, about 6 oz.
2 cups chicken or vegetable stock
¼ cup cilantro, roughly chopped
6 oz. nettles, washed
Salt and pepper
Nutmeg
The Recipe
In a heavy bottomed stock pot, melt the butter until it stops foaming over medium heat. Add the shallots, leek and onions and stir. Cook for about 15 minutes or until they soften, stirring occasionally. If the veggies begin to brown, lower the heat slightly, you are looking to sweat them, not brown them. When the veggies are soft, add the potato and stock. Cover and cook over medium heat for about 20 minutes or until the potatoes are cooked (you can pierce them with the tip of a knife with no resistance). Add nettles and cover, cooking for 6-7 minutes until the nettles are wilted (this will also take out the stinging quality of the nettles). Remove from heat and puree in 2 batches, adding ½ of the cilantro to each batch. When done pureeing the soup, if the soup is too thick, stir in water or stock in small quantities until the desired thickness is achieved. If it is too thin, add some additional cooked potato puree to thicken it. Season with salt and pepper to taste. Serve hot or warm with a few grinds of fresh nutmeg and some nice bread.
Notes
If you can’t find nettles, use spinach instead. It won’t be as good but you will be able to make the soup all year round. The recipe will feed 4-6 people and scales really easily and can be served as either a main course or an appetizer. It will keep in the fridge for 2-3 days but freezes well and reheats easily, so it makes for a nice meal in a hurry. This soup is ultra creamy and luxurious, and, best of all, involves no actual dairy and can be made completely vegan by using veggie stock and olive oil instead of chicken stock and butter.