My current favorite sandwich bread using Bread Flour, Rogue de Bordeaux flour, and sourdough discard. The recipe is easy:
600 grams flour total:
350 grams King Arthur bread flour (58% of the flour weight)
200 grams Rogue de Bordeaux flour (33%)
100 grams sourdough discard (50 grams flour (8% of the flour weight)/ 50 grams water)
370 grams room temperature water (with the water from the sourdough the total hydration is 70%)
12 grams extra-virgin olive oil (2% of flour weight)
12 grams kosher salt (2% of flour weight)
1 tsp instant (not rapid rise) yeast
Combine all ingredients in a mixer and mix on low speed for 8 minutes. Lightly spray a Pullman Pan and move the dough to the Pullman Pan, patting it down and spreading to the ends. Cover and let rise until the dough is 1″ from the top of the pan. Preheat oven to 350F.
Bake covered 30 minutes, then remove the cover and bake an additional 25 minutes. De-pan to a cooling rack.
1/3 of the flour by weight is the Rogue de Bordeaux. This seems to be a good ratio of whole wheat to regular bread flour. The bread has good structure. The Rogue de Bordeaux adds a lot of the flavor and cinnamon and baking spices. One neat thing is that it highlights different flavors in the sandwich depending upon the ingredients.
The Pullman Pan works well for the relatively extensible Rogue de Bordeaux. Using wet hands for all handling helps a lot.
A friend of mine expressed interest in a recipe for a gluten-free flatbread, since they weren’t happy with any of the pre-made mixes they’d tried. That sparked my interest too — and I spent a bunch of hours digging around forums and websites looking for commonalities and differences among the recipes I could find.
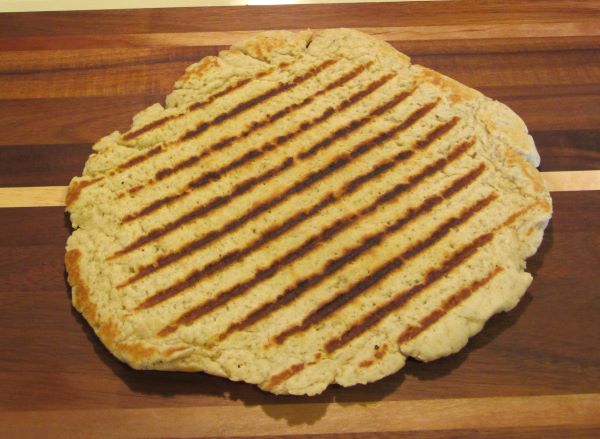
This recipe makes a flatbread that just fits into our grill pan. When the flatbread comes out of the grill pan it’s flexible — to make it crispy on the bottom put the finished bread onto a pizza stone at 450F for 2-3 minutes. The oven is also a good way to warm up any desired toppings.
I’ll post some other thoughts towards the bottom of the post.
The Recipe:
Wet Ingredients:
110g lukewarm warm (~100F)
40g milk powder
8g psyllium husk
10g extra virgin olive oil
Dry Ingredients:
65g Super Fine Brown Rice Flour
20g Tapioca Starch/Flour (same thing)
10g Corn Starch
5g Potato Starch
4g Baking Powder
3g Kosher Salt or Sea Salt
The steps:
Add the lukewarm water to a mixing bowl. Add the powdered milk and whisk to combine.
Add the psyllium husk and whisk to combine. Let rest a few minutes to let the psyllium husk hydrate.
In a separate bowl combine all of the dry ingredients and stir to distribute.
Add the olive oil to the wet, now viscous milk mixture. Whisk to combine.
Add the dry ingredients to the wet ingredients. Starting with a spoon or spatula mix to combine.
“Knead” and press the mixture until it becomes the texture of masa. I use my knuckles to fold and press the dough into the leftover dry bits until it’s completely combined.
Preheat a pan to medium-high. I use the same temperature that I use for hashbrowns. I want brown but not charred.
Cut a piece of parchment to the same size as the pan. Mine is 8″ x 8″.
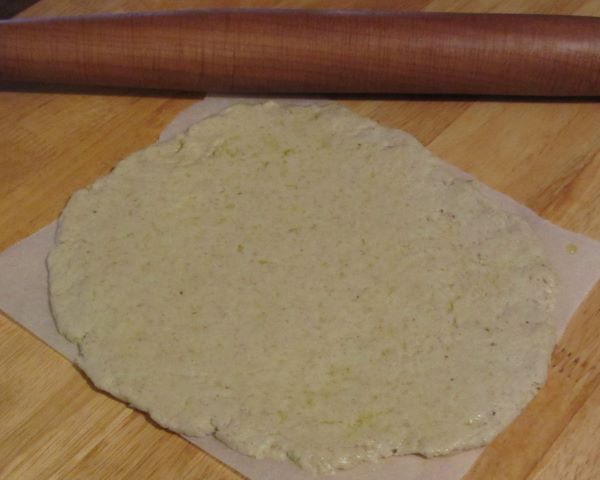
Oil the parchment and roll out the dough to 1/4″ thick. (picture below)
Oil the top of the dough.
When the pan is up to temperature, invert the dough/parchment onto the pan and peel away the parchment paper. Add more oil to the top if it looks dry.
Bake 3 minutes on side one, then flip and bake on side two another 2-3 minutes. I use two spatulas to flip to try to make sure the bread doesn’t break.
At this point the dough can be topped and reheated in the oven.
For pretty edges, trim the outside with a knife or pizza cutter. I’m always ok with rustic.
When creating the recipe I wanted to pin-down at least one variable. I decided that 100g of flour + starches would fit pretty well in the pan so that became the “base”. The end result is (65g brown rice + 35g total starches = 100g). More notes on that ratio below. Once I settled on the dry weight only the wet weight required adjusting.
The tapioca / corn starch / potato starch ratio was partly inspired by a forum post on pizzamaking.com, and partly because I was targeting a particular mouthfeel and taste in combination. Every starch has a “signature” taste and mouthfeel, I tried to avoid using too much of anything so that when people eat it they won’t say “that’s tapioca”, or “that’s corn starch”. I started with way too much potato starch, which has a pleasant taste, but too much and it becomes dense and “potatoey”.
Flexible when it comes out of the pan.
Some other commonalities among gluten-free baking recipes, broadly:
2% salt by weight is a very normal amount in all bread baking. This becomes 3g in the recipe above due to all the other stuff in addition to the 100g of flour and starch.
4% baking powder by weight is normal. This one took a little more digging since almost without exception people use volumetric measures.
For gluten-free flatbreads the ratio of flour to starch varies quite a bit but often lands around 2 flour to 1 starch by weight. Water tends to be around the same weight as the combined weight of the flour and starch. “Regular gluten-free breads” tend to be more around 1:1 flour:starch by weight.
One other thing I learned that I didn’t know going in, was that the potential ingredients/exchanges can vary a lot in weight, given the same volume. I always bake with metric weights, so changing one component for another was pretty simple, and I usually didn’t have to mess with the amount of liquid required to get a similar dough ball.
More so than in “regular” (gluten) bread baking, substituting anything will make for a different, or very very different end result. The ingredients themselves have different tastes, or they hydrate differently, or they give a different mouthfeel. I know that this recipe gives consistently pleasing results. Changing anything will basically make it a different recipe. It may still have a good taste and texture, it’ll just be different, and using a substitution may require more fiddling to make it work.
Finally: The most obvious way that this recipe differs from pre-made mixes is it uses psyllium husk rather than xanthan gum, or guar gum. I think the reason so many mixes contain xanthan gum, and by extension so many people include it in their recipes is this: It doesn’t require a separate hydration step and it can be bagged and shipped together with the rest of the pre-made mix. I feel like Xanthan gum has its places but psyllium husk was the better choice for this recipe.
This week’s sandwich loaf steers back towards “normal”. It includes a bit of sourdough starter, caraway, and milk powder. The caraway is the most obvious flavor.
450 grams bread flour (500 grams bread flour total including the starter.)
300 grams room temperature water. (70% hydration, the water amount is 350 grams total including the starter)
50 grams milk powder (10% bakers percentage)
15 grams olive oil (3%)
10 grams kosher salt (2%)
1-2 teaspoons crushed/ground caraway seed. I didn’t go too fine because I still wanted to see flecks of caraway.
1.5 tsp instant (not rapid rise) yeast.
Combine all ingredients. Mix until combined, about 1 minute at low speed. Cover and let rest 30 minutes. Mix for 8 minutes on low speed.
Oil / butter / Baker’s Joy the pullman pan. Move the dough to the pullman pan and spread the dough out to the sides of the pan. Cover and let rise until 1″ from the top of the pan. Bake at 350F covered for 30 minutes, then uncover and bake an additional 25 minutes.
The finished loaf had a lighter crust color this time, partly because I left out the usual honey. The crumb was spongy and moist with dark flecks of caraway — it worked really well as a sandwich loaf and I think it’ll make good toast if it lasts that long.
Overall the finished bread was simple, quick, and fairly interesting on a baking night where I wanted simple, quick, and easy. Perfect.
Combine all ingredients, cover, and let rest 30 minutes. At the 30-minute mark do Rubaud folds in the bowl. Repeat at 30-minute intervals for a total of four rounds of folds.
Shape the dough and move to a Silpat-lined sheet tray. Dust with flour and cover for 90 minutes. At the 60-minute mark preheat the over to 425F. Slash the dough. Bake for 50-60 minutes, or until the bread reaches 200F.
I guess technically some people would call this a 1.7kg (or 3.7 lb) loaf since that’s the total weight of the ingredients. I always think of it in terms of “how much flour is there”, so for me it’s a 1kg loaf.
I’ve now reached a point with the weekly sandwich bread bake that I’m basically happy with it. I’m sure I’ll continue to fiddle with it to see how it reacts, but here’s where I’ve settled as a base recipe:
Ingredients
100g starter discard or overnight poolish (either of these are optional but they seem to improve the mouthfeel of the finished bread). The starter discard is 50g bread flour and 50g water. If using a poolish it will be 50g bread flour, 50g water, and a tiny tiny pinch of yeast.
200g Bread flour and 250g fresh-milled whole wheat flour (Red Fife, Turkey Red, or Rogue de Bordeaux berries), (In total it is 500g flour weight total including the starter/poolish).
325g cool water (with the 50 grams from the starter/poolish the total water is 375 total grams. 75% dough hydration).
15g honey (3% of flour weight)
15g olive oil (3% of flour weight)
10g kosher salt (2% of the flour weight)
1.5 tsp instant (not rapid-rise) yeast.
Process
Start by adding the 325 grams of cool water to the bowl of the stand mixer.
Scoop 100 grams of starter discard into the water.
Grind the wheat directly into the water/starter mixture. I feel like this helps keep the milled wheat temperature lower than it would be if I just milled it into an empty container. At the very least, it can’t hurt.
Add the remaining ingredients and mix for one minute to combine. Cover and let rest 20 minutes, up to an hour. Uncover and mix another 6 minutes.
Spray a pullman pan lightly with Baker’s Joy. (I’ve tried more than a few ways of attempting to prevent the baked loaf from sticking to the pan. Baker’s Joy has been by far the easiest and most consistent solution. If overused Baker’s Joy with give the crust a vaguely weird and sticky quality, so don’t go overboard with it.)
Transfer the dough to a pullman pan and spread out the dough with wet fingers. Cover, and let rise until 1/2″ to 1″ from the top of the pan. Preheat oven to 350F when the dough is getting close to ready.
Bake, covered for 30 minutes then remove the cover and bake for another 25 minutes or until the loaf reaches 195-205F.
I had been using powdered milk in the recipe, but it didn’t seem to be adding flavor. I thought it might also be contributing to the finished loaf being a little crumbly, since when used in moderation the powdered milk is supposed to help with loft. Simpler might be better here.
This recipe still technically functions as a same-day loaf, given I always have a starter in the refrigerator. The weekly sandwich bake then doubles as an opportunity to remember to refresh the starter. Win-win.
I went a little over the top with the Thanksgiving breads this year: A 1.3x batch of King Arthur’s Epis de Ble, two batches of King Arthur’s Dutch Oven Dinner rolls, and two No-Knead breads. All of that for nine people. I started at 4:30am and finished around 11am.
I made a couple of changes to the Epi de Ble recipe. I increased the total flour weight to 620 grams and used bread flour instead of all purpose. This made four epi. The poolish was changed to incorporate all of the water — 403 grams water and 403 grams flour. The total formula included 63% water, 2% salt. King Arthur original recipe here.
I made a double batch the Dutch Oven Dinner Rolls and modified that recipe slightly as well. All of the water (227g x 2 = 454g) and 454g of the flour were included in poolish that spent three days in the refrigerator. And I used 2% salt by weight. King Arhur recipe is here.
Finally, I made two No-Kneads using the recipe in the header at the top of the page.
I think overall everything came out a little bit lighter colored than usual — I put a sheet tray in the bottom of the oven so that none of the bottoms would get too dark. It had the side effect of not allowing the breads to deeply brown either, but I thought it was a reasonable tradeoff and nobody seemed to mind.
It was basically five individual bakes, so I made a chart of when everything needed to be handled, mixed, or if the oven needed a temperature change for the upcoming items. With that many things happening I was glad I did, and I didn’t wind up with any timing conflicts.
Next year I’m going to make half as much stuff and get more sleep.
The recipe is 200 grams King Arthur Bread Flour, 200 grams fresh-milled Yecora Rojo wheat flour, 336 grams cool water (84% hydration), 8 grams kosher salt (2%), and 1/4 tsp instant (not rapid-rise) yeast. Combine all in a bowl and mix until it’s a homogenous mass. Cover and leave on the counter.
I started the dough at 7pm the day before baking. At 11pm the dough was looking pretty feisty and had about doubled, so I did some Rubaud folds and put the container into the refrigerator, mostly because I preferred sleep over handling bread at that hour.
I did two more Rubaud folds at 1am and 4am, each time returning the dough to the refrigerator. At 4am the dough was still fairly shaggy but it was coming together. I removed the dough from the refrigerator at 6am and did coil folds at 6am, 7am, and 8am.
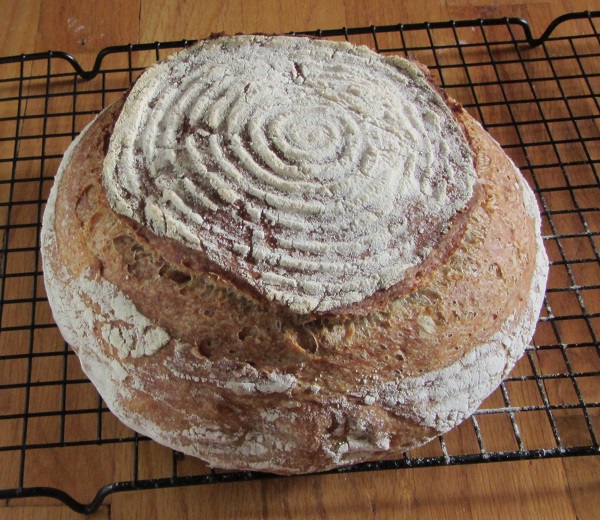
The dough was smooth and handled well after the 8am coil fold so I moved it to a covered banneton. At 9am I preheated the oven and our Le Creuset bread oven to 460F. At 10am the dough went onto a parchment and was slashed, then moved over to the bread oven. I reduced the temperature to 450F and baked the dough for 20 minutes covered, then 22 minutes uncovered. (The same time and process that I use for No Knead bread, though most times I’ll just go directly into the Le Creuset or a dutch oven rather than starting on parchment.) Cool on a baking rack.
The 84% hydration matches the Breadtopia recipe. The 1/4 tsp instant yeast matches my normal No Knead recipe. The bread measured 205F when I removed it from the oven which (again) is in-line with Breadtopia.
The bread was very moist. It had a decently open crumb, though it wasn’t quite as open as the pictures on Breadtopia. My feeling is that the dough could have possibly used another round or two of coil folds, but that was going to put the timing really close to when we needed to take it across town.
I was happy with the crust too, it had a nice bite to it but not “too much”. The next time around I’m going to try a little less flour in the banneton — I was probably too concerned with the dough easily releasing from the banneton so I may have overdone it a bit.
I don’t normally drop breads that I haven’t tested at all into a group setting, but I was reasonably confident everything had worked out and the bread was well received. So that was good.
The next time I’ll probably move the dough to the refrigerator after a shorter initial room temperature rise, then incorporate coil folds as soon as the dough will allow it. It might be the right answer is to do some Rubaud folds in the first hour prior to refrigerating overnight, then moving the dough back to the counter in the morning and using coil folds until the dough is ready.
Yecora Rojo is a Hard Red Spring wheat variety developed in the 1970’s. It’s my understanding that it’s used by some well-known bakeries and in flour blends for “artisan breads”. Last week I was buying wheat berries and Rogue de Bordeaux was not available, so I added Yecora Rojo to the Breadtopia shopping cart. I’m glad I did. It (predictably) functions well as an artisan bread flour. Based on one bake it’s not finicky to work with. The taste is not assertive and I think even people who Don’t Like Wheat Bread would eat it, especially if the percentage of Yecora Rojo was cut back to 20% or so.
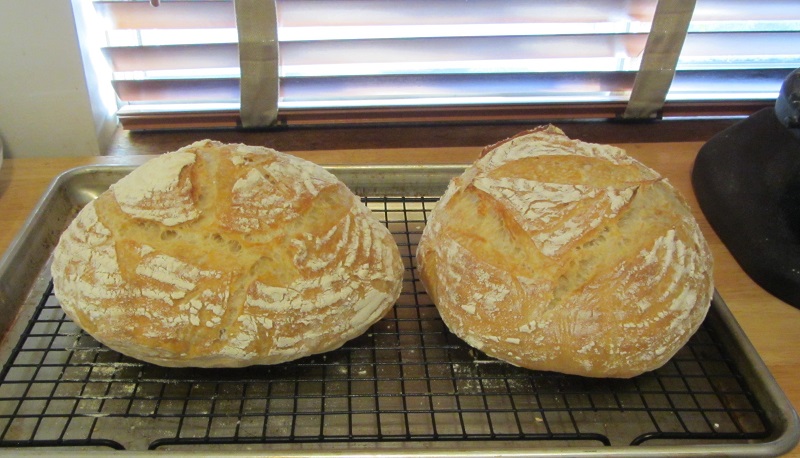
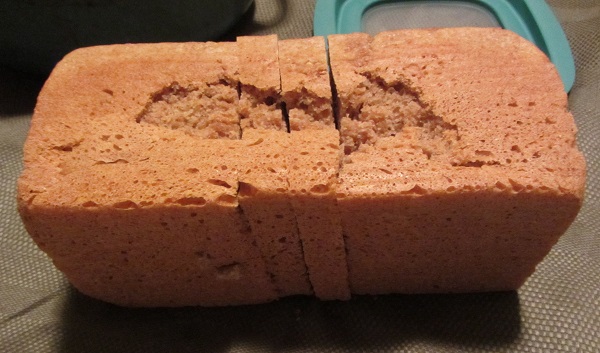
The last few loaves have wanted to stick to the sides of the loaf pan a little bit. This one took the sticking thing a little more seriously:
The pans themselves are no longer super duper new, and I haven’t been crazy fastidious about soaking the pans and cleaning out the old residue, so I probably deserved one that failed to release from the side. I did lightly oil the interior of the pan, but it may also need more oil than I’ve been using.
Another thing that might have contributed is the Red Fife flour combined with a longer bulk proof than usual — I let the bulk proof go a full two hours, followed by 45 minutes to an hour in the pan and the Red Fife might have started breaking down somewhat after that much time — I’ve read that Red Fife is prone to weakened gluten structure when given long proofing times. The crumb was more open than usual as well, which may be a sign of something, even if it’s just a looser crumb.
I’ve been experimenting with sometimes using Bread flour rather than AP flour and I’m leaning towards always using Bread flour going forward:
250g Bread flour and 250g fresh-milled whole wheat flour (Red Fife or Rogue de Bordeaux berries), (500g flour weight total). 375g water (75% hydration). 15g honey (3%), 15g olive oil (3%), and 15g (3%) powdered milk. 12g kosher salt (2.4% of the flour weight), 1.5 tsp instant (not rapid-rise) yeast.
Combine all ingredients. Knead on low speed for 8 minutes. (A prior hydration step is a potential and obvious improvement here.)
Cover and let rest one hour (two hours this time) for the dough to hydrate and proof.
Lightly oil the Pullman pan, pan lid, and a rubber spatula. Move the dough to the Pullman pan and spread it out with wet fingers or the spatula. Cover and let rise until 1/2″ from the top of the pan.
Bake at 350F, covered for 30 minutes then remove the cover and bake for another 25 minutes or until the loaf reaches 195-200F.
I own Flour Lab by Adam Leonti. On page 71 he presents his Yeasted Loaf recipe, where he suggests a wheat variety: “I like Red Fife”.
At the start of this process I didn’t consult the book, I just picked a Hard Red Winter Wheat from the pantry (Turkey Red) and then adjusted the ratios of the ingredients bake by bake looking for the most suitable bread for sandwiches. No matter what adjustments I made the bread was still vaguely crumbly and lacked the gluten structure and springiness to be a good sandwich bread.
So I got what I deserved. It’s always the better idea to Stand On The Shoulders Of Giants, then riff from there. And I know that, usually.
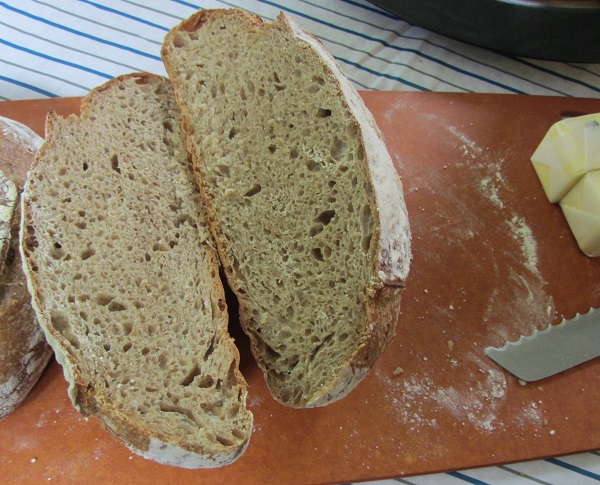
The bread above is made with Red Fife. It works great as a sandwich bread, and it has a more interesting taste profile than Turkey Red. Rouge de Bordeaux works great too, and to my taste it’s even more intensely flavored, aromatic, and interesting than the Red Fife. Both the Red Fife and the Rouge de Bordeaux taste even better after a couple of days after baking, which may be true for all whole wheat breads. Leonti specifically states in a few places to let the finished bread rest until the next day prior to cutting into it.
The recipe this time is intended to be as quick and easy as possible. I’m sure it can be improved but I was initially curious to see what Red Fife would do with no other steps than would be used with a quick same-day loaf:
250g AP flour and 250g fresh-milled whole wheat flour (Red Fife or Rogue de Bordeaux berries), (500g flour weight total). 375g water (75% hydration). 15g honey (3%), 15g olive oil (3%), and 15g (3%) powdered milk. 12g kosher salt (2.4% of the flour weight), 1.5 tsp instant (not rapid-rise) yeast.
Combine all ingredients. Knead on low speed for 8 minutes. (A prior hydration step is a potential and obvious improvement here.)
Cover and let rest one hour for the dough to hydrate and proof.
Lightly oil the Pullman pan, pan lid, and a rubber spatula. Move the dough to the Pullman pan and spread it out with wet fingers or the spatula. Cover and let rise until 1/2″ from the top of the pan.
Bake at 350F, covered for 30 minutes then remove the cover and bake for another 25 minutes or until the loaf reaches 195-200F.
Having poked around some bread forums, it seems I’m not alone in my experience that “Turkey Red Is Sort Of Crumbly And Maybe Not The Best Variety For Bread”. I’m not sure if I’m going to re-purchase it when I run out. For a Hard Red Winter Wheat it’s relatively neutral tasting, and I didn’t love the gluten structure. It may still be useful in situations where strong gluten or an assertive flavor is not desirable, so I’ll focus on using it other places before I make a final decision.
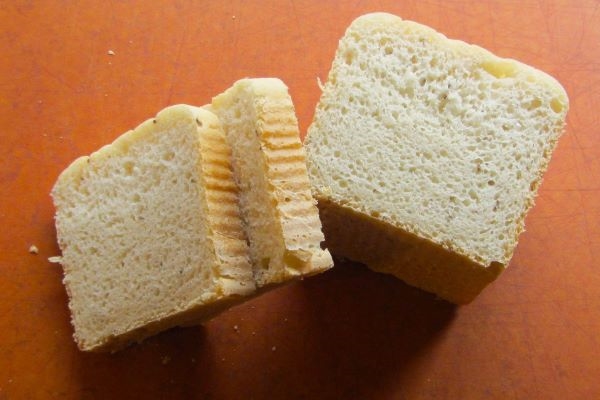
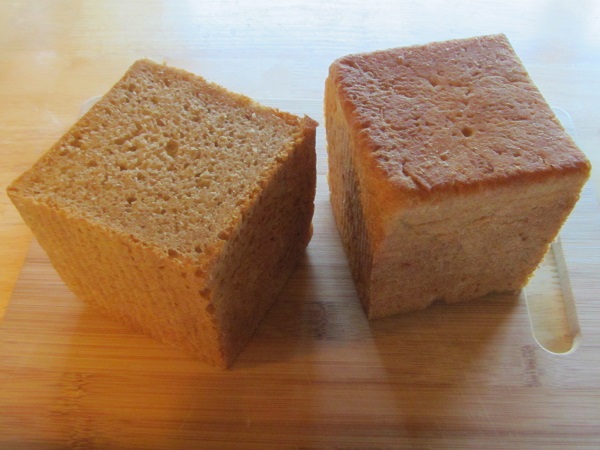
I’m pretty happy with the loaf at this point. It’s still vaguely more crumbly than I’d prefer, but the rest of it is good. The left-half has the crumb facing up:
It’s 250g AP flour and 250g fresh-milled whole wheat flour (heritage Turkey Red berries), (500g flour weight total). 375g water (75% hydration). 15g honey (3%), 15g olive oil (3%), and 50g (10%) powdered milk. 10g kosher salt (2% of the flour weight), 1.5 tsp instant (not rapid-rise) yeast.
As far as changes from where it started, it’s just been a continuous reduction in oil and honey from the original. The kneading has been cut way back. And the dough now goes directly from the mixing bowl to the Pullman pan. The current recipe:
Combine all ingredients. Knead on low speed for 1-2 minutes or until the dough comes together.
Cover and let rest one hour for the dough to hydrate.
Mix for 1-2 minutes. Cover and bulk rise until doubled.
Lightly oil the Pullman pan, pan lid, and a rubber spatula. Move the dough to the Pullman pan and spread it out with wet fingers or the spatula. Cover and let rise until 1/2″ from the top of the pan.
Bake at 350F, covered for 30 minutes then remove the cover and bake for another 25 minutes or until the loaf reaches 195-200F.
I think to a degree I’m at a bit of a inflection point for further improvements. I’ve tried a moderate amount of mixing and very little mixing, and the “little mixing” seems to work better. It may be that combining at least the flour with the water overnight in the refrigerator (or possibly all of the ingredients) may allow for a better finished product. Another obvious change would be to sift the biggest chunks of bran out of the whole wheat flour, though that’s something I don’t want to do, both for the loss of nutrients and the bit of hassle and things to clean up afterwards.
It may also be that Turkey Red isn’t the best grain from this application. I still have Rouge de Bordeaux and Red Fife to try out.
So it feels like more upcoming process changes, to what, I’m not sure. Which is a fine problem to have, relatively.