A Few Thoughts On “00” Flour

by A.J. Coltrane

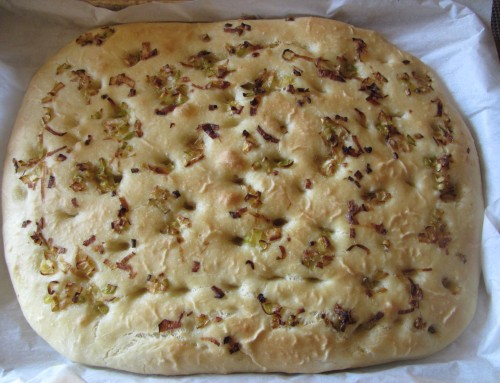
Iron Chef Leftovers gave me ten kilos of “00” flour over the holidays. I’ve gradually been working through it. I initially tried some high-hydration pizzas with a small amount of oil, just like I’ve been doing with AP and bread flour. The results were waayy too extensible (stretchy) — extensible to the point of nearly disintegrating in my hands while shaping the dough. Last night’s pizza had a very modest 61% hydration and no oil at all. Even with that adjustment the dough was still very, very extensible.

April 28: Oven baked pepperoni.
April 28: Oven baked pepperoni. Medium hydration dough with oil.

A little poking around the internet gives this comparison of different flours at SeriousEats.

The fact is, the label Tipo “00” has nothing to do with protein content. Rather, it refers to the fineness of the milling. Tipo “00” is the finest grade of flour milled in Italy, and it has a consistency similar to baby powder. It’s available with several different levels of protein intended for different baking projects, just like American flours (which we’ll get to in a moment). The ones you’ll most commonly see in pizzerias are the redRinforzato bag, which features pictures of pizzas and bread, the bluePizzeria bag, which pictures a single pizza, and — the most common in the U.S. — the red The Chef’s Flour bags, which, in fact, contain the exact same flour as the RinforzatoAll three bags of flour have the exact same protein content: 12.5%

Because of the fineness of their milling, they don’t need quite as much water as an equivalent American flour (try making a 65% hydrated dough with “00” and American bread flour side-by-side and you’ll find that the “00” is much runnier).

To quote the Mythbusters guys:  “Well there’s your problem!”

June 2:  Grilled crab rangoon pizza.
June 2: Grilled Crab Rangoon pizza. Finished with cilantro.

One nice thing about using the grill when experimenting is that it forces me to create a dough that is *not* a total, sloppy mess. “How can I get this onto the grill” can become a real issue. In this case, using the grill pushed me to use a lower hydration dough than I might normally have tried, and it led to a small breakthrough.

A note about oil:  Normally, the addition of oil promotes browning and flavor at the expense of “lift”. I *like* browning and flavor, so the next “no oil” attempt will have something along the lines of 58-60% hydration, minimal kneading, and an 8 hour+ rise. In theory the longer rise (and short kneading) should give back some of the browning and flavor that would be lost by the absence of oil. It may be that adding a small amount of salt would help too — it should improve the structure and tie up some of the water, making the dough more manageable.

In theory anyway. It’s a process.

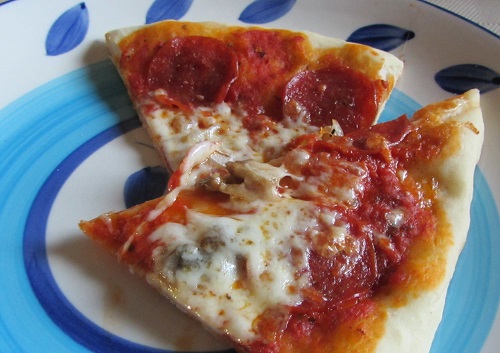
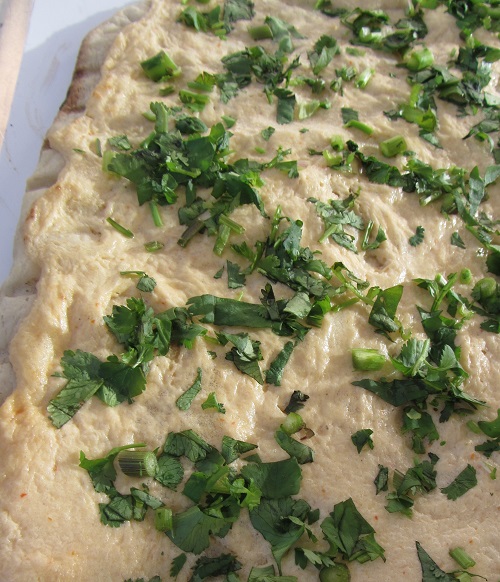
For the record – I was informed that this was the better of the two Crab Rangoon pizzas. Last night’s topping was cream cheese, crab, lime juice, honey, Sriracha, and cilantro.  I liked both of them about equally.


Squirrel!

By Iron Chef Leftovers

Those who love me know of my man-crush on Alton Brown. Not only is he responsible igniting my interest in the science of food, he made the single best cooking show ever with Good Eats. I had the pleasure of meeting him several times over the years and he is a genuinely sincere and funny guy.

AB recently launched a web series that is a short bunch of how-to videos, like how to hard cook an egg in an oven (really useful if you need to cook a couple dozen eggs at once). His latest is how to make cat-poo flavored dog treats. I will admit, I am intrigued and am considering making them to try them out on friends’ dogs. The video is below and the link to the recipe is here. The bonus is that he shoots the short with his own dog, Sparky, guest-starring and calls the cat box the “stinky cheese shop.”

Creamy Nettle Soup

By Iron Chef Leftovers

Soups are a great meal since they don’t generally require a ton of ingredients, are easy to make in a large quantity, are easy to make from a technical standpoint and don’t require a ton of attention. One of the simplest and most delicious soups I have ever come across is the creamy nettle soup at the old Le Gourmand space in Ballard. This soup was so good that I think it might actually be the best thing that I ever had there. Unfortunately the restaurant is long gone, but the chef, the great Bruce Naftaly, still runs cooking classes and shows you dishes that he served in the restaurant. Since we are approaching the tail end of nettle season, I figured that this would be a good one to put out there, especially considering the somewhat unpredictable Northwest spring weather. Not sure where to get nettles? Try Foraged and Found – they are at the U-District Farmer’s Market on Saturdays and Ballard on Sundays. You probably only have 1 or 2 weeks left in nettle season though, so you many want to hurry.


The Software

1 tablespoon of unsalted butter

1 medium leek, dark green part removed, quartered and rinsed and cut into ½ inch pieces, about 8 oz.

½ yellow onion cut into 6 parts, about 8 oz.

2 shallots peeled and quartered, about 4 oz.

1 Yukon gold potato, quartered, about 6 oz.

2 cups chicken or vegetable stock

¼ cup cilantro, roughly chopped

6 oz. nettles, washed

Salt and pepper

Nutmeg


The Recipe

In a heavy bottomed stock pot, melt the butter until it stops foaming over medium heat. Add the shallots, leek and onions and stir. Cook for about 15 minutes or until they soften, stirring occasionally. If the veggies begin to brown, lower the heat slightly, you are looking to sweat them, not brown them. When the veggies are soft, add the potato and stock. Cover and cook over medium heat for about 20 minutes or until the potatoes are cooked (you can pierce them with the tip of a knife with no resistance).  Add nettles and cover, cooking for 6-7 minutes until the nettles are wilted (this will also take out the stinging quality of the nettles). Remove from heat and puree in 2 batches, adding ½ of the cilantro to each batch. When done pureeing the soup, if the soup is too thick, stir in water or stock in small quantities until the desired thickness is achieved. If it is too thin, add some additional cooked potato puree to thicken it. Season with salt and pepper to taste. Serve hot or warm with a few grinds of fresh nutmeg and some nice bread.


Notes

If you can’t find nettles, use spinach instead. It won’t be as good but you will be able to make the soup all year round. The recipe will feed 4-6 people and scales really easily and can be served as either a main course or an appetizer. It will keep in the fridge for 2-3 days but freezes well and reheats easily, so it makes for a nice meal in a hurry. This soup is ultra creamy and luxurious, and, best of all, involves no actual dairy and can be made completely vegan by using veggie stock and olive oil instead of chicken stock and butter.


No Knead Bread, The Next Day

by A.J. Coltrane

The next-night-using-up-the-No-Knead-Bread dinner. Grilled steak sandwiches with blue cheese-horseradish mayo, caramelized onions and green peppers.

142114 no knead sandwich3

Messy and good.

[Product recommendation that sort of reads like a plug:]  The steak was hit with McCormick’s Steakhouse Seasoning Grinder. It’s a quick and easy way to “add something” that’s tasty but still somewhat hard to define. Hands down my favorite offering of theirs. (From the website:)  “A robust blend of green, black, and pink peppercorns with salt, garlic and onion.  This grinder jazzes up steaks, burgers, ribs and potatoes.”

I guess I could have put actual effort into the picture, but we were hungry, and I’m not one of those bloggers to spend a bunch of time on the photo and get cold food as a reward. Those people have a sickness. (Initially the colors in the photo were really funky. I think maybe the camera was trying to normalize the yellow cutting board as “white”. Maybe. Placing a white cutting board behind the sandwich helped the camera figure out what “white” really looks like.)

Three attempts at a decent photo is plenty.

Tonight the bread “ends” are becoming garlic croutons.

No-Fuss Roasted Potatoes

By Iron Chef Leftovers

Potatoes are not one of my favorite things to cook or eat since they act as more of a flavor vehicle for what they are cooked in rather than having a great deal of inherent flavor on their own. Mrs. Iron Chef however loves them so I do occasionally make them, but I am constantly looking for new ways to cook them.  I came across an easy, no-fuss, one pot recipe on America’s Test Kitchen that I figured was worth a shot. Basically it calls for braising the potatoes first and then searing them, but it didn’t involve even taking them out of the pot, and only a couple of ingredients, so it really doesn’t get too much easier than this.

The Software

1 lb. Red Potatoes, roughly 1 to 1 ½ inches in diameter, washed and halved

1 cup water

3 cloves of garlic, peeled

2 teaspoons of salt

3 tablespoons of unsalted butter, in 6 pieces

1 tablespoon, fresh squeezed lemon juice


The Recipe

Arrange the potatoes in the bottom of a skillet (don’t worry about over-crowding, it won’t matter, I used a 10 inch, straight sided skillet) so that all of the cut surfaces are in contact with the surface of the pan. Add the water (it should come up about half way on the potatoes, add more water if necessary), butter, salt and garlic to the pan. Turn burner on high and heat the skillet until the water comes to a boil. Reduce heat to medium and cover for about 15 minutes. Check if the potatoes are cooked after 15 minutes (a knife inserted should pull out easily), if they are not, cover until they are. Once the potatoes are done, remove the lid and remove the garlic to a bowl. Increase heat to medium high and continue cooking until the bottoms of the potatoes are golden brown – all of the water will evaporate leaving just the butter (this should take 10-15 minutes depending on your stove). While this is happening, mince the garlic and combine with lemon juice. Once the potatoes are done, remove from heat and toss in garlic and lemon. Season with salt and pepper to taste and serve.


Notes

I would recommend using a non-stick skillet for this process to keep the potatoes from sticking to the bottom of the pan. The recipe scales easily, just put enough potatoes to fit in the pan and add enough water to come up half way on the potatoes. You probably won’t need to add more butter unless you use something larger than a 12 inch skillet. Fresh rosemary, sage, thyme or oregano would work well with this recipe. Just mince them and add them at the end with the garlic.

Spicy Shrimp and Grits

By Iron Chef Leftovers

I really do enjoy shrimp, but since I am picky about where it is sourced and how it is processed, it tends to be spendy so I don’t eat it that often. For a recent party, I was tasked with making the small bites, so I decided to go with my take on a classic, shrimp and grits. I wanted something that was really easy to make and would still be fun an interesting, so I came up with this. It works nicely on a rice cracker and can be served as a sit down app or main course.


The Software

1 lb. 21-25 count shrimp, preferably sustainably wild caught, peeled and patted dry.

½ head cauliflower (about 1 lb.) trimmed into 1 inch pieces

2 tablespoons of olive oil

1 tablespoon butter

2 oz. grated cheddar cheese

1 oz. grated parmiggano reggiano

2 teaspoons cornstarch

Garlic powder

Kosher Salt

Chili flakes

1 smoked jalapeño (can be replaced with adobe)

Smoked paprika

Cumin

Oregano


The Recipe

The Spice Rub – make a spice mix. In a coffee grinder add 1 part each chili flakes, smoked paprika, cumin and  oregano, the smoked jalapeño (or one part adobe) and 2 parts each garlic powder and kosher salt. Pulse until a fine powder. (You can skip the grinding part if you are not using a whole smoked pepper as everything will already be powdered).

The Grits – steam the cauliflower in a covered pot for 10-15 minutes until tender. Transfer to a blender and add ¼ cup of the steaming liquid and 1 teaspoon of kosher salt. Blend until smooth. If the puree is too thick, add a little bit more water to thin. Transfer the puree back to an empty pot and add butter and cheese, stirring until combined. Check seasonings and add salt and pepper as necessary.

The Shrimp – heat a medium sauté pan over medium-high heat. Add 1 tablespoon of olive oil until just smoking. You are going to work in 2 batches with the shrimp. In a bowl, toss half the shrimp with 1 teaspoon of corn starch and 1 tablespoon of the spice rub until coated. Before putting the shrimp in the pan, shake off any excess. Cook the shrimp in the pan 2 minutes each side (don’t move them around) until done. Move to a plate, wipe out the pan and repeat with the second batch of shrimp

Serve the shrimp over the cauliflower grits.


Notes

I didn’t give exact measurements for the spice rub since it is scalable – you can use either a teaspoon or a tablespoon as your base measure, so the 1 part would be 1 teaspoon or tablespoon and the 2 parts would be 2 of either. You can easily adjust or change the ratios to go with your likes. You can use any size shrimp you want (I don’t think that I would recommend anything smaller than 26-30 count), but you will need to adjust the cooking time according to the size. You will still need to work in batches regardless of the size of the shrimp – you don’t want to crowd the pan when you cook the shrimp. I would also recommend that you don’t by any shrimp treated with Trisodium Phosphate (if you buy them in a bag, it should say. If you buy them from a fish counter, ask and don’t buy them if they are not sure – they should know), it affects the texture and you will end up with mushy shrimp.

A Simple Onion Focaccia

by A.J. Coltrane

The current go-to focaccia. This is the one I make when I have three hours to prepare something — short notice by bread standards.

The Recipe:

1.  Finely slice 100g of onion. (Red onion, sweet onion, scallions, bunch onions — they all work.) Lightly saute the onion in 100g (7  TBP) of extra virgin olive oil. The idea is to remove the rawness from the onion and to impart that flavor into the oil. Let the oil cool for a few minutes, until the pan is no longer hot to the touch. 64g of the oil is used in the dough, below:

Ingredient Quantity Bakers %
Bread Flour 800g 100
Water 600g 75
Ex Virgin Olive Oil 64g 8
Kosher Salt 20g 2.50
Instant Yeast 2 tsp
Thinly Sliced Onion ~100g

2.  Combine all ingredients in a KitchenAid and mix with the dough hook, low speed for 15 minutes.

3.  Place parchment paper in a 13″ x 18″ sheet pan, leaving enough to go up the sides and hang over a little. Very lightly oil the parchment paper, then scrape the dough out onto the parchment.

4.  Oil your fingers and gently stretch the dough towards the edges of the sheet tray. It doesn’t have to go all the way to the edges. It will settle somewhat towards the edges on its own.

5.  Cover the dough for 1:45. At the 1:45 mark turn the oven to 425F. Oil your fingers again and dimple the dough. Spread the onion and remaining olive oil over the top of the dough.

6. When the oven is hot, bake the focaccia for 15 minutes, then rotate the pan and bake for another 15 minutes.

140128 focaccia

—-

Notes:

Halving the recipe will work. Reduce the pan size and the baking time to a total of about 24 minutes.

The crumb has a relatively fine texture, inspired by this Rose Levy Beranbaum recipe. The Beranbaum recipe calls for a very long mixing time (basically 20-30 minutes on medium speed) and an even larger amount of water.

One nice thing about making a focaccia for company rather than a leaner bread, is that the extra oil helps prevent staling while it’s sitting around.

..aaaand… Bonus Girl Cat Pic!

Everybody loves playing in packing paper

Chewy Chocolate Brownies

By Iron Chef Leftovers

I don’t generally like to bake, partially because I hate following recipes and partially because I usually end up eating too much of the finished product. However, when it comes to parties, it is nice to have something sweet on hand that can feed a large number of people easily, and brownies fit that bill very well. The better the chocolate used in these, the better the brownies will be. There are so few other ingredients that you will actually be able to taste the more subtle flavors that the chocolate will carry, so use one that you like the taste of when eating it on its own. The recipe is adapted from Cook’s Illustrated.

The Software

The Recipe

  1. Adjust oven rack to lowest position and heat oven to 350 degrees.
  2. Make a Foil Sling using the following steps: Cut 18-inch length foil and fold lengthwise to 8-inch width. Fit foil into length of 13 by 9-inch baking pan, pushing it into corners and up sides of pan; allow excess to overhang pan edges. Cut 14-inch length foil and fit into width of pan in the same manner, perpendicular to the first sheet (if using extra-wide foil, fold second sheet lengthwise to 12-inch width). Spray with nonstick cooking spray.
  3. Whisk cocoa and boiling water together in large bowl until smooth. Add unsweetened chocolate and whisk until chocolate is melted. Whisk in melted butter and oil. (Mixture may look curdled.) Add eggs, yolks, and vanilla and continue to whisk until smooth and homogeneous. Whisk in sugar until fully incorporated. Add flour and salt and mix with rubber spatula until combined. Fold in bittersweet chocolate pieces. (this may seem like a bunch of steps, but it comes together very quickly)
  4.  Scrape batter into prepared pan and bake until toothpick inserted halfway between edge and center comes out with just a few moist crumbs attached, 30 to 35 minutes. Transfer pan to wire rack and cool 1½ hours.
  5. Using foil overhang, lift brownies from pan. Return brownies to wire rack and let cool completely, about 1 hour. Cut into 2-inch squares and serve.


Notes

This is a very easy recipe and makes a big pan of chewy, dense, intensely chocolaty brownies, just prep everything in advance. These are nice with a small sprinkle of sea salt on top, but really just work fine on their own. I like using chocolate in the 70-85% range for this (my preferred chocolate is Kallari), but the original recipe calls for 60%, so you can use that. I wouldn’t use chocolate under 60% (the brownies will be very sweet) or over 85% (never tried this, but I suspect that the chocolate chunks won’t end up melting enough). The notes from the Cook’s Illustrated recipe:

For the chewiest texture, it is important to let the brownies cool thoroughly before cutting. If your baking dish is glass, cool the brownies 10 minutes, then remove them promptly from the pan (otherwise, the superior heat retention of glass can lead to overbaking). While any high-quality chocolate can be used in this recipe, our preferred brands of bittersweet chocolate are Callebaut Intense Dark Chocolate L-60-40NV and Ghirardelli Bittersweet Chocolate Baking Bar. Our preferred brand of unsweetened chocolate is Scharffen Berger. Leftovers can be stored in an airtight container at room temperature for up to 4 days.

Keeping The Peazza

by A.J. Coltrane

Terrible pun, I know.

Somebody doesn’t think that pineapple belongs on a pizza.

Hint:  That someone is me.

140122 pizza

Note the pineapple well removed from the neutral zone.

Left side:  Pancetta, Chevre, Ham, Pineapple

Right side:  Pancetta, Chevre, Feta

Everybody’s happy.

Sausage Dressing without the Turkey

By Iron Chef Leftovers

I am not much of a traditionalist when it comes to Thanksgiving – I really don’t care for turkey (have had too many bad ones over the years and that is inexcusable – turkey is easy to cook, of course, I am there if you are going to serve wild turkey, either the bird or the booze), stuffing (especially the store bought stuff) or cranberry jelly. I would much rather have a traditional Thanksgiving of deer, game bird and small furry woodland creatures; pretty much what would have been served at the actual first Thanksgiving. I still get roped into making the traditional meal and my sister-in-law usually requests my stuffing, and lots of it for leftovers. The beauty of this stuffing recipe is that it doesn’t require it to be stuffed into a turkey cavity (the idea is that you butterfly the bird and put it on top of the tray of stuffing so the juices drip down), so you actually don’t need to make a turkey at all to enjoy stuffing (the directions are for if you aren’t cooking a bird with the stuffing). The plus side is that it is easy to make, produces a sufficient quantity (the recipe feeds 12 in theory) and reheats well. I adapted this from the original Cook’s Illustrated recipe.

The Software

  •  18 cups 1-inch challah or Italian bread cubes (from about 1 1/2 loaves)
  • 2 cups turkey stock or chicken stock
  • 1 cup half-and-half
  • 2 large eggs, beaten lightly
  • 1 ½ lbs mild Italian sausage
  • 3 cups onions, chopped fine – I prefer sweet onions here
  • 1 ½ cups celery, chopped fine
  • 2 tablespoons unsalted butter
  • 2 tablespoons minced fresh thyme leaves
  • 2 tablespoons minced fresh sage leaves
  • 3 medium cloves garlic, minced or pressed through garlic press
  • 1 ½ teaspoons table salt
  • 2 teaspoons ground black pepper


The Recipe

  1. Adjust one oven rack to upper-middle position and second rack to lower-middle position and heat oven to 250 degrees. Spread bread in even layers on 2 rimmed baking sheets and dry in oven 40 to 50 minutes.
  2. Place bread in large bowl. Whisk together stock, half-and-half, and eggs in medium bowl; pour over bread and toss gently to coat so bread does not break into smaller pieces. Set aside.
  3. Heat heavy-bottomed, 12-inch skillet over medium-high heat until hot, about 1 1/2 minutes. Add sausage and cook, stirring occasionally, until sausage loses its raw color, 5 to 7 minutes. With slotted spoon, transfer sausage to medium bowl. Don’t drain the fat. If there isn’t much in there, add a tablespoon of olive oil.  Add about half of onions and celery to fat in skillet; sauté, stirring occasionally, until softened, about 5 minutes. Transfer onion mixture to bowl with sausage. Return skillet to heat and add 2 tablespoons butter; when foam subsides, add remaining celery and onions and sauté, stirring occasionally, until softened, about 5 minutes. Stir in thyme, sage, and garlic; cook until fragrant, about 30 seconds; add salt and pepper. Add this mixture along with sausage and onion mixture to bread and stir gently to combine, trying not to break bread into smaller pieces.
  4. Spray disposable aluminum 12 by 16-inch roasting pan with nonstick cooking spray. Transfer dressing to roasting pan and spread in even layer. Cover pan with foil and refrigerate until needed. It should be good in the fridge for up to 24 hours. Remove from the fridge about 45 minutes before cooking.
  5. In a 400 degree oven, cook the dressing covered for 80 minutes covered, rotating the pan after 40 minutes. The internal temperature should be about 150-155 degrees. Uncover, increase heat to 450 degrees and cook until the surface starts to become golden (keep an eye on it, it can burn), about 10-15 minutes. Let stand for 5 minutes, plate and serve.

Notes

The original recipe called for just 12 oz. of sausage, which really didn’t seem like that much. I like the flavors Italian sausage brings to the party, but you could certainly use any sausage that you like. I would highly recommend using turkey stock if you are making this, even if you roast a bird on top of it, I think it has better flavor than chicken stock, plus then you can make turkey gravy to put over it. If you want to make it vegetarian or vegan, it is easy – I have made this using vegan sausage and it works. You just need to use oil in the pan for sautéing the sausage and veggies and replace the meat stock with veggie stock; everything else would be the same. I prefer Italian bread to challah just because it is easier to work with. Oh yeah, the recipe actually scales down pretty easily if you don’t want too much leftover stuffing.