A friend of mine expressed interest in a recipe for a gluten-free flatbread, since they weren’t happy with any of the pre-made mixes they’d tried. That sparked my interest too — and I spent a bunch of hours digging around forums and websites looking for commonalities and differences among the recipes I could find.
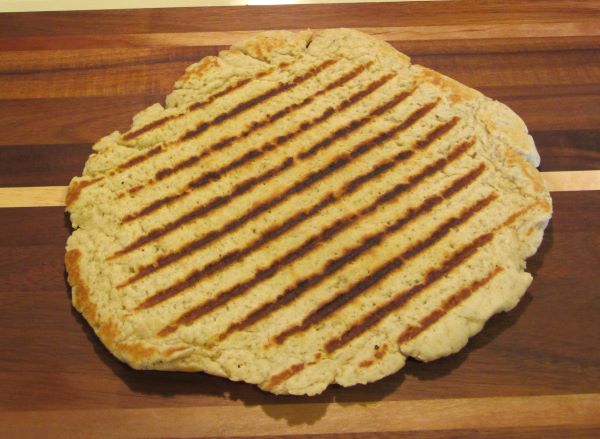
This recipe makes a flatbread that just fits into our grill pan. When the flatbread comes out of the grill pan it’s flexible — to make it crispy on the bottom put the finished bread onto a pizza stone at 450F for 2-3 minutes. The oven is also a good way to warm up any desired toppings.
I’ll post some other thoughts towards the bottom of the post.
The Recipe:
Wet Ingredients:
110g lukewarm warm (~100F)
40g milk powder
8g psyllium husk
10g extra virgin olive oil
Dry Ingredients:
65g Super Fine Brown Rice Flour
20g Tapioca Starch/Flour (same thing)
10g Corn Starch
5g Potato Starch
4g Baking Powder
3g Kosher Salt or Sea Salt
The steps:
- Add the lukewarm water to a mixing bowl. Add the powdered milk and whisk to combine.
- Add the psyllium husk and whisk to combine. Let rest a few minutes to let the psyllium husk hydrate.
- In a separate bowl combine all of the dry ingredients and stir to distribute.
- Add the olive oil to the wet, now viscous milk mixture. Whisk to combine.
- Add the dry ingredients to the wet ingredients. Starting with a spoon or spatula mix to combine.
- “Knead” and press the mixture until it becomes the texture of masa. I use my knuckles to fold and press the dough into the leftover dry bits until it’s completely combined.
- Preheat a pan to medium-high. I use the same temperature that I use for hashbrowns. I want brown but not charred.
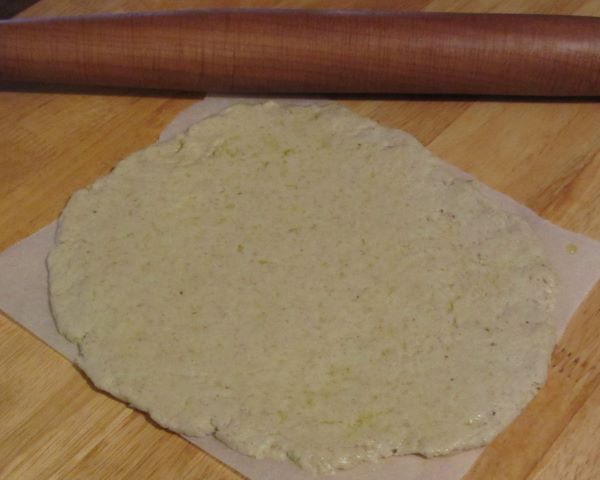
- Cut a piece of parchment to the same size as the pan. Mine is 8″ x 8″.
- Oil the parchment and roll out the dough to 1/4″ thick. (picture below)
- Oil the top of the dough.
- When the pan is up to temperature, invert the dough/parchment onto the pan and peel away the parchment paper. Add more oil to the top if it looks dry.
- Bake 3 minutes on side one, then flip and bake on side two another 2-3 minutes. I use two spatulas to flip to try to make sure the bread doesn’t break.
At this point the dough can be topped and reheated in the oven.
When creating the recipe I wanted to pin-down at least one variable. I decided that 100g of flour + starches would fit pretty well in the pan so that became the “base”. The end result is (65g brown rice + 35g total starches = 100g). More notes on that ratio below. Once I settled on the dry weight only the wet weight required adjusting.
The tapioca / corn starch / potato starch ratio was partly inspired by a forum post on pizzamaking.com, and partly because I was targeting a particular mouthfeel and taste in combination. Every starch has a “signature” taste and mouthfeel, I tried to avoid using too much of anything so that when people eat it they won’t say “that’s tapioca”, or “that’s corn starch”. I started with way too much potato starch, which has a pleasant taste, but too much and it becomes dense and “potatoey”.

Some other commonalities among gluten-free baking recipes, broadly:
2% salt by weight is a very normal amount in all bread baking. This becomes 3g in the recipe above due to all the other stuff in addition to the 100g of flour and starch.
4% baking powder by weight is normal. This one took a little more digging since almost without exception people use volumetric measures.
For gluten-free flatbreads the ratio of flour to starch varies quite a bit but often lands around 2 flour to 1 starch by weight. Water tends to be around the same weight as the combined weight of the flour and starch. “Regular gluten-free breads” tend to be more around 1:1 flour:starch by weight.
One other thing I learned that I didn’t know going in, was that the potential ingredients/exchanges can vary a lot in weight, given the same volume. I always bake with metric weights, so changing one component for another was pretty simple, and I usually didn’t have to mess with the amount of liquid required to get a similar dough ball.
More so than in “regular” (gluten) bread baking, substituting anything will make for a different, or very very different end result. The ingredients themselves have different tastes, or they hydrate differently, or they give a different mouthfeel. I know that this recipe gives consistently pleasing results. Changing anything will basically make it a different recipe. It may still have a good taste and texture, it’ll just be different, and using a substitution may require more fiddling to make it work.
Finally: The most obvious way that this recipe differs from pre-made mixes is it uses psyllium husk rather than xanthan gum, or guar gum. I think the reason so many mixes contain xanthan gum, and by extension so many people include it in their recipes is this: It doesn’t require a separate hydration step and it can be bagged and shipped together with the rest of the pre-made mix. I feel like Xanthan gum has its places but psyllium husk was the better choice for this recipe.
Happy Baking