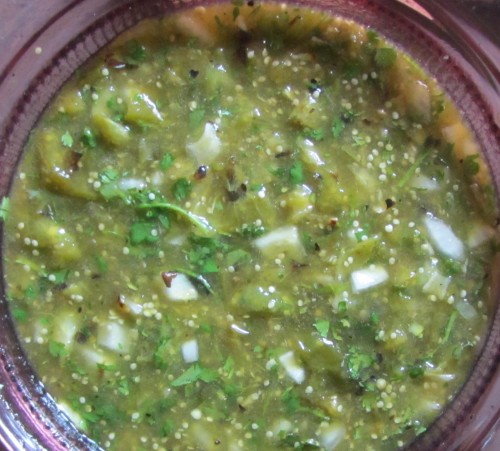
The tomatillos have been cranking out fruit. Four and a half pounds of the stuff were dominating the kitchen counters. It was time to make a salsa. It was time for a Rick Bayless recipe.
In short- it’s roasted tomatillos, jalapeno, and garlic, blended with water and cilantro. Minced white onion and salt are added at the end.
There were enough tomatillos for 9 batches of the Bayless recipe. (At 8 ounces of tomatillos, a Jalapeno, and two cloves of garlic per recipe batch.) To keep it manageable it got broiled it in 3 x 24 ounce groups:
I just noticed — everything got scaled properly except the garlic. Each of those batches should have six cloves of garlic, not two. Oh well.
Removed to bowl to cool:
Keep the juice created by the broiling process.
Then the blending. Then the onion and salt. If I had it to do over again I would have used less than the recommended amount of water and added it later if I felt the salsa was too thick. As it was, I felt like the salsa was a vaguely loose.
Overall though, it went over well. This is the new go-to green salsa recipe.
This type of steamer basket works best. You can get them at Amazon.com for about $8.
I do entirely too much reading of cookbooks. These days, I am not really looking for recipe ideas, more just to learn techniques. One thing that I hate to cook, but Mrs. Iron Chef loves to eat are potatoes. For me, they really are just a vehicle for adding stuff to it, much like chicken breast, so you go from healthy to unhealthy in a hurry since potatoes don’t inherently have much taste. For my End of the World meal, I was making beef stew served in a can, which I thought about it, and what goes better with beef stew than potatoes (well, celery root puree, sun choke puree…just humor me here). I took a hybrid technique from Modernist Cuisine and Cook’s Illustrated to come up with this recipe. This really isn’t much more difficult to do than making regular potatoes, but you will get better texture on them and you can actually do stage one in advance and finish them when you are ready to serve. When you are done, you should end up with potatoes that are creamy on the inside and crispy on the outside. The only special equipment you really need is a steamer basket.
The Software
1 large Yukon Gold potato, cut into ¼ inch slices
2 tablespoons fat (bacon fat, duck fat, butter or olive oil all work well. See note below)
Salt and pepper
The Recipe
Stage 1 – Fill a large pot with water to just below the surface of the steamer basket. Heat water over high heat until steam is visible. Add the potatoes to the basket in a single layer. Cover the pot and steam for 13 minutes. Check the potatoes for doneness – you are aiming for them to be slightly al dente and they should have leached their starch to the surface, so they will feel tacky. Remove them to a plate lined with a couple of paper towels and dry. It is important that the potatoes are dry before starting stage 2.
Stage 2 – Heat a large (12 inch) skillet over medium-high heat for 5 minutes (don’t use non-stick here). Add the fat and heat over medium-high heat until it just begins to smoke. Test the heat of the fat by dipping the edge of one potato slice in the fat. If it sizzles immediately, the fat is hot enough and you can add the potatoes in a single layer. If they all won’t fit in the skillet, you can do stage 2 in multiple batches. If the fat is not hot enough, continue heating it until you can get your test to sizzle. You are really just browning/reheating the potatoes and looking to get a golden crust on each side, so you probably won’t need more than about 2 minutes of cooking time on each side, checking after 1 minute to see the progress. After both sides are browned, remove to a cooking rack or a plate with a paper towel, season with salt and pepper to taste and serve right away. It pairs nicely with this Beef Carbonnade recipe.
Your end result should look something like this. You can also get really classy and serve it in a can, like I did.
Notes
You really want the potatoes dry before putting them in the fat since hot fat + water = bad news. Your cooking time will really depend on what type of fat you use. Animal fats (butter, bacon fat, duck fat) have a lower smoke point than vegetable fats (olive oil, vegetable oil), so they will reach that stage quicker and take longer to brown the potatoes, which is why you really want to check them after about the first minute. You can actually skip stage 2 if you want and just serve the potatoes steamed. Just increase the cooking time to about 16 minutes in the steamer. This dish would also benefit from the addition of some fresh rosemary, sage or thyme.
Too bad the Mayans hadn’t actually invented this dish, they might be remembered for something other than they amazing grasp of astronomy and a faulty calendar.
I like quinoa – it is nutty, easy to cook and really healthy for you since it is a whole grain and does not contain gluten. It is also one of the oldest cultivated agricultural products on the planet. I recently served a quinoa hash as a side dish for my End of the World meal. If you need a hearty side dish or something that can be expanded to a meal and cooked in really short time, this is one for you. I got the idea from this recipe from both Modernist Cuisine at Home and Cooks Illustrated, but the recipe is pretty much my version.
The Software
½ cup red (or any type) quinoa
2 teaspoons olive oil
¾ cup stock (chicken of veggie) or water
½ can black beans (preferably low or no sodium)
2 oz. queso fresco
The Recipe
Rinse the quinoa and drain. In a medium sauce pan, heat olive oil over medium high heat until it begins to shimmer. Add the quinoa and toss to coat with the oil. Sautee the quinoa for 3-5 minutes, stirring occasionally, until golden and fragrant. If it starts to brown deeply, lower the heat to medium. Add stock to the pot and bring to a simmer. Reduce heat to low and simmer uncovered until the quinoa begins to unfurl, about 15 minutes. Drain the beans and fluff the quinoa with a fork when it is finished. Add the beans to the quinoa, taste (add salt as necessary) and let sit covered for 10 minutes. Plate and sprinkle queso fresco on top. A sprinkle of chopped cilantro would also be nice.
Notes
The quinoa can be made in advanced and reheated with the beans prior to serving. This serves as a nice base for chicken, fish, veggies, or pretty much anything that you would want to put with it. Make sure you rinse the quinoa first and drain most of the water before putting it in the oil. Rinsing it removes a naturally occurring chemical on the grain that produces bitter flavors if you make it without washing it first. Quinoa can be found at most supermarkets either in the bulk food section, the rice isle, organic section or the ethnic foods section.
Farro, or emmer as it is also known, is an ancient grain that is popular in Italian cooking and is starting to gain acceptance in the US because of its high nutritional value and diabetic friendly properties. I tend to use is as a substitute for rice and I love its nutty flavor and tend to cook it to an al dente consistency to give it some toothiness. It is a simple grain to cook and it is pretty much like cooking rice.
The Software
½ cup farro
2 cups chicken stock
1 tablespoon olive oil
Kosher salt
The Recipe
In a medium sauce pan, heat the olive oil over medium-high heat until shimmering. Add the farro and toss in the olive oil until coated. Cook over medium-high heat for about 2 minutes, stirring every 30 seconds. Add the stock and a pinch of salt and bring to a boil. Once at a boil, reduce heat to medium low and simmer covered for 30-40 minutes. Check the grain after about 25 minutes – you are looking for a consistency that is slightly chewy, but not crunchy. The farro may be cooked before it absorbs all of the liquid. If it is, drain the liquid and season as needed (a little salt and pepper usually are nice, maybe a couple of teaspoons of nice olive oil). This can be served either hot or cold.
Notes
You can replace the stock with water if you want – the stock adds flavor, but isn’t necessary. Use farro in place of brown rice as a side dish or put it cold on a salad for a nice, nutty crunch. It is also really good with some slivered almonds and dried cranberries as a side dish – just add those in once the liquid is drained and toss.
Since I now need to harvest all of my tomatoes before the cool nights cause them to split (not to mention the basil, tarragon and Vietnamese coriander), dinner pretty much every night in the Iron Chef household is going to consist of something tomatoish. A nice, quick and easy recipe is a tomato salad. It is cool and refreshing for those remaining few warm evenings and it is quick and simple if you don’t want to think about putting together something elaborate.
The Software
½ cucumber, seeds removed, cut into ¼ inch pieces
¼ cup onion, sliced thin or cut into ¼ inch pieces
¾ lb. tomatoes, cut into ½ inch pieces
1 tbsp. basil, minced
1 tbsp. extra virgin olive oil
1 ½ tsp. red wine vinegar
Salt
Pepper
The finished product in all its tomato happiness.
The Salad
Combine cucumbers, onion, tomatoes, olive oil and vinegar into a bowl. Toss to combine and let stand for 7 minutes on the counter. Add basil and salt and pepper to taste. Serve with a crusty piece of bread to soak up the juices.
Notes
That is it, quick and easy. You can skip the sitting for 7 minutes piece and serve right away, but that will mean your onions will be stronger in flavor and you won’t get the really tasty juice to soak up. You can really add anything you want to this, but in season tomatoes bring much more flavor to the party. If you are using out of season tomatoes, use balsamic vinegar instead of red wine to account for the lack of sweetness in the tomatoes. If you tomatoes are like mine, super sweet, don’t use balsamic – it will be too sweet. The recipe feeds two easily and can be scaled as much as you want.
It is summer and it is hot out, so you probably don’t feel like cooking anything in the kitchen and you don’t always have veggies that can be grilled easily. I tend to eat a lot of salad in the summer – they are quick and easy, refreshing and tasty salad greens are easily found during the summer. Another summertime treat are avocados. Mrs. Iron Chef loves them and they are very versatile. They also make a great salad dressing that is so good that you can actually use it as an accompaniment to fish, chicken or pork (and probably beef, although I have never tried it). All you need is 5 minutes, a few simple ingredients and a blender.
The Software
½ of a ripe avocado, pitted, skin removed and roughly chopped
½ cup good quality yogurt
¼ cup cilantro
¼ cup olive oil
¼ cup rice wine vinegar
Salt
Pepper
The Recipe
Take all of the ingredients except the oil and add the blender. Pulse a few times to break up the avocado and then with the blender running, add the oil slowly until the dressing comes together. Add salt and pepper to taste and you are done. Toss with salad or serve as a sauce for meat or veggies.
Notes
A clove of garlic, a squeeze of lime or a small hot pepper would also be nice in this dressing. If you would like the dressing thinner, add some water slowly to dilute until you reach the ideal consistency. This makes about 1 cup of dressing, which is a lot of a salad, but it is so good you might not end up with leftovers anyway.
Ok, so it was up against two potato salads and this dessert, and the dessert won the “winner” medal, even though the dessert wasn’t a “side dish”, which is what the medal was supposed to be for, but I’m not bitter at all, even though a dessert isn’t technically a side dish, I don’t think anyway… don’t you agree?
Seriously, the medal said “WINNER” on it.
Anyhow, here’s the chickpea salad recipe that I “borrowed” from somewhere and I can’t find the recipe again, but it’s always a hit. Even the 1,000,000 kids at the BBQ ate it, they about wiped out a big tupperware container of the stuff. (At least it seemed like 1,000,000 kids.)
I love Caesar Salad but the store bought dressings are somewhat lacking and there are too many people who are scared off from eating the real stuff due to a raw egg yolk in the dressing. I won’t go into it here as to why that is nothing to worry about, but needless to say, I wouldn’t make Caesar dressing with just any store bought egg. Alton Brown devoted an episode of Good Eats to tofu a number of years ago, which lead me to discover the Tofu Chocolate Cake, which is really an easy and wonderful dessert item. Also in this episode was a recipe for Caesar Dressing, replacing the eggs with tofu, so I decided to give it a shot. You know what, it is pretty tasty and about 100 times better than the store bought dressing.
The Software
2 ounces cubed Parmesan
2 cloves garlic
2 tablespoons Dijon mustard
11/2 teaspoons white wine vinegar
11/2 teaspoon Worcestershire sauce
Pinch kosher salt
Pinch freshly ground black pepper
1 cup silken soft tofu
2 tablespoons extra-virgin olive oil
The Dressing
Starting on the lowest speed, chop the cheese cubes in the blender jar until it settles into the bottom of the jar, gradually increasing the speed. With the blender running, add the garlic down the chute and chop until minced. This step will take 30-60 seconds, depending on your blender
Next, with the blender off, add the mustard, white wine vinegar, Worcestershire sauce, salt and pepper, and tofu to the blender and blend until smooth. While the blender is running, drizzle olive oil down the middle of the vortex that has formed. Slowly add the olive oil (can’t stress SLOWLY enough) and blend until it reaches salad-dressing consistency anywhere from 1-3 minutes. You may need a bit of extra oil, depending on how much liquid is in your tofu.
Notes
The above is the original recipe ratios, I adjusted the instructions. This dressing probably takes about 5 minutes to make. The first time I made it, I made it a couple of hours in advance and while it was very tasty It thickened considerably, so you need to bring it back to room temperature before serving it. I would actually just make it right before serving, as it is so easy to do. Taste the dressing before you serve it, I have, at times had to add more mustard or garlic or vinegar to it. The dressing could also stand the inclusion of 2 anchovy fillets, if you are so inclined.
“I am going to solve all the world’s problems with one salad dressing” –Michael Struk
Salad dressing is usually an afterthought to most people. We buy it pre-made in a jar and it is loaded with stabilizers and salt. What most people don’t realize is that salad dressing is really easy to make at home. My friend Mike adapted the below recipe from the “Le Bec Fin Cookbook”. The dressing is amazing and takes about 5 minutes to prepare.
The Software
1 1/2 cup Good Extra Virgin Olive Oil
1/2 cup Walnut Oil
1/3 cup Verjus
10 Stalks Lemon Thyme – leaves removed from stems
20 basil leaves – chopped
1 tablespoon Mayo
1 teaspoon Dijon Mustard
1/3 teaspoon granulated garlic
Salt and Pepper
The Dressing
Combine everything but the salt and pepper in a blender or food processor. Blend until combined. Taste and add salt and pepper to taste. That is it. It will take you longer to measure the ingredients than it will to put this together.
Notes
If you don’t want to go out and buy Walnut Oil, just substitute Olive Oil for it. If you don’t have Verjus (and you really should in your pantry – don’t know what Verjus is? Click here), substitute a good Red Wine or Champagne Vinegar. You should be able to find Walnut Oil and Verjus at any good specialty food store (in Seattle I would recommend DeLaurenti; over the web I would recommend chefshop.com – which conveniently also has a retail location in Seattle). This recipe produces a good amount of dressing – it can either be scaled down or put in a container and kept in the fridge for 3 days. If you want a thicker dressing, add a bit more Mayo to it.