A Couple Of Not-Pretty Baguettes

by A.J. Coltrane

A twist on a classic dough — 60% hydration, 2% salt. (300g bread flour, a scant 1/4 tsp instant yeast, overnight rise.)

141213 baguette

It’s really visible on the top loaf — I didn’t try to shape the dough much, I just divided it, rolled out the pieces on the counter, and laid them baguette pan. They got a 20 minute rise in the pan, then were slashed before they went into the oven. The bread blew out at every seam.

141213 baguette2

The bottoms expanded more than the tops. Still, they were nicely caramelized and tasty.

(450F oven, a few minutes of steam created by a small amount of water in a loaf pan in the bottom of the oven. 12 minutes, rotate 180 degrees and bake another 12 minutes.)

[Two previous attempts here. Including a cute cat pic.]

No Knead Bread — AP vs Bread Flour

by A.J. Coltrane

Last week I had an excuse to make two loaves of No Knead Bread at the same time. I thought it would be interesting to try one loaf using all AP flour, and one loaf using all Bread flour. Furthermore, I’d bake the AP loaf in a smallish dutch oven (4-1/2 quarts), and the Bread loaf in a somewhat oversized dutch oven (7 quarts). In theory the Bread flour loaf would have a stronger gluten network, have more room to expand, and end up as the bigger loaf while possessing a more open crumb.

That’s not what happened. But I did learn a couple of things along the way.

The AP flour is on the left in each photo.

Here they are after an overnight rise, the stretch and fold, and the 15 minutes of rest before they’re to go into the bowls for the final rise. Note how much shaggier the left-hand (AP) loaf looks:

AP Bread Flour 141128

I’ve read that bread flour absorbs more water than AP flour. In this case it meant that the AP dough was stickier and that handling it meant more tearing and abuse. Ultimately it led to the shaggier appearance on the left.

I think it’s pretty neat seeing the difference in absorption illustrated like that — it had always been a somewhat abstract concept to me, but there it is in practice.

That shagginess stuck around after the two-hour rise in the bowls. It looks like the Bread flour dough just wants to be more organized — it’s almost like the increased gluten in Bread flour means that it’s naturally more structured:

AP Bread Flour2 141128

The bowls were then inverted into preheated dutch ovens. I was surprised by the end result:

AP Bread Flour3 141128

The Bread flour loaf wound up much darker. That’s because it spent the uncovered part of the baking time in the hotter part of the oven. In the future I’ll want to rotate the loaves half-way through the uncovered portion of the process (instead of right after removing the lids.)

The finished loaves wound up more or less the same size. The irregularties in the AP dough manifested themselves in the final bread, allowing the loaf to expand in the oven. The Bread flour loaf was *too* regular — the crust never split on its own. In retrospect, it should have been slashed. I thought about it, but didn’t because I wanted a completely equal trial.

I’d gone to a fair amount of care to have two distinct end products. It didn’t work out that way at all, but that’s ok because I learned more in one shot than I’ve learned in a while.

[Recipe link. Or just click on the No Knead tab at the top of this page.]


The Best Zucchini Bread

by A.J. Coltrane

A recipe we got from a former co-worker of mine. It came with the title: The Best Zucchini Bread. I’ve never had better, so I’m fine with calling it that.

The software:

Bread Ingredient Measure
AP Flour 3 cup
Eggs 3
Canola/Vegetable Oil 1 cup
Brown Sugar 2 cup
Zucchini (grated) 3 cup
Chopped Nuts (optional) ½ cup
Salt 1 tsp
Baking Soda 1 tsp
Baking Powder ½ tsp
Cinnamon 3 tsp
Nutmeg ½ tsp
Vanilla 3 tsp
Topping Ingredient Measure
AP Flour 1/3 cup
Sugar 2 TBP
Brown Sugar 2 TBP
Cinnamon ½ tsp
Butter (softened) ¼ cup

The Steps:

1.  Preheat oven to 325F.

2.  Butter and flour two loaf pans.

3.  Mix the bread ingredients. Divide into the pans.

4.  Using your fingers, combine the topping ingredients. Sprinkle on the batter. Try to cover as much of the surface as possible.

5.  Bake 1 hour. The bread is done when a toothpick comes out clean.

zucchini bread

Tomato Focaccia

by A.J. Coltrane

I’ve read about a Roman bread that has tomato “painted” into the surface. (Thanks for the perfect word to describe it, Kurt.) I spent a little time looking for a picture of what I’m visualizing… I don’t know that I’ve found a “right” picture. Most of the recipes seem to include a tomato puree and/or paste within the dough. Some rub a finished bread with a cut tomato after it comes out of the oven, which I’m thinking is what I had in mind when starting this bread:

tomato focaccia 141101

The bloody end result was based around what’s become my default focaccia recipe:  300g AP Flour, 300g Bread Flour, 420g water, 36g olive oil, 14g kosher salt.  (That’s 70% hydration, 6% oil, and 2.33% salt by weight.) This time I omitted the honey, reduced the instant yeast to 3/8 teaspoon, and allowed for a 18 hour rise.

Note that it’s the same rise time, and ratio of yeast as goes into the No Knead Bread — the No Knead Bread uses 400g flour and 1/4 teaspoon of yeast.

The Tigerella tomato sauce was simmered with three smashed cloves of garlic and two thai bird chilis until fairly thick but still “drizzleable”. (We’d recently been to a cooking class where the chef used a little bit of heat to “focus” things. I think that it worked — there was just a faint hint of heat at the finish.)

The Rest Of The Recipe:

1.  Combine dough ingredients, mix on low speed for 10 minutes, and let rise 18 hours.

2.  Transfer the dough to a lightly oiled baking sheet let rise one hour. (I went with a one hour rise instead of two or three because I was looking for a denser finished product, and so that the dough would support the weight of the sauce.)

3.  Preheat oven to 425F.

4.  Drizzle on the cooled sauce. Note that a focaccia typically has olive oil on the surface. I didn’t use any oil this time.

5.  Bake for 15 minutes, turn the tray, and bake for another 12-15 minutes.

—–

I think the Reinhart book American Pie has the application I’m looking for. Maybe I’ll dig through it for the recipe. Maybe.

The GNOIF Big Sandwich Bread

by A.J. Coltrane

I’ve been making a sheet-tray sized sandwich for every GNOIF over at least the last two or three years. The bread components of those sandwiches have all been riffs on focaccia.

The most recent ratios:

Ingredient Measure Baker’s %
Flour 600g
Water 420g 70
Salt 14g 2.33
Honey 1 TBP
Instant Yeast 1.5 tsp
Olive Oil 36g 6

The “Flour” for the pictured bread is 50% Gold Medal unbleached AP flour and 50% King Arthur bread flour. I added a small amount of honey to try to improve the browning, which seemed to work ok. It’s largely the same process as “Potluck Focaccia” — I’ve settled into a preferred routine for focaccia it seems:

1.  Combine all ingredients in a mixer and combine on low speed for 10 minutes. Lightly oil a parchment lined sheet tray.
2.  Pour the dough into the sheet tray, gently coaxing the dough towards the edges of the pan. Cover and let rest 2 hours.
3.  Preheat oven to 425F.
4.  When the oven is hot, drizzle a small amount of oil on the dough. Gently coax the oil over the surface.
5.  Bake for 15 minutes, turn the tray 180 degrees and bake for another 10 minutes.

141004 focaccia

This one is roast beef and ham with swiss. The flavored mayo (which one guest mistook for mustard) included olive oil, salt, “Montreal Steak Seasoning”, and a healthy dose of horseradish. (The pungency of the horseradish is likely what crossed him up.)

There are now 14 posts that reference focaccia on CheapSeatEats. It still trails pizza, which gets at least a mention in 55 posts (though I’m sure there’s some overlap)… We clearly love us some flattish breads.


Pot Luck Focaccia

by A.J. Coltrane

Another variation on a high hydration focaccia, using this one as a jumping off point.

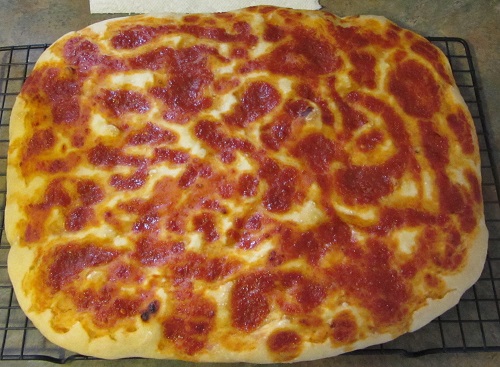
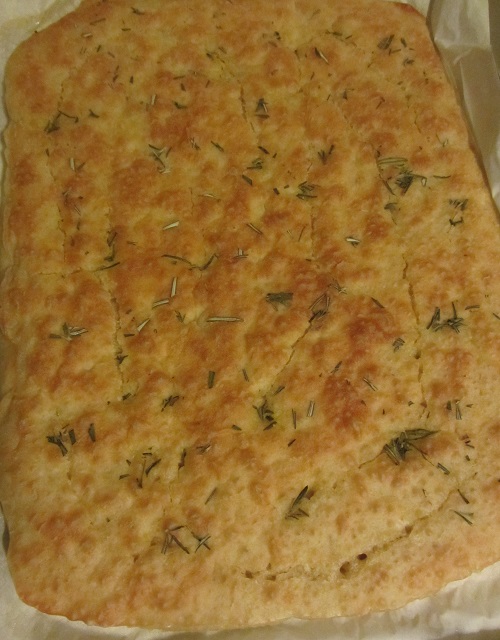
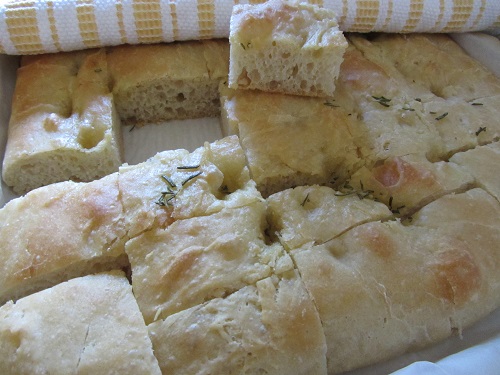
The goal this time was to make a focaccia that could stand on its own at a potluck. As compared to the linked (non-assertive) bread, this one features more salt, more oil, and the addition of rosemary to the top.

All I had in the house was AP flour. I would have preferred Bread Flour for this one, but I wasn’t going to make a trip to the store for it.

The recipe:

Ingredient Measure Baker’s %
AP Flour 500 g
Water 500 g 100
Salt 12 g 2.5
EV Olive Oil 30 g 6
Instant Yeast 1.5 tsp


1.  Combine all ingredients in a mixer and combine on low speed for 10 minutes. Lightly oil a parchment lined sheet tray.

2.  Let the dough rest for 20 minutes, then pour it into the sheet tray, gently coaxing the dough towards the edges of the pan. Cover and let rest 2 hours. Chop rosemary.

3.  Preheat oven to 425F.

4.  When the oven is hot, drizzle a small amount of oil on the dough. Sprinkle chopped rosemary on top.

5.  Bake for 15 minutes, turn the tray 180 degrees and bake for another 10 minutes.

If it’s a two-hour dough I’m always suspicious of the ability of the finished product to be interesting on it’s own. That’s not enough time for good stuff to happen, chemically speaking. On this variation I turned to the “volume knobs” of oil and salt — the oil was increased from 4% to 6%, and the salt was increased from 2% (the “standard”), up to 2.5% of the weight of the flour. The small amount of additional salt helps the bread stand up to other big flavors.

140828 focaccia

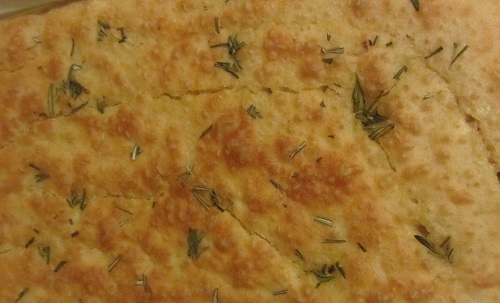
Something I ran into with both of these high-hydration doughs was that the raw doughs couldn’t support the weight of a drizzle of oil. This may be because the house was 80F+ on both attempts. Each time the top of the dough was saturated with tiny delicate bubbles. Spreading the oil around on the surfaces was out of the question. I wound up drizzling a thin stream of oil, which looks like little canals or “breaks” on the finished focaccia.
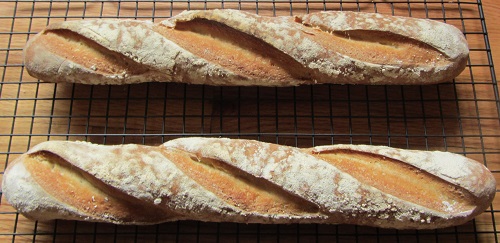
A close up:

140828 focaccia close up

(Rushed 5 a.m. photography. Not terrible, considering.)

What I think I learned:

1.   100% hydration doughs might not be the best idea when the house is over 80 degrees. Something like 75-80% hydration would have been “safer” way to go.

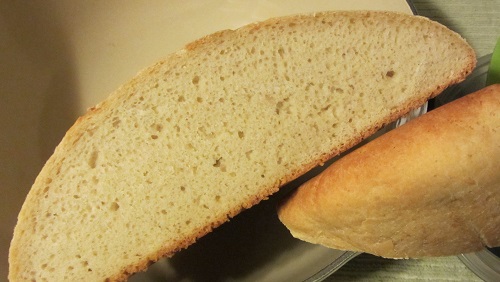
2.   The dough was basically a batter. The finished bread likely would have benefited from a pan smaller than a sheet tray. As it was, the edges were pretty thin, which could have led to uneven baking.

3.   When I initially pulled the bread out of the oven it was fairly pasty looking. At the risk of drying out the bread, I popped it back in for 4 minutes — that’s what gave it a better color.

Fortunately all of that worked out, though I had my doubts.

I think it’s time to steer back towards “sane hydration” land for a while.

Oil Instead Of Butter – Sandwich Loaf

by A.J. Coltrane

Many sandwich bread recipes call for butter, milk, and/or buttermilk. In theory this one is a little bit healthier, it uses extra virgin olive oil as the fat.

The formula:

Ingredient Measure Baker’s %
AP Flour 500g
Water 325g 65
Salt 10g 2
Olive Oil 20g 4
Instant Yeast 1.5 tsp

It’s basically the same formula as this recent focaccia. The only real difference is that it uses 65% hydration rather than 75%.

The mixture was kneaded for 8 minutes. A small amount of oil was added to coat the mixing bowl, then the dough was allowed to rest for two hours. From there it’s mostly the No Knead Bread recipe — place a 5 quart dutch oven into the real oven and preheat to 425F (No Knead bread is cooked at 450F). Turn the dough out into the dutch oven. Bake, covered for 20 minutes, uncover and cook for another 20 minutes. Cool on a wire rack.

140824 sandwich bread

Crusty but not too crusty. Chewy but not too chewy. It retains the sandwich ingredients without leaking or falling to pieces. A perfectly fine sandwich bread.

Rosemary Focaccia

by A.J. Coltrane

Another focaccia. I was happy with the crumb on this one.

140628 rosemary focaccia

The recipe:

Ingredients-

600 g King Arthur bread Flour

480g water (80% hydration)

15g salt (2.5%)

1.5 tsp instant yeast

1/2 cup total olive oil warmed in a skillet with rosemary. Let the oil cool. Strain out the fried rosemary. 42g oil goes in the dough (7% of the flour by weight). Reserve the remaining ~30g for the bottom and top of the focaccia.

The Process-

1.  Mix ingredients (except the “top and bottom oil”) on low speed for 12 minutes. Let rise 1 hour. Spread ~2 tsp of the olive oil onto a parchment covered sheet tray.

2  Mince a little more rosemary for the top of the dough. Toss this in with the reserved olive oil so that they can hang out a while.

3.  Move dough to the sheet tray, let rise 1.5 hours, covered with another inverted tray. (This is easier if you first dip a spatula and/or your fingers into the reserved oil. The dough will be very sticky.)

3.  Just before the dough is to go into the oven, top with the reserved oil/rosemary.

3.  Preheat oven to 425F. Bake 12 minutes, turn the sheet tray around and bake another 12 minutes.

4.  Previous attempt is here. Also here, here, here, and here. It seems I like making focaccia.

——-

I’m guessing that the crumb came out better than usual because:

A)  I used only 7% oil inside the dough, and a light hand was used with the oil on top. Historically it’s been 8-10% oil within the dough.

B)  The 1 hour initial rise before placing the dough into the sheet tray.

C)  It was warm in the house.

———

If I were to try it again I’d take it a little easier on the rosemary — maybe not warm as much rosemary in the oil, or not leave it in for quite as long.

The Right Tool For Slashing Bread Dough — II

by A.J. Coltrane

Previous post here. It seems I revisit this “problem” periodically.

For reference, the last attempt:

I took the picture on the floor because that was the best light at that hour. Naturally, it drew some interest.

And today’s:

140609 bread

The Differences:

1.  Fewer slashes on this attempt. The slashes were more “lengthwise” and less “across”.

2.  The slashes were at a slight angle to the dough. Maybe 30-45 degrees or so. Last time they were perpendicular to the countertop.

3.  Prior to this attempt I reread an earlier CSE post. In that post I noted that I’d read that it was best to keep the slashes in the middle 3rd of the dough. (In other words, I tried to not slash all the way to the edges of the dough this time.) The real advantage of documenting this stuff is the searchable notes.

4.  The breads received less steam on this attempt, resulting in darker loaves and a thicker crust — they got steam for 5 minutes rather than 10 minutes. The steam was in the form of a small amount of water in a roasting pan underneath the loaves. [For reference:  450 degrees. 5 minutes with steam, 10 minutes without steam, then turn the loaves around and bake for another 10 minutes. 25 minutes total.]

In any event, I think that this time they were way closer to what I have in mind as “correct”.