Focaccia, And The Twelve Steps Of Bread Baking Reduced To Four Activities

-A.J.

Authors write about “Twelve Steps” (or more) to baking bread, which sounds like a lot of processes:

  1. Scaling
  2. Mixing
  3. Bulk or Primary Fermentation
  4. Folding/Degassing
  5. Dividing/Scaling
  6. Pre-shaping
  7. Bench Rest
  8. Shaping/Panning
  9. Proofing/Final Fermentation
  10. Baking
  11. Cooling
  12. Storage/Eat


I “simplify” it in my head into four groups of “Activities”:

  1. Scaling
  2. Mixing
  3. Bulk or Primary Fermentation
  1. Folding/Degassing
  2. Dividing/Scaling
  3. Pre-shaping
  4. Bench Rest
  1. Shaping/Panning
  2. Proofing/Final Fermentation
  1. Baking
  2. Cooling
  3. Storage/Eat


At the end of each Activity there’s a natural rest break.


In effect then, Twelve Steps become Four Activities:

  1. Weigh and mix the dough, and let rest.
  2. Divide and shape the dough, and let rest.
  3. Shape/pan the dough, and let rest.
  4. Bake, cool, and eat.


That sounds pretty manageable, doesn’t it? If you don’t count the baking step it’s only three Activities. Easy.

I bring all this up because I’d gotten into the habit of skipping Activity #2 when making focaccia. I’d mix, then coax the loose dough into a parchment-lined tray, allowing for one rise in the tray.

And that was fine, sort of. The focaccia were well-received, though I thought they had the potential to be better. As it turns out, if you don’t skip an Activity that people having been doing for thousands of years the results improve! Behold the power of trial and error!

A two-pound focaccia from Easter dinner:

Cell phone pic, not color-adjusted.

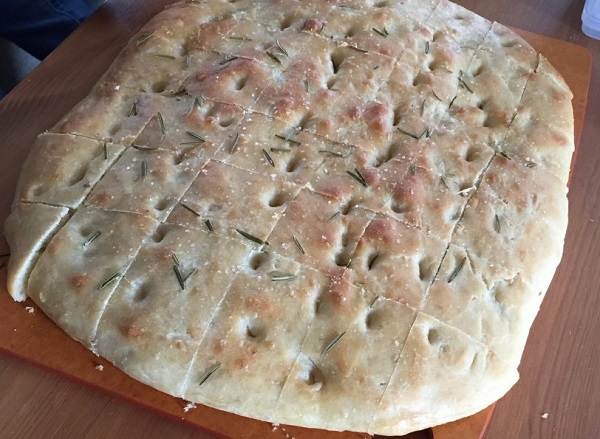
A one-pound focaccia we ate with dinner last night:

170422 focaccia

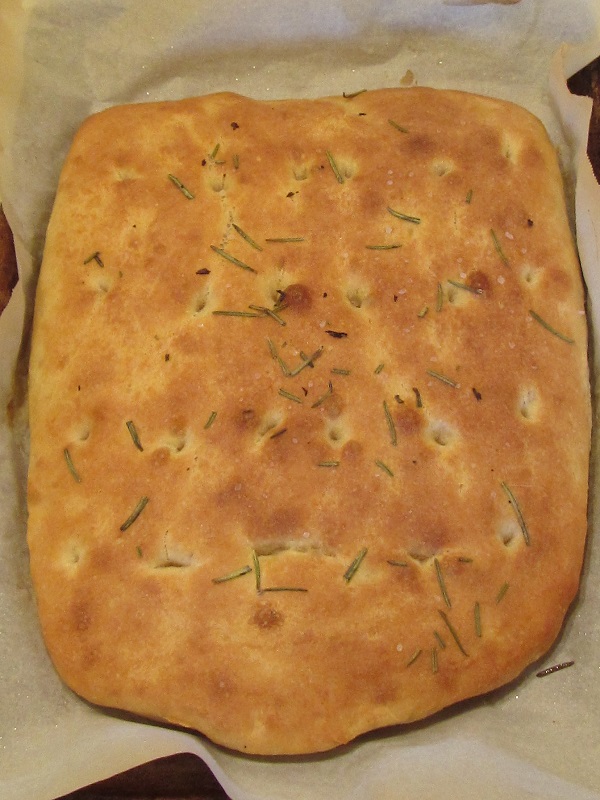
Re-introducing the initial bulk fermentation gives a better crumb structure — the bread becomes more airy, with uniform bubbles throughout. I think that’s partly because the extra rest and handling means that the bubbles get redistributed more evenly. I’ve cut back on the oil too. The end result is a lighter, less oily focaccia.

Both breads:  70% hydration, 6% oil, 2% salt (not counting the pink salt), about 1% diastatic malt, baked at 425F for 24 minutes.

————————

Here’s a Cheap Seat Eats post from January of 2016 talking about a good result due to allowing for an initial 30-minute rise before transferring the dough to the tray. Which means I’ve re-re-learned something. That’s good, right? The biggest difference between that one and these two is that the oil percent for these two were 6% rather than the 3% in the 2016 post. That, and I allowed for a 30-minute pre-ferment in 2016. These two got ~1 hour.

A 100% hydration, 6% oil focaccia, August 2014.

Another 100% hydration, 4% oil focaccia, August 2014. 20-minute rest. Note the somewhat irregular hole structure.

80% hydration, 7% oil, September 2014. 1-hour rest.

70% hydration, 3% oil, December 2015. 1-hour rest. The crumb structure looks fairly tight, though that might just be the photo. It was served with stew, so I might have been targeting that result.

75% hydration, 8% oil, January 2014, topped with onions. No rest. The color isn’t very deep in the photo.

113% hydration, 9% oil, May 2013. 4-hour rest. Beranbaum’s recipe.

——————–

For a good, brief description of the Steps see this Reddit post.


The First Asparagus

-A.J.

The first asparagus to come up this spring! Given it was only planted last year, that makes it the first asparagus ever!

170406 asparagus

Talking to another local who grows asparagus, I thought we might have to wait until closer to the end of the month to see some shoots. Nope!

Last year we planted asparagus in three different areas of the back yard. The thinking was that they’d likely do better in some places and worse in others. Depending upon how many survived the winter we could try to consolidate the plots into the best spot. Also, if we did lose a few to the wet and cold it might not be terrible, since they may have been over-crowded in the first place. More elbow room might be a good thing!… Or they were going to be fine all along as is… Hard to say.

Of course, this all means that our first real harvest is a year away..

Buttery Cheesy Breadsticks

-A.J.

Buttery Cheesy Breadsticks:

170326 breadsticks

These don’t skimp on the butter or the cheese — the butter weight is 25% of the flour weight.

The recipe:  600 g AP Flour, 150 g room temperature butter, 300 g refrigerator water, 12 g kosher salt, 1 tsp instant yeast. (1+ cup of Grated Pamesan is applied to the dough sheet in step 5, below.)

  1.  Add the flour to the work bowl of the mixer. Add the butter and break it up into the flour with your fingers.
  2.  Add the other ingredients (except the Parmesan) and mix on low speed for 8 minutes.
  3.  Refrigerate, covered, for 1-3 days.
  4.  Preheat the oven to 400 F.
  5.  Roll out the dough on parchment paper to 1/4″ – 1/2″ thick. It should come out to a rectangle around 10″ x 15″. The parchment paper will make it easier peel up the dough in step 8.
  6.  Spread the grated Parmesan evenly over the dough rectangle. Use a rolling pin to sort of mash it into the surface of the dough.
  7.  Using a pizza cutter, slice the dough across the short dimension into pieces 1/2″ wide and 10″ long.
  8.  Twist the individual slices and place on Silpat lined baking sheets. I was able to fit these onto two baking sheets.
  9.  Let rest, covered, for 15 minutes.
  10.  Bake for 20 minutes at 400 F.
  11.  Let cool on a cooling rack.

The finished weight of the breadsticks is somewhere North of two pounds — seven people wiped these out in no time. The nice thing about this recipe is that it will hold in the refrigerator for a few days, then be ready to eat in about an hour.

I’ll be making these again. They were a big hit.

The Salad Table Wears Trellis Bling, Or, More Posts Obliquely About Peas

-A.J.

Each year when we grow peas I push some stakes into the ground and add trellis netting. It never looks awesome. The peas usually do well until the sunny days kick in. At that point their pots dry out quickly and the peas suffer.

Attaching the trellis assembly to the salad table is an attempt to address those issues:

170303 trellis salad table

It’s the same Ultomato stakes and netting that was used last year. The netting just happened to almost perfectly wrap around the North and East sides of the newly seeded salad table. I used cable ties to attach the stakes to the table. Quick and easy.

It’s a sturdier build than just pushing the stakes into the ground. As an added bonus, the pea pots are spread around the shady sides of the salad table. They should be relatively protected from the sun, and therefore cooler.

Here’s the line of pots on the North side of the table:

170303 peas from the back

Once they get a bit taller the plants will poke out above the salad table. That’s the theory anyway.

All in all, combining the trellis with the salad table makes for a cleaner and more compact solution, and the peas aren’t as crowded this year. Hopefully it works out great.

————-

Two other thoughts:

We’re getting a lot of mileage out of the pea trellis.  Here it is stuck into the soil at the edge of the walkway almost one year ago. After the peas were done we attached it to the lemon cucumber trellis for extra support.

The clamp light rig seems to keep the soil near the lights around 78F. No need for a heat mat. The other good thing is that the clamps can be attached to the top bar and pivoted to face downward. Lots of room for vertical growth:

170303 lights


No more posts about peas in the immediate future. Probably.

———–

Finally, one inspiration for the title of this post — From the album More Songs About Buildings And Food; Talking Heads version of Take Me To The River:


The Peas, Nine Days Later

-A.J.

The peas nine days later:

170224 peas

Crazy, huh? They’ve spouted and grown between 6 and 10 inches tall in just over a week. If you look closely you can see the roots poking out of the bottom of the rolls. (The empty looking pots have recently planted dill and cilantro seeds. They should make an appearance sometime in the next week or so.)

Today was their first day with time outside. I left them outside for a couple of hours after work. The temperature was in the mid-forty degree range, and I didn’t think it’d whack the peas.

Hopefully the weather will be decent enough in the next few days to plant them outside. The forecast calls for night-time temperatures in the 20’s tonight and in the 30’s until Wednesday, possibly with some snow mixed in. We may just have to take our chances, since I don’t think the peas will fit in the current setup for another week — they’ve already grown almost to the top of the lighting rig.

That, and the toilet paper rolls are really beginning to show some mold. My inclination right now is not to use toilet paper rolls the next time around and instead use some of the reusable plastic “pots” we’ve gotten from nurseries over the years.

Previous “toilet paper pots” post here.


Starting Seeds In Toilet Paper Roll “Pots”, And The Improved Lighting Rig

-A.J.

Over the winter I came across a blog post that recommended using emptied toilet paper rolls as mini pots for starting seeds. It looked neat, clean, and easy, and it seemed like a great way to use up a free resource. The author simply cut the tubes in half, placed the smooth (uncut) side down in a baking dish, and filled the tubes to 1″ from the top with damp soil. Seeds were placed on the soil and buried to the appropriate depth.

I could have been neater about it — here’s what I wound up with when I planted peas:

170215 rolls

When I added a little water many of the rolls immediately  began to unravel. Right now I think they have enough integrity that when the seeds sprout I’ll still be able to plant the plugs without too much drama. As it is, added water needs to go on the bottom of the dish, otherwise all the soil would wash out of the tubes.

I also did some tweaking on the lighting rig. It’s now smaller, at about 20″ x 8″:

170215 seed rig

The lights are now nearly touching each other, and the light is much more concentrated. The lights themselves are around 1-1/2″ above the soil. It’s very bright, if only in a small space of 16″ x 8″. That’s enough room for direct light on about 15 paper roll tubes. The dish could probably hold 25 tubes or so. It seems like a good compromise that doesn’t totally dominate the counter top.

The first time I tried the lighting rig (version 1.0) most of the plants wound up leggy, partly because the lights were a ways apart, and (I think) partly because I needed to leave the lights on for more hours than I did. This time I’m targeting ~16 hours a day. 16-18 hours seems to be the consensus on the interweb. We’ll see. Assuming this works we’ll start beans and Brussel Sprouts the same way in a couple of months.

New Seeds For 2017

-A.J.

Last year’s post was titled “Too Many Seeds, Probably“. While we did manage to use up some of the inventory, not everything was consumed. Still, I wanted to try some new things. The list:

SP783/L Escalade Spinach Organic – Escalade
HR1114/L Garlic Chives-Nira Organic – Nira Garlic Chives Organic 1/2 gram
ON557/S Guardsman Onion – Guardsman Onion Seeds
OV580/S Joi Choi Pac Choi – Joi Choi Pac Choi Seeds
BN039/S Maxibel Bean – Maxibel Bean Seeds
BN062/L Midori Giant Bean Organic – Midori Giant Bean Seeds Organic

The left column is the Territorial Seed catalog number. The thinking behind the “new stuff” –

Escalade Spinach Organic:  We used up the last of the spinach packets, so it was time for more.

Garlic Chives-Nira Organic:  Rick Bayless loves garlic chives, and it sounds like something we’ll love too. As an added bonus, slugs don’t mess with alliums. We should be able to seed them about “wherever” and have success. (Rick grills them. He then dices the garlic chives and adds them to many different dishes.)

Guardsman Onion:  Replenishing the scallion supply. We planted the last of these seeds in the fall.

Joi Choi Pac Choi:  A Chinese Cabbage variety that’s supposed to grow faster and be more bolt resistant than regular Bok Choi. We’ll see. Because it’s a Brassica the cabbage moths and aphids will come after them. We’ll likely grow the Joi Choi with Brussels Sprouts, cover all of it with tulle, and dose with Neem Oil (wikipedia link). In theory that should work to keep the bug population down. In theory.

Maxibel Bean:  A french/filet bean. Think Haricot Vert. The slugs may like these too much to be worthwhile. I figure we can try them in a few locations and see what shakes out. No trellising required. So long as the slugs don’t decimate the plants we should get something. Super fresh Haricot Verts have the potential to be awesome.

Territorial Seed Company picture.

Midori Giant Bean:  An extra-early maturing Edamame. I love Edamame. No trellising(!)

————–

I see now that everything that’s really “new” is either indestructible or potential slug/pest bait. So it goes. We’ll know how effective Neem Oil is by the end of the season.


A Crackly “Bar Pie”, Sorta

-A.J.

I recently came across The Pizza Show (Vice Network, part of their MUNCHIES series). It’s a fun and informative show, and it’s less.. guarded than the programming on some of the other networks — it’s more relaxed and it seems less scripted and far less premeditated. Recommended.

The show featured a “bar pie” at one point. A “bar pie” has a thin, crackly crust and is traditionally square cut. (As opposed to the triangular slices seen on most pizzas.)

Which inspired this:

170111 bar pie

There’s no red sauce, so I’m hesitant to call it a pizza — it’s really more of a flatbread thing. It came out nice and crispy/crackly. The toppings are spicy salami, pesto, and feta.

As I’ve “discovered” over the years, it’s important not to work the dough too much when the target is a crispy or crackly end result. Working the dough encourages gluten development, which is the arch-enemy of crispy. (Digression:  Perhaps not surprisingly there’s a Queensryche-meets-death-metal band called Arch Enemy. Meh. Nothing new to see here, other than the female lead singer doing death shouts. I’m guessing that’s the “hook”. (YouTube link))

The recipe:

  1.  Combine 300g AP flour, 180g water (60% of the flour weight), 6g kosher salt (2%), 12g olive oil (4%), and 1 tsp yeast in the mixer.
  2.  Mix for 6 minutes.
  3.  Stretch and fold the dough (once from each direction).
  4.  Lightly oil the mixing bowl. Rub the dough ball around in the oil in the bowl. Cover and let rise 90 minutes.
  5.  Preheat the oven to 500F for at least 30 minutes prior to baking.
  6.  Roll the dough out to about 1/4″ thick. The diameter will be around 12″. Transfer to a baking sheet and let rest 10 minutes.
  7.  Dock everywhere except the edges of the flatbread pizza with a fork. Brush the edges with olive oil. Top with the salami.
  8.  Bake for 8 minutes. Top with the feta.
  9.  Bake for 5 minutes. Remove the pizza from the oven and let rest a minute or two.
  10.  Dollop pesto over the top of the pizza.
  11.  Eat.

—————

For posterity —  The first pass at Hamelman’s Pain Rustique. It could have gone better in a number of ways. The fatal issue was that it was vaguely underbaked.

And all of the other problems were caused by some variety of user error:

170111 Pain Rustique


Epi de Blé at the Annual Lasagna Party

-A.J.

Epi Bread makes an appearance at the Iron Chef Leftover Annual Lasagna Party (cell phone pic):

161224-epi-bread

I feel like everything came together pretty well this time around. The color was better than usual due to the addition of egg wash — two eggs were beaten then strained and brushed onto the doughs before the doughs were cut into the Epi shape. The egg wash created more contrast between the light and dark parts.

Each individual Epi was around 15″ long. The finished weight of all of the breads put together was around five pounds.

As far as the actual “mechanics”:

Each “batch” was three breads at 150 grams of flour each.

This time around I used a refrigerated “Poolish” (preferment) that I started on the 22nd — two days before the event. I went with a refrigerated Poolish because on the 22nd we weren’t sure we were going to be able to make it to the event, and I could bake the dough on the 25th if we missed out on lasagna.

To make one batch of Poolish combine 150 grams of bread flour, 150 grams of refrigerated water, and a pinch of instant yeast. Mix on low speed for 8 minutes. Cover. It can be refrigerated for up to three days with no real loss in quality.

(I did all three batches together (900 grams total), then divided it out into three – 300 gram units on baking day.)

On baking day combine in the mixer one batch of Poolish with 300 grams of bread flour, 120 grams water, 9 grams of salt, 1/3 stick unsalted butter (36 grams), and 1 teaspoon of instant yeast. Mix for eight minutes. Hand knead a little if the dough looks rough. Let rest, covered for 20 minutes.

Divide into three pieces and roll each piece into a baguette shape that will fit lengthwise into a Silpat-lined sheet tray. Cover and let rise two hours.

Brush each baguette with (beaten and strained) egg wash. Using scissors, cut the breads and lay the cut segments off to the sides for the finished Epi shape.

Bake at 460F for 22 minutes. Carefully remove to a cooling rack. (I used tongs to slide the Silpat out of the sheet tray, then slipped the Epis off of the Silpat.)

The addition of butter to the recipe made the finished product a little richer and dinner-roll like. The Epi shape made it easy to cut or break off pieces, and increased the total amount of “browned goodness” surface area. I’d like to think those decisions helped the breads fit in with the rest of the meal. Nobody complained.

[Total recipe in Baker’s Percentage is 60% hydration, 8% butter, 2% salt, yeast.   Or:  450g bread flour, 270g water, 36g butter, 9g salt, yeast.]


Flat Bread “Pizza”

-A.J.

I’ve been experimenting more with the pizza stone lately, trying to get more comfortable with it. (Most recently, these hearth breads.) It’s definitely a better cold weather activity, when the kitchen and house can use the heat from the oven.

For reference, the pictured flatbread is about 12″ across.

161216-flat-bread-pizza

One “trick” that I noticed making this Flat Bread “Pizza” is that if I lightly dust the counter with flour before rolling out the dough then that little bit of flour seems to help keep the dough from sticking to the pizza peel when it comes time to slide the dough into the oven — the dusting of flour removes some of the tackiness from the bottom of the dough. As an added benefit, the pizza peel then requires less corn meal for slipperiness, so I’m less likely to set off the smoke detector with burning corn meal. Win-win!

Not exactly a “Eureka” moment, but I’ll gladly take any new nuances like that one.

During the initial bake this flatbread had only a bit of oil and a couple of thinly sliced shallots as toppings. By the five minute mark it had poofed to between 3″ and 5″ high in places, so I stabbed it with a knife a few times and beat back the bubbles. The herbed goat cheese was added at the ten minute mark and the flatbread was allowed to cook for another five minutes. (15 minutes all total.)

The crust came out nice and crunchy — in places the crust was separated from the top by big bubbles. I was very happy with the texture overall.

—————————-

300g bread flour, 190g room-temperature water (63% hydration), 7g salt, 1 TBP “Italian Seasoning”, 1 tsp instant yeast, 1/4 tsp diastatic malt.

Mix on low speed for 8 minutes. Let rise one hour. Stretch and fold the dough. Let rise one hour.

Preheat oven and stone to 500F, 30 minutes prior to baking. Roll out the dough to ~12″ across. Bake for 10 minutes, top with cheese and bake for another five minutes.


I think the stretch and fold definitely encourages the “poofiness”.