King Arthur Baking Dutch Oven Dinner Rolls. Recipe is here
2025 Thanksgiving modifications:
All of the water (227g) , milk powder (28g), 70g whole wheat flour (Sonora White), 157g AP flour, and a tiny tiny pinch of active dry yeast were combined into a poolish, covered, and refrigerated for 2 days. I also removed the butter from the refrigerator at that time to ensure it was room temperature when needed.
About 4-5 hours before time to bake, combine the rest of the ingredients (including the remaining 127g AP flour) and mix until a smooth ball of formed.
The recipe calls for a total of 350g flour, one half AP and one half whole wheat. I used 20% of the total flour weight as fresh milled Sonora White flour.
The rest of the recipe was used as directed except that I baked 10 minutes covered and 13 minutes uncovered. I have found that 15 covered and 10 uncovered leaves the tops relatively light.
The poolish and Sonora White combined nicely to make smooth but interesting on their own dinner rolls.
We cut back on the 2026 garden for a variety of reasons. One of the reasons is the yield is declining every year.
Mid-morning picture taken before the sun has come over the house, facing west.
That yellow tree was planted shortly after we moved in. The garden is in the back of the house facing west, and the sun sets through that gap between the trees, mostly on to the left, which is south. Very conservatively I think it’s reduced the amount of direct sunlight on the garden by at least 30%.
For our 2025 garden we’re growing basil, Oregon Spring tomatoes, and cucumbers. We just harvested the first ripe tomatoes. The basil has been doing fine. We’ve also gotten a decent numbers of cucumbers from two plants, though the cucumbers are now mostly done for the year. To be fair, we started a little late this year, so that could be contributing to the somewhat late harvest.
Going forward, I think we’ll continue with a more limited garden, at least so long as we eat the output. If I get excited or have extra time available maybe we’ll try growing something in the front of the house on a limited scale — there’s not much space without tearing up the yard. Alternately we’ll go all-in, pull out a few shrubs, and tuck a long skinny greenhouse up against the front of the house.
On the other hand — we have a big yard for suburbia, so as I age I may also decide the yard is plenty of work as is. One of our older neighbors moved out a few years ago and he said at the time that the yard and house was too much for him to maintain. We’ll see how it goes.
My current favorite sandwich bread using Bread Flour, Rogue de Bordeaux flour, and sourdough discard. The recipe is easy:
600 grams flour total:
350 grams King Arthur bread flour (58% of the flour weight)
200 grams Rogue de Bordeaux flour (33%)
100 grams sourdough discard (50 grams flour (8% of the flour weight)/ 50 grams water)
370 grams room temperature water (with the water from the sourdough the total hydration is 70%)
12 grams extra-virgin olive oil (2% of flour weight)
12 grams kosher salt (2% of flour weight)
1 tsp instant (not rapid rise) yeast
Combine all ingredients in a mixer and mix on low speed for 8 minutes. Lightly spray a Pullman Pan and move the dough to the Pullman Pan, patting it down and spreading to the ends. Cover and let rise until the dough is 1″ from the top of the pan. Preheat oven to 350F.
Bake covered 30 minutes, then remove the cover and bake an additional 25 minutes. De-pan to a cooling rack.
1/3 of the flour by weight is the Rogue de Bordeaux. This seems to be a good ratio of whole wheat to regular bread flour. The bread has good structure. The Rogue de Bordeaux adds a lot of the flavor and cinnamon and baking spices. One neat thing is that it highlights different flavors in the sandwich depending upon the ingredients.
The Pullman Pan works well for the relatively extensible Rogue de Bordeaux. Using wet hands for all handling helps a lot.
A friend of mine expressed interest in a recipe for a gluten-free flatbread, since they weren’t happy with any of the pre-made mixes they’d tried. That sparked my interest too — and I spent a bunch of hours digging around forums and websites looking for commonalities and differences among the recipes I could find.
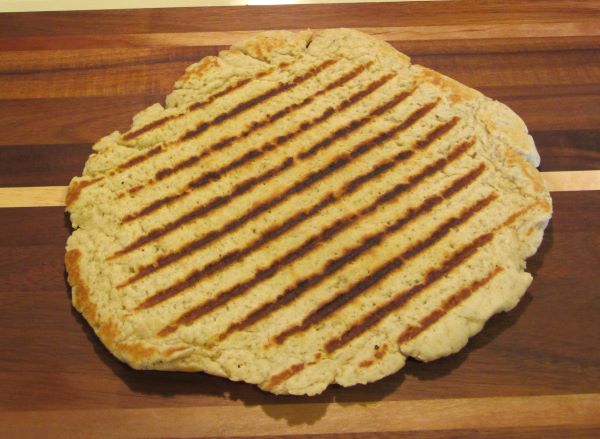
This recipe makes a flatbread that just fits into our grill pan. When the flatbread comes out of the grill pan it’s flexible — to make it crispy on the bottom put the finished bread onto a pizza stone at 450F for 2-3 minutes. The oven is also a good way to warm up any desired toppings.
I’ll post some other thoughts towards the bottom of the post.
The Recipe:
Wet Ingredients:
110g lukewarm warm (~100F)
40g milk powder
8g psyllium husk
10g extra virgin olive oil
Dry Ingredients:
65g Super Fine Brown Rice Flour
20g Tapioca Starch/Flour (same thing)
10g Corn Starch
5g Potato Starch
4g Baking Powder
3g Kosher Salt or Sea Salt
The steps:
Add the lukewarm water to a mixing bowl. Add the powdered milk and whisk to combine.
Add the psyllium husk and whisk to combine. Let rest a few minutes to let the psyllium husk hydrate.
In a separate bowl combine all of the dry ingredients and stir to distribute.
Add the olive oil to the wet, now viscous milk mixture. Whisk to combine.
Add the dry ingredients to the wet ingredients. Starting with a spoon or spatula mix to combine.
“Knead” and press the mixture until it becomes the texture of masa. I use my knuckles to fold and press the dough into the leftover dry bits until it’s completely combined.
Preheat a pan to medium-high. I use the same temperature that I use for hashbrowns. I want brown but not charred.
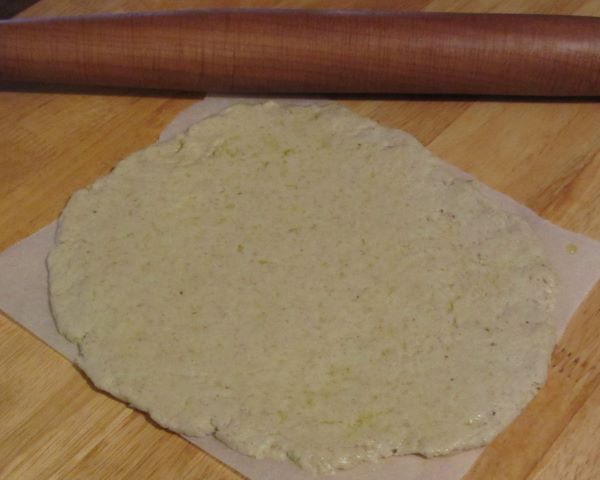
Cut a piece of parchment to the same size as the pan. Mine is 8″ x 8″.
Oil the parchment and roll out the dough to 1/4″ thick. (picture below)
Oil the top of the dough.
When the pan is up to temperature, invert the dough/parchment onto the pan and peel away the parchment paper. Add more oil to the top if it looks dry.
Bake 3 minutes on side one, then flip and bake on side two another 2-3 minutes. I use two spatulas to flip to try to make sure the bread doesn’t break.
At this point the dough can be topped and reheated in the oven.
For pretty edges, trim the outside with a knife or pizza cutter. I’m always ok with rustic.
When creating the recipe I wanted to pin-down at least one variable. I decided that 100g of flour + starches would fit pretty well in the pan so that became the “base”. The end result is (65g brown rice + 35g total starches = 100g). More notes on that ratio below. Once I settled on the dry weight only the wet weight required adjusting.
The tapioca / corn starch / potato starch ratio was partly inspired by a forum post on pizzamaking.com, and partly because I was targeting a particular mouthfeel and taste in combination. Every starch has a “signature” taste and mouthfeel, I tried to avoid using too much of anything so that when people eat it they won’t say “that’s tapioca”, or “that’s corn starch”. I started with way too much potato starch, which has a pleasant taste, but too much and it becomes dense and “potatoey”.
Flexible when it comes out of the pan.
Some other commonalities among gluten-free baking recipes, broadly:
2% salt by weight is a very normal amount in all bread baking. This becomes 3g in the recipe above due to all the other stuff in addition to the 100g of flour and starch.
4% baking powder by weight is normal. This one took a little more digging since almost without exception people use volumetric measures.
For gluten-free flatbreads the ratio of flour to starch varies quite a bit but often lands around 2 flour to 1 starch by weight. Water tends to be around the same weight as the combined weight of the flour and starch. “Regular gluten-free breads” tend to be more around 1:1 flour:starch by weight.
One other thing I learned that I didn’t know going in, was that the potential ingredients/exchanges can vary a lot in weight, given the same volume. I always bake with metric weights, so changing one component for another was pretty simple, and I usually didn’t have to mess with the amount of liquid required to get a similar dough ball.
More so than in “regular” (gluten) bread baking, substituting anything will make for a different, or very very different end result. The ingredients themselves have different tastes, or they hydrate differently, or they give a different mouthfeel. I know that this recipe gives consistently pleasing results. Changing anything will basically make it a different recipe. It may still have a good taste and texture, it’ll just be different, and using a substitution may require more fiddling to make it work.
Finally: The most obvious way that this recipe differs from pre-made mixes is it uses psyllium husk rather than xanthan gum, or guar gum. I think the reason so many mixes contain xanthan gum, and by extension so many people include it in their recipes is this: It doesn’t require a separate hydration step and it can be bagged and shipped together with the rest of the pre-made mix. I feel like Xanthan gum has its places but psyllium husk was the better choice for this recipe.
We recently had the opportunity to attend the Salt Blade speaker series at Eight Bells winery. Events like these are always informative – people devote their lives to making good wine and good charcuterie, so they know a million times more about the subject than we do, and they’re happy to describe they whys and hows of what they’re doing in detail.
This event included wine with charcuterie pairings. The menu:
Our somewhat wrinkled menu. No wine or sausage stains though. We had two menus and this one gets the picture.
We were served the Rosé as a warmup. After some introduction from the principles, it led into the first pairing with Salt Blade’s Orange and Coriander stick. The Orange and Coriander is among Salt Blade’s best sellers, and for good reason, it has a universal appeal. The Rosé served as a great opener and it was a good marriage with the charcuterie.
Eight Bells and Salt Blade have done pairing sessions before. Some of the pairings were repeats from past events. One of the new pairings was Sangiovese with the Spring Lamb, which we thought was perfect. The Merlot with the Seattle Stick was pretty flawless as well. I like spicy, so I especially enjoyed the Southern Voyage with Sopressata.
There was further presentation throughout the pairings intermixed with Q+A about both the wine and the charcuterie. The doors were open and it was a beautiful spring night. We purchased more than a few things so that we can share some of our favorites with our friends. Thanks to everyone for a nice evening-
A few months ago I decided to begin maintaining a starter. To that point I’d avoided it, partly because I didn’t want Another Living Thing to maintain, partly because the idea of throwing away starter seemed wasteful, and partly because it just felt like it was going to be a messy and unnecessary hassle.
Hanging with the salsa.
The flip side of maintaining a starter would be that it would allow for more interesting things to try with breadmaking. It would also add another “color” to my available “palette”. The end product could be better tasting, better for us, and keep longer before spoilage. Ultimately I read enough intriguing starter-based recipes that I decided to give maintaining a starter a try so I took the leap.
I wanted a starter recipe that wouldn’t consume or waste much flour. I also wanted a starter recipe I could mostly ignore after it was finished. I settled on Ken Forkish’s Levain recipe from Evolutions In Bread. The entire process requires one week and 550 grams of flour.
Creating the starter is pretty simple really. Weigh the container and write that number down. Every 24 hours some amount (by weight) of the contents of the jar will be discarded and then the container will be fed a small amount of fresh water and flour. I made the decision ahead of time to mill all of the whole wheat flour I was going to need, 250 grams total. That way I wasn’t getting the mill out for the first few days when it was time to discard and feed. The process felt very easy and pretty bulletproof — I think that fresh milled whole wheat contains enough nutrients and enough bacteria/enzymes/assorted microbes and whatnot that kicking off the new tiny ecosystem basically took care of itself.
The recipe it calls for 250 grams of starter as the end product. I “shorted” the final feeding and I didn’t see any adverse effect. I did that because I wanted to be able to pull a smaller amount out of the jar each week and still keep things fresh and lively with smaller feedings. If I want to build up a large quantity of starter it takes a little longer but I’m fine with that.
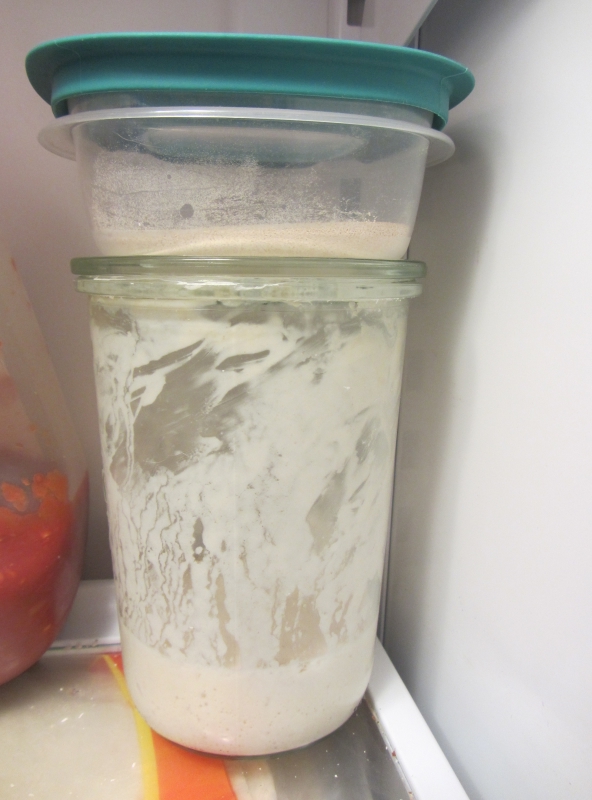
I maintain 150 grams of starter in a 393 gram jar (weighed with no lid). Each week I take a small spatula and scrape/pour out 100 grams for bread baking. I then add 50 grams of bottled water and 50 grams of bread flour to the container, scrape down the sides, and stir it up. I put the lid back on and let it sit on the counter for 1-2 hours, until it starts to show some signs of life. Then it goes into the back corner of the refrigerator for another week. I store yeast in a tupperware-type container on top of the starter. Everything is in one place and ideally staying fairly cold.
As for the container – it became clear pretty quickly that straight sides are a good thing and a threaded jar is a bad thing. Straight sides because it’s much easier to get into and scrape down the jar when there’s no “neck”. Threads just gather crud and rapidly clog. I purchased a 6-pack of the Weck 743 jars and split it with a friend who was also making a new starter. (At the time the total cost was ~$6.50 per jar for six.) I use them without the gasket. They’re nice somewhat heavy jars made of thick glass. The lid just sits on top and it’s plenty secure.
Final thought: Evolutions in Bread is a great book. Highly recommended.
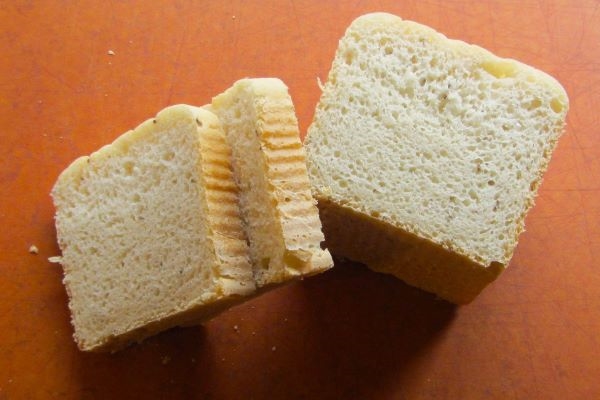
This week’s sandwich loaf steers back towards “normal”. It includes a bit of sourdough starter, caraway, and milk powder. The caraway is the most obvious flavor.
450 grams bread flour (500 grams bread flour total including the starter.)
300 grams room temperature water. (70% hydration, the water amount is 350 grams total including the starter)
50 grams milk powder (10% bakers percentage)
15 grams olive oil (3%)
10 grams kosher salt (2%)
1-2 teaspoons crushed/ground caraway seed. I didn’t go too fine because I still wanted to see flecks of caraway.
1.5 tsp instant (not rapid rise) yeast.
Combine all ingredients. Mix until combined, about 1 minute at low speed. Cover and let rest 30 minutes. Mix for 8 minutes on low speed.
Oil / butter / Baker’s Joy the pullman pan. Move the dough to the pullman pan and spread the dough out to the sides of the pan. Cover and let rise until 1″ from the top of the pan. Bake at 350F covered for 30 minutes, then uncover and bake an additional 25 minutes.
The finished loaf had a lighter crust color this time, partly because I left out the usual honey. The crumb was spongy and moist with dark flecks of caraway — it worked really well as a sandwich loaf and I think it’ll make good toast if it lasts that long.
Overall the finished bread was simple, quick, and fairly interesting on a baking night where I wanted simple, quick, and easy. Perfect.
Combine all ingredients, cover, and let rest 30 minutes. At the 30-minute mark do Rubaud folds in the bowl. Repeat at 30-minute intervals for a total of four rounds of folds.
Shape the dough and move to a Silpat-lined sheet tray. Dust with flour and cover for 90 minutes. At the 60-minute mark preheat the over to 425F. Slash the dough. Bake for 50-60 minutes, or until the bread reaches 200F.
I guess technically some people would call this a 1.7kg (or 3.7 lb) loaf since that’s the total weight of the ingredients. I always think of it in terms of “how much flour is there”, so for me it’s a 1kg loaf.
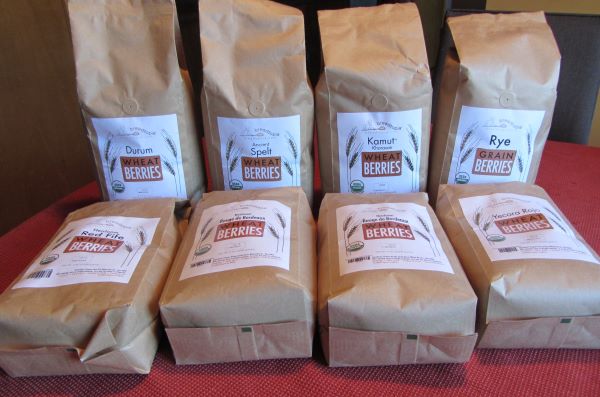
Rogue de Bordeaux recently came back into stock, so it was time for another order of wheat berries from Breadtopia. I ordered two bags of that variety because it has a wonderful rich smell and taste, a five pound bag wouldn’t last long.
Delivering a heavy package from Iowa to the Pacific Northwest — freight isn’t cheap. I used that as excuse to splurge on some of the not-inexpensive varieties such as the Kamut and the Durum. I’ve been meaning to bake this Whole Spelt Sourdough Bread from the Breadtopia site so Spelt went into the shopping cart as well.
Rounding out the order was a bag of Rye, a bag of Red Fife, and a bag of Yecora Rojo. All of that will join the Turkey Red, Sonora White, and other smaller quantities of berries already in the pantry. The weekly sandwich loaves are usually one of Red Fife / Yecora Rojo / Turkey Red / Rogue de Bordeaux, with the Yecora Rojo delivering the most consistently good results for a tightly crumbed and elastic slice of bread.
I’d love to be able to buy these closer to home, but the relatively local places don’t sell many varieties of berries, they mostly just sell flours. I’m little surprised they don’t also bag and distribute the berries, I’m assuming it’s a value-add thing for the mill.
This is the first post with the new laptop. This blog and the previous title (CheapSeatEats) have now seen at least two other laptops come and go, maybe three. There were a few new things to learn with handling and resizing photos but it’s really nice not having to wait for things to spin up so that I can get on with the writing. I’ll be interested to see what the photos look like when viewed from the web. I cropped to the same size as usual and it looks grainy in the preview, so that may need some attention later on.
I’ve also read that Kamut is super hard and may initially cause the Mockmill 200 to discharge some millstone into the flour. We’ll see how that goes.
Now to figure out where it’s all going to live in the pantry.
I’ve now reached a point with the weekly sandwich bread bake that I’m basically happy with it. I’m sure I’ll continue to fiddle with it to see how it reacts, but here’s where I’ve settled as a base recipe:
Ingredients
100g starter discard or overnight poolish (either of these are optional but they seem to improve the mouthfeel of the finished bread). The starter discard is 50g bread flour and 50g water. If using a poolish it will be 50g bread flour, 50g water, and a tiny tiny pinch of yeast.
200g Bread flour and 250g fresh-milled whole wheat flour (Red Fife, Turkey Red, or Rogue de Bordeaux berries), (In total it is 500g flour weight total including the starter/poolish).
325g cool water (with the 50 grams from the starter/poolish the total water is 375 total grams. 75% dough hydration).
15g honey (3% of flour weight)
15g olive oil (3% of flour weight)
10g kosher salt (2% of the flour weight)
1.5 tsp instant (not rapid-rise) yeast.
Process
Start by adding the 325 grams of cool water to the bowl of the stand mixer.
Scoop 100 grams of starter discard into the water.
Grind the wheat directly into the water/starter mixture. I feel like this helps keep the milled wheat temperature lower than it would be if I just milled it into an empty container. At the very least, it can’t hurt.
Add the remaining ingredients and mix for one minute to combine. Cover and let rest 20 minutes, up to an hour. Uncover and mix another 6 minutes.
Spray a pullman pan lightly with Baker’s Joy. (I’ve tried more than a few ways of attempting to prevent the baked loaf from sticking to the pan. Baker’s Joy has been by far the easiest and most consistent solution. If overused Baker’s Joy with give the crust a vaguely weird and sticky quality, so don’t go overboard with it.)
Transfer the dough to a pullman pan and spread out the dough with wet fingers. Cover, and let rise until 1/2″ to 1″ from the top of the pan. Preheat oven to 350F when the dough is getting close to ready.
Bake, covered for 30 minutes then remove the cover and bake for another 25 minutes or until the loaf reaches 195-205F.
I had been using powdered milk in the recipe, but it didn’t seem to be adding flavor. I thought it might also be contributing to the finished loaf being a little crumbly, since when used in moderation the powdered milk is supposed to help with loft. Simpler might be better here.
This recipe still technically functions as a same-day loaf, given I always have a starter in the refrigerator. The weekly sandwich bake then doubles as an opportunity to remember to refresh the starter. Win-win.