I originally posted about the A-frame style trellises in 2014. The external links on that post are dead now, so today’s post includes an update with a few close-ups and explanations of the details of construction.
First the improvised Ultomato trellis:

I’m hoping this is a more stable answer than putting the stakes directly into the boxes — almost every year at least one pepper box has toppled over on a windy day when the plants are heavy with fruit.
This was done with 60″ Ultomato stakes and held together with cable ties. It barely covers two 30″ EarthBoxes lengthwise. The commonly available 48″ stakes would work too, but would only cover one box. The “X’s” at the ends are 24″ wide.
I built this by myself, though an extra set of hands would have been very helpful, especially in the early stages. I wound up creating both “X’s”, then leaning one against a wall and loosely attaching the cross-pieces to the “X” leaning against the wall, then attaching cross-pieces to the “free end” I was holding up. Then I again tightened all the ties once it was standing on its own. It all fell over a few times but eventually it cooperated.
The cross pieces pictured below are separated by 12″, which is the length of the Ultomato clips:
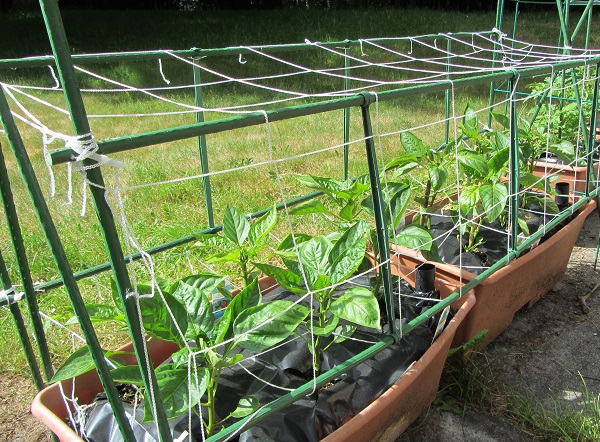
As much as possible I tried to secure the trellis netting using the clips attaching the cross pieces, though there are a few small cable ties mixed in too. I may still add one higher level of cross-pieces and netting depending upon how tall the pepper plants get. The netting is the same used for the A-frame trellises — the “squares” are 7″ or 8″. We purchased one or two packages of (I think) this and 7 years later it’s still holding up.
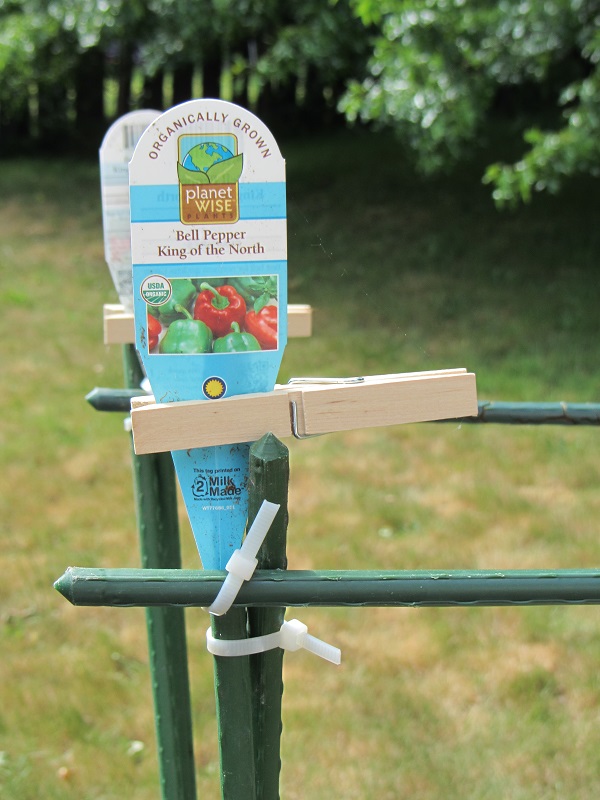
We use clothes pins to hold the plant labels. This is also a good close-up of the tops of the “X” and how it’s all tied together:
Next are a few close-ups of the A-frame trellis. They’re made from 2″ x 2″ x 8′ cedar for weather resistance. We have two heights – 6′ and 8′:

That’s the 8′. I’ve discovered that the top of the trellis is taller than I can reach without a ladder or stepstool, so it only gets used for Tromboncino (a vining zucchini). The overall dimension of the trellis is 8′ high x 4′ wide. The smaller trellises are 6′ high x 4′ wide. Unless you’re a giant I’d stick to the 6′ trellis for ease of harvesting.
A picture of the 6′ high version in process — the bottom cross-piece is set to the same height as the top of the EarthBoxes:

The brackets are galvanized and readily available at a local hardware store. I erred on the side of heavier than maybe necessary, but they’re handled a fair amount and there’s often torque on things when moving them around. I didn’t see any reason to have anything break if it could be avoided. The brackets are 5-1/2″ long to the tips. The original link pointed to these Rigid Tie Angle. (Which I think are right but I’m not 100% sure.)
A close up of the bottom of the assembled trellis:

The top:

The tops are attached with galvanized or zinc-plated hinges. When attaching the hinges take care not to get the wood pieces too tightly together, or the hinge may not swing freely and allow the A-frame to fold up for storage. Ours are stacked up against the dry side of the house all winter. A picture of the tops of the frames:

The trellis netting was attached with a staple gun. It wraps over the top. So far the top isn’t the bit that’s showing wear — it’s the middle and bottom where the plants hang and it gets a lot of contact with organic material, and receives the occasional cut from a mistake with the pruner.
I’m thinking the plural of “trellis” should be “trellisi”.. kind of like the plural of octopus.
