How Not to Make Banana Bread

By Iron Chef Leftovers

I don’t have a great ego when it comes to cooking, but I am pretty good at it. Contrary to what some people think, I really couldn’t be a professional chef nor would I want to – I enjoy cooking and it is my relaxation. Baking on the other hand is not something I am good at – where I excel in cooking a savory dish is that I know how flavors work together, I can improvise and improve a recipe on the fly and I can adjust the dish during the cooking process to correct it, baking it’s the opposite. I hate that you can’t tell if you got it right until the finished product comes out of the oven and by that point it is too late to do anything about it. Don’t get me wrong, I understand the science behind baking and why ingredients do what they do, but I hate the lack of improvisation that baking delivers.

Why do I mention this, well up until a few weeks ago, my greatest culinary failure had been a tiramisu that I forgot to add the egg whites. I realized this after I put the entire thing together, when it was too late to add the egg whites, but fortunately, I was able to save it by putting in some cream and running it though an ice cream machine and I ended up with tiramisu ice cream. It turned out to be edible at least.

A few weeks ago, I had a few bananas that were well past being edible (they were black), perfect for banana bread. I remembered there was a really easy recipe for it on cooksillustrated.com, so I went there to grab it. Instead of printing it out, I wrote down the ingredients. Unfortunately, Mrs. Iron Chef came home as I was doing this and I got distracted. I picked up where I left off and this is what I wrote down:

My ingredients list. Any idea what I missed?

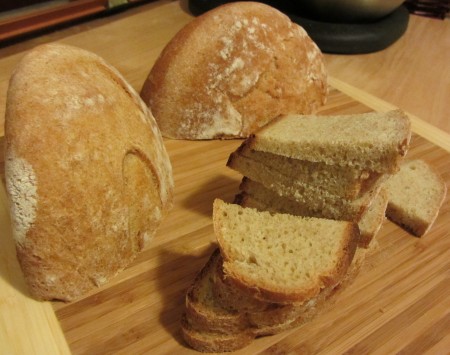
I looked at the ingredients list and thought it looked a little strange, but I figured that it was right, so I proceeded to put everything together and bake the bread. It smells wonderful in the house the entire time it is baking. After and hour I check for doneness and pull it out of the oven and think, it looks a little odd. I finally pull it out of the pan and onto the rack and think, it looks really flat. I let it cool, it settles and looks like this:

I know at this point I screwed it up. I taste it and it tastes good, but the bread is so dense that it is practically inedible. You could probably build a house with this thing it is so dense.

So what did I screw up? I left out one simple but very important ingredient – the leavening agent, in this case, baking soda. The leavening is what causes baked goods to rise by adding gas to the batter as it cooked. When you don’t you get something that is dense enough to collapse in on itself and form a black hole.

I believe I can actually see the gravity well forming in this banana bread brick.

In case you are wondering, here is the actual recipe, and I do recommend it. It is quick to assemble and produces pretty good banana bread. From cooksillustrted.com:

Makes one 9-inch loaf

Greasing and flouring only the bottom of a regular loaf pan causes the bread to cling to the sides and rise higher. If using a nonstick loaf pan, on which the sides are very slick, grease and flour sides as well as the bottom.

Ingredients

* 2 cups unbleached all-purpose flour
* 3/4 cup granulated sugar
* 3/4 teaspoon baking soda
* 1/2 teaspoon table salt
* 1 1/4 cups toasted walnuts , chopped coarse (about 1 cup)
* 3 very ripe bananas , soft, darkly speckled, mashed well (about 1 1/2 cups)
* 1/4 cup plain yogurt
* 2 large eggs , beaten lightly
* 6 tablespoons unsalted butter , melted and cooled
* 1 teaspoon vanilla extract

Instructions

1. Adjust oven rack to lower middle position and heat oven to 350 degrees. Grease bottom only of regular loaf pan, or grease and flour bottom and sides of nonstick 9-by-5-by-3-inch loaf pan; set aside. Combine first five ingredients together in large bowl; set aside.

2. Mix mashed bananas, yogurt, eggs, butter, and vanilla with wooden spoon in medium bowl. Lightly fold banana mixture into dry ingredients with rubber spatula until just combined and batter looks thick and chunky. Scrape batter into prepared loaf pan; bake until loaf is golden brown and toothpick inserted in center comes out clean, about 55 minutes. Cool in pan for 5 minutes, then transfer to wire rack. Serve warm or at room temperature.

An Easy Wheat/ White Bread

by A.J. Coltrane

An improvised bread. I would highly recommend using a scale instead of measuring cups when baking breads —  the process becomes dead simple, really nearly impossible to screw up. Once you have a feel for what the baker’s percentages should be (the relative weight of the ingredients), recipes aren’t necessary anymore.

Ingredient Baker’s Percentage Weight Approx Volume
Bread Flour 75 300g 2-1/4 cups
Wheat Flour 25 100g 3/4 cup
Water 65 260g 1 cup + 5 tsp
Sea Salt 2.5 10g 1.5 tsp
Yeast 1.75 7g 2 tsp
Sugar 1.5 6g 1.5 tsp

Process:  I kneaded the ingredients for six minutes in the kitchenaid, covered the bowl with a towel, and allowed the dough to rise for a couple of hours. I put a Le Crueset in the oven to preheat with the oven to 450 degrees. (This is the same process that I use for the Lahey No Knead method, referenced many times on this site.) The bread was set in the pot, slashed, then allowed to bake, covered, for 22 minutes. The lid of the pot was removed and the bread was baked for another 20 minutes.  The bread was then moved to a cooling rack.


The postmortem:  25% of the bread flour was swapped out for wheat flour. The combination of the wheat flour, the 65% hydration, and the sugar made for a relatively dense interior. I think the bread may have benefitted from the slashing going a little deeper than it did — it may have allowed a little more expansion in the oven. Still, it tasted good, and was virtually no work, so I’ll call that a win.

No Knead Bread — What Happens When It’s Slashed

by A.J. Coltrane

Jim Lahey’s No Knead Bread doesn’t need to be slashed.

Usually though, it comes out looking something like this:

Or these:

This is a lucky outcome, from an appearance standpoint:


But here’s what I got the first time I put it in the pot, then slashed it:

The nice thing is that the attractive slash and rise in the last photo represents a reproducible result. Note that the shape is a little more “regular” too — the bread didn’t just crack organically.

Which looks most appetising?

—–

Postscript:  Four different photos of bread using four different photo techniques, and the last picture uses the newer camera. The first bread obviously used more flour for proofing, and the left of the twin breads used a non-preheated pot. Still, at this point the baking has a more predictable outcome than I get from the photography — there are a lot more hours invested in the baking to date.

A Very Agreeable Bread

by A.J. Coltrane

Here’s a typical french bread recipe (scaled to “15 servings”)

  • 3 cups all-purpose flour
  • 1-1/4 (.25 ounce) packages active dry yeast
  • 3/4 teaspoon salt
  • 1 cup warm water (110 degrees F/45 degrees C)

This is the same basic ratio of flour to water (3:1) as my “go to” pizza dough recipe. 3 cups of flour weighs about 375-400 grams (I’ve been using Lahey’s 400 grams as standard). 1 cup of water weighs 237 grams. Expressed as a baker’s percentage, the water weight is about equal to 60-63% of the flour weight.  (By rounding the water up very slightly to 240 grams:  240/400 = .60)

The beauty of using weights instead of volumetric measures is that it removes all of the variables from the paragraph above, and removing variables leads to more consistent results. Baking is enough of an inexact science as it is, without intentionally introducing variables into the process.

So here’s the point:  When using baker’s percentages a “classic” french bread formula would be called out as “60-2-2”. For every 100 parts flour the formula calls for 60 parts water, 2 parts salt, and 2 parts yeast. Everybody knows what french bread “is”, and that makes for a good jumping off point to try other things:

Ingredient Original French Bread Percentage Approx French Bread Volume French Bread Weight Agreeable Bread Weight
White Flour 100 3 cups 400g 300g
Wheat Flour 0     100g
Water 60 1 cup 240g 268g
Salt 2 1-1/4 tsp 8g 8g
Yeast 2 2 tsp 8g 8g

What happened here, exactly? I replaced 1/4 of the white flour with wheat flour, and I increased the hydration from 60% to 67% by adding 28 grams of water — about two tablespoons. The end goal was a slightly more rustic, somewhat “wheaty” bread. I also added two tablespoons of butter to the dough because there was butter in the fridge and I felt like adding it.

To bake the bread I used the Lahey “covered pot” technique (30 minutes covered, 15 minutes uncovered), decreasing the baking time from 45 minutes down to 40 (only 10 minutes of uncovered baking) —  the hydration of the Agreeable bread was 67% rather than the 75% in Lahey’s “no knead” dough; there was less water to cook out.

If I had to do over again I would have removed the pot lid 5 minutes sooner, to try to get a little more color on the crust. Slashing the dough may have also produced a slightly more open crumb, a “better” result — 60% hydration doughs pretty much always get slashed, and high hydration (75%) doughs basically never get slashed (they’ll often collapse into the slash); there’s a point in between there where slashing the dough is a good thing. Now I just have to figure out what that “point” is.

In any event, the Agreeable Bread went well with Saint Andre cheese, and it made a good breakfast sandwich too.

Two Breads

by A.J. Coltrane

I’m always looking around at how everyone is making Jim Lahey’s No Knead Bread. One day I ran across a blog post where the writer recommended *not* preheating the cooking pot. Her method was to place the the dough on parchment and let it rise in the pot prior to baking. I had to try it out — if it worked then it wouldn’t be necessary to transfer the dough from a towel into a smoking hot pot. The approach would be neater, cleaner, and easier.

The two breads below use the same formula, one of the two didn’t use a preheated pot:


One bread is significantly lighter, isn’t it? The darker crust was preheated, and it had a better crust that was more highly regarded by the crowd.

The Lahey recipe calls for a 4.5-5 quart heavy pot. I don’t own that size – yet.

The larger of the two is 7.25 quarts (#28). The smaller is 2.75 quarts (#23).

The lighter bread used the smaller container. The darker bread used the larger one. I mention this because it might be possible that the difference in pots changed the color of the crust, though I doubt it. I do think the difference changed the finished shape. (Related note:  From what I’ve read, smaller pots create a higher rise.)

So… In my opinion, the “no preheating” thing doesn’t work as well.

One change from the recipe that I think works is this:  I let the final rise happen in a bowl instead of on a towel. I put about 1 teaspoon of olive oil into the bowl and spread it around the entire interior with a paper towel. I then dust the interior of the bowl lightly with flour. The flour prevents most of the interaction between the oil and dough, which keeps the oil from tendering the crust.

I use a bowl that is slighter smaller in diameter than the final pot. I’ve tried it with just flour in the bowl, or just oil towards the bottom of the bowl, and in my experience the dough will stick somewhat to the sides and/or bottom when I attempt it one of those ways. Using both flour and oil, the dough plops right out:

No dough is stuck to the bowl! That’s my $.02 “improvement”.

Grissini In A Blender!!

by A.J. Coltrane

This Grissini recipe uses two formulas from The Bread Baker’s Apprentice — Pate Fermentee and French Bread. Really, it’s the same recipe twice. The Pate Fermentee is made 24 hours in advance then refrigerated. The exact same ingredients are used again and combined with the (warmed) refrigerated dough to make French Bread. Reinhart suggests a number of different potential bases for Grissini, I used the French Bread version because it’s only flour, water, salt, and yeast — all stuff I had on hand.

Grissini ready for the oven. They're about 1/2" wide

This is the first time I’ve done a recipe using weights instead of volumes. I did this for three reasons:

1.  The Reinhart formulas inevitably call for volumes that are too much for one loaf. The French Bread winds up using 4-1/2 cups of flour, intended to make three baguettes. For reference, I use 1-1/2 cups for a large pizza. I definitely didn’t want to make three large pizzas worth of Grissini.

2.  Scaling the recipes down tends to make lots of weird measurements and oddball math. Halving the following formula below would mean halving 1-1/8 cups of each flour, which comes to 1/2 cup + 1 TBP. Halving the salt would be 3/8 teaspoon. That’s all assuming the scaling isn’t 1/6 of a recipe or something. “Makes 6 baguettes, 6 to 8 pizzas, or one 17 by 12-inch focaccia”.

3.  Baker’s Percentages allow working in grams, and the metric system is waaayyy easier to scale than messing around with cups, tablespoons, and teaspoons.

The nice thing about Baker’s Percentages is that everything is weighed relative to the total weight of the flour. The “65” in the water column means that for every 100 grams of flour the formula uses 65 grams of water. It couldn’t be simpler. Especially with a calculator.

The table:

  Reinhart (vol) Reinhart (weight) Reinhart (grams) This One Baker’s Percentage
AP Flour 1-1/8 cup 5 oz 140 g 75 g 50
Bread Flour 1-1/8 cup 5 oz 140 g 75 g 50
Water 3/4 cup 6-7 oz (6.5 oz) 182 g 98 g 65
Yeast 1/2 tsp .055 oz 1.5 g 1 g (0.67%) 0.55
Salt 3/4 tsp .19 oz 5.5 g 3 g (2%) 1.9

The 75 grams of each flour was pretty arbitrary — it was loosely half a recipe. Had I realized how close it was to a half recipe I might have gone with exactly half a recipe, though at the time I was more interested in the nice, round 150 grams of flour to use as a base for the rest of the math.

The recipe in short form:

1.  Knead all of the ingredients, place the dough in a lightly oiled bowl, cover, and let it rest in the refrigerator overnight.

2.  Remove the dough from the refrigerator and let it warm up for an hour. Cut the dough into about 10 pieces and mix together with the “new” ingredients. Knead and let rise about 2 hours.

3.  Roll out the dough and divide into strips. Let the strips rise, covered, on parchment lined baking sheets, about 60-90 minutes. (I used a pizza cutter to make the strips.)

[One difference between what Reinhart calls for and what I actually did:  I rolled the dough out on semolina flour. I wanted some crunch on the outside of the breadstick.]

4.  Reinhart simply says “To drive off the moisture for crisp breadsticks, bake them for a long time at low temperatures, 325F to 350F, until dry and crisp. For soft breadsticks, bake hotter, at 400F to 450F, until the sticks turn golden brown.”

I wanted not-super skinny grissini with a little bite and soft insides. Looking around the internet, I settled for 400F for 20 minutes. At the 20 minute mark there was no browning, so I gave them another 5 minutes, then gave up on brown.

Way hotter than they look.

In retrospect, a small amount of fat on the outside of the sticks, or a higher temperature, might have made for an appearance closer to what I’d visualized as a target.

Of course, I don’t own anything to use to serve or display the breadsticks, therefore it’s

GRISSINI IN A BLENDER!!

7 Hour Rustic Bread

by A.J. Coltrane

This is another attempt at a “same day rustic bread”. The last batch didn’t get mixed adequately. The recipe is the same as the last time, with some modifications — this recipe uses 1-1/4 tsp salt to 3c flour. (The salt was increased to .42 tsp per cup from .375 per cup.) This was also a 3 cup recipe rather than a one cup recipe, so the crust had time to get much darker — the color it’s supposed to be. There were also some time and handling differences.


Scaled to 1 cup flour Lahey/Bittman Reinhart This Loaf
Flour ap or bread bread bread
Water .44 cups .4-.5 cups, cold .5 cups, cold
Yeast .08 tsp .3 tsp .125 tsp
Salt .42 tsp .375 tsp .42 tsp

Because the dough was underworked on the last try I also decided to incorporate more folding, (only one during fold the last attempt) and the dough got an extra hour of time. I had originally intended for 8 hours with folds every two hours, but other stuff came up:

9 am – Mix dough

11 am – fold (stretch and fold over each direction one time)

1 pm – fold (x2)

2 pm – fold, wait 15 minutes, form into a ball as in the Lahey/Bittman recipe and place seam side down in a floured bowl. (I’m still sticking with trying the bowl, at some point I’ll have to try the towel as in the Lahey/Bittman recipe.)

4 pm -bake as the Lahey/Bittman recipe calls for.

The result:


I think I may have to start slashing these loaves — the bread has cooperated exactly one time getting nice ears and rising like I think it’s supposed to (out of four attempts). Either that, or I need to make sure the seams wind up on top, which is tricky with a dough this wet (of course, I *could* use a towel like the recipe calls for…).

The overall result was better than last time — it may be as a that as a dough with only flour, water, yeast, and salt, that there is a limit to how good a bread can be without an overnight rise or a preferment. I’m going to assume there’s still plenty of room between this dough and whatever that limit is.. The Lahey/Bittman recipe blows it away. It still made a nice turkey melt though:

Vaguely out of focus, but I've already eaten it, so it's too late.

A Rustic “Long Rise” Bread

by A.J. Coltrane

This bread came about as an attempt at a rustic bread that’s “longer- rise- without- having- to- wait- overnight”. It’s rooted in the Lahey-Bittman No Knead Bread, as well as Peter Reinhart’s Pain a l’Ancienne in his book The Bread Baker’s Apprentice.

Both the Lahey and Reinhart breads call for an overnight rise — Lahey’s rise happens on the counter, and Reinhart’s happens in the refrigerator. I wanted to try something similar, shooting for about 6 hours of rising time on the counter. Using Reinhart’s recipe as a jumping off point, here’s where I wound up:

Scaled to 1 cup flour Lahey/Bittman Reinhart This Loaf
Flour ap or bread bread bread
Water .44 cups .4-.5 cups, cold .5 cups, cold
Yeast .08 tsp .3 tsp .125 tsp
Salt .42 tsp .375 tsp .375 tsp

The table above assumes 1-1/3c water to 3c flour for the Lahey bread — the amount of water he uses in his book, “My Bread”. (I’m now using this as the “standard” amount of water for the Lahey/Bittman bread.)

I had started with 1/4 tsp salt — I didn’t want the salt getting in the way of the yeast too much. (It’s a small amount of yeast in these recipes.) I changed course and went with 3/8 tsp because salt helps with gluten structure — I was hoping for a rustic loaf with good volume and large interior holes. (Thank you Jeffrey Hamelman, whose book “Bread – A Baker’s Book of Techniques and Recipes” needs its own “Recommended Cookbook” post.)

Very wet and very shaggy. By any other name, it's a "batter."

I think it’s an interesting point really:  When I think I want volume my first thought would normally be “don’t use too much salt, it’ll slow down the yeast and the rise won’t be as high”, when in reality I’m better served using a more “normal” amount of salt and being patient with the yeast — the end result should be a better product.

…back to the recipe — I used the Lahey/Bittman technique as a template:  I chose to go with a 4 hour rise, followed by folding the dough and letting it rest 15 minutes, then a final 2 hour rise in a very lightly oiled and floured bowl.

Enough flour to keep it from sticking when turned out? Nope.

For baking, the Lahey/Bittman recipe calls for a temperature of 450F in a dutch oven. Reinhart calls for 475F, on a baking stone that has been preheatead to 500F, for 20-25 minutes total. Reinhart also mists the oven with water to create steam. I chose to go with 450F using the dutch oven, 10 minutes covered and 15  minutes uncovered. The final temperature of the bread was 207F, almost right on the target of 205F.

As for the final result:

Out of the oven -- not very brown on the outside.

And:

I got holey bread, just not the intended result.

What happened: 

The bread tasted good and had a good crust. Neither was exceptional, though it worked great for sopping up marina sauce — the flavors of the sauce and bread married very well together.

The finished bread had a fairly light complexion:  It was a small loaf (1cup flour), so it didn’t get much uncovered cooking time.

The large irregular holes are a symtom of insufficient mixing or folding. As part of the postmortem I read (in Hamelman’s book) that high hydration doughs need to be folded more times than lower hydration doughs. This dough only got one fold. (Which worked fine for the Lahey bread, but in that case the enzymes had 20 hours to work on the gluten.) Also, the mixer had trouble with the tiny quantity of flour in the bowl, more dragging the dough around rather than kneading.

Next up, an eight hour process, folding every two hours.

Bittman — Lahey No Knead Bread: The Third Time’s A Charm?

by A.J. Coltrane

The first time I tried No Knead Bread I used quite a bit of extra flour on the work surfaces. I was happy with the taste, but less so with the appearance. (Really, I was completely happy with it the first time, almost giddy really, but there’s always room for improvement.) The “first time” bread was somewhat misshapen and seemed to have an excess of flour on the outside. The second time I tried it was more or less the same story — same shape, same rise, and probably more flour than would be desirable on the outside of the finished bread.


The 3rd loaf.

The Bittman/Lahey No Knead Bread recipe basically breaks down to five steps, I’ll list them, as well as what I tried that was different on the 3rd attempt:

1.  Combine the ingredients in a bowl. Let rise 18 hours.

No changes here. Mix the ingredients with a wet spatula, cover the bowl with plastic wrap and come back the next day. The dough is happy to do its thing.

2.  Remove the dough from the bowl and place on a work surface. Fold the dough onto itself and let rest 15 minutes.

The first two times I used a very generous amount of flour and a cutting board work surface, and the dough still stuck. You might say: “Of course, you dummy, the cutting board has lots of grooves for the dough to grab onto!” (And you’d be right to say so.) During the rise I covered the dough with plastic wrap, which also stuck a little.

On the third try I used a large round (flat) serving platter. I added a tiny amount of cooking spray to the platter and dusted it with a small amount of flour. I covered the dough with an inverted bowl. This worked *much* better, though the dough might have benefited from a little flour on top. The top is eventually flipped to become the bottom, and the flour might help protect it from the heat of the dutch oven.

There’s an important note in here — everytime the dough sticks to something it degasses. Degassing = less open crumb structure and less rise in the finished product. All of my (intentional) adjustments were rooted in the idea of having less stickage happening.

The first loaf, note that it didn't really develop "ears".

On the first two attempts I used a wet spatula to fold the dough onto itself. On the 3rd try I got my hands wet and used them to fold the dough. Between the relatively no-stick surface and my somewhat no-stick hands it worked a lot better, and the folds were much more pronounced — better all the way around. I think that may be why the 3rd dough had the nice ears and the first two breads only developed a crack along the surface. (Either that, or the final handling was responsible for the ears, OR, it was all luck.)

I also think I may be underselling the importance of the folding in the no-knead method. If the dough is really only being handled two or three times I’d guess each time *really* makes a difference. (Though the dough will taste awesome regardless.)

3.  Shape the dough into a ball and place it seam-side down on a well-floured towel. Let rise two hours.

Use really wet hands. Less dough will stick to them that way.

I ditched the towel idea and went with a medium size serving bowl with straight sides. The idea was that the diameter of the bowl would allow me to invert the bowl directly over the dutch oven and the dough would plop out. To encourage the dough to fall out easily I added a tiny amount of cooking spray and then lightly floured the bowl. The issue that I ran into was that I didn’t spray/flour all the way up the sides of the bowl, so the dough got a little stuck at the very top. Other than that though, I thought this modification worked really well.

4.  Transfer the dough to a preheated dutch oven. (Seam side up.)

My oven is small. I’m thinking that it’s a bad idea to preheat the dutch oven longer than it takes the oven to come up to temperature. The bottom of the dutch oven gets too hot, since it’s relatively close to the bottom of the oven. I’m also of the suspicion that my oven may be running vaguely warmer than it says it is — each time the bread has been done at the very earliest recommended cooking time. (Either that, or it’s the small oven talking again.)

5.  Bake, removing the dutch oven lid partway through.

The crust came out browner on the 3rd try, especially on the bottom of the bread. Reasons for this might include:  The small amount of cooking spray used in handling the dough; the oven and dutch oven both preheating for longer than the first two attempts; or the absence of bench flour protecting the outside of the dough from the heat.

My first guess at the main “brownness” culprit is the preheating that happened on the 3rd attempt — on the first two attempts the dutch oven was placed in the oven and the oven was preheated to 450 degrees, the dough was then immediately put into the dutch oven. On the 3rd attempt the dutch oven was allowed to hang out in the preheated oven for about 10-15 minutes. I think the environment was hotter overall.

I’d like to think that I used such a tiny amount of cooking spray that it didn’t significantly darken the finished bread. If only because it’s easier make the bread that way. More flour on the dough might help too, especially on the bottom.

Variables.

Another picture of the 3rd loaf.


The recipe and “first attempt” post is here.

Bittman – Lahey No Knead Bread

by A.J. Coltrane

Boy, talk about being late to the party! To quote Jim Lahey’s website:

In November of 2006, Lahey’s no-knead method drew the attention of “The Minimalist” columnist Mark Bittman. His articles about it in the New York Times sparked a worldwide home baking revolution.

Or, as Mark Bittman said:

I set up a time to visit Mr. Lahey, and we baked together, and the only bad news is that you cannot put your 4-year-old to work producing bread for you. The method is complicated enough that you would need a very ambitious 8-year-old. But the results are indeed fantastic.

Mr. Lahey’s method is striking on several levels. It requires no kneading. (Repeat: none.) It uses no special ingredients, equipment or techniques. It takes very little effort.

Bittman also says:

The loaf is incredible, a fine-bakery quality, European-style boule that is produced more easily than by any other technique I’ve used, and will blow your mind.

I finally figured I’d give it a try, starting it on Thursday for a Friday dinner. In my opinion, the superlatives that people use about this bread are all true. I was actually kind of shocked at how good it was! It was far and away the best bread I’ve ever made, and that’s damning it with faint praise.

Out of the oven. I think I may have used more flour than necessary.

The recipe is here. The Minimalist column is here. I would highly recommend reading the Minimalist column in addition to the recipe. It has some good insights on bread baking in general.

A few notes:

1.  It’s an 18 hour initial rise, then the dough is folded and allowed to rest for 15 minutes, followed by a 2 hour final rise. Allowing time for cooling, the process needs to be started about 21 hours before the bread is ready for serving. So, if dinner will be at 6pm tomorrow night then the dough needs to started at 9pm the night before. In the future I’m just going to use the “Eastern Time Zone” automatic translation that goes on in my head for sports start times.

The crumb.

(The crumb wasn’t really quite *that* white. The color in the last photo is closer to the truth.)

2.  The recipe doesn’t say at what temperature the bread is done, simply “until loaf is beautifully browned”. In my opinion, the “right answer” is to insert an instant read thermometer into the “center of the center of the loaf” (to quote Peter Reinhart). The bread is cooked at 205 degrees. (Or maybe 200 degrees, though I’m currently thinking 205 is “correct”.)

Note that the recipe calls for 30 minutes covered, plus 15-30 minutes uncovered. I found the loaf to be cooked after 15 minutes uncovered, on the very short end of the recommended time.

The aftermath.

3.  The NY Times recipe calls for 1-5/8c flour. I need to do some further looking around, but it sounds like 1-1/2c or 1-1/3c is actually correct. In (the newer edition of) How To Cook Everything, Bittman uses a 1:2 water to flour ratio (by volume), which would be 1-1/2c water for the 3c flour in this recipe. For my first loaf I used the more conservative 1-1/3 cups of water, a ratio of 4:9.  (For reference, the pizza dough recipe that I use has a 1:3 ratio of water to flour, and the Ming Tsai hot water dough uses 1:2. I shot for the middle.)

The reality of all of that is, of course, that I should be using weights rather than measures. That’s not happening until I can find the kitchen scale, which is still in a box someplace waiting to be unpacked after the last move.

4.  The bread crackles as it cools, which is pretty neat.

5.  It makes the house smell amazing.

The recipe:

Adapted from Jim Lahey, Sullivan Street Bakery
Time: About 1½ hours plus 14 to 20 hours’ rising

3 cups all-purpose or bread flour, more for dusting
¼ teaspoon instant yeast
1¼ teaspoons salt
Cornmeal or wheat bran as needed.

1. In a large bowl combine flour, yeast and salt. Add 1 5/8 cups water, and stir until blended; dough will be shaggy and sticky. Cover bowl with plastic wrap. Let dough rest at least 12 hours, preferably about 18, at warm room temperature, about 70 degrees.

2. Dough is ready when its surface is dotted with bubbles. Lightly flour a work surface and place dough on it; sprinkle it with a little more flour and fold it over on itself once or twice. Cover loosely with plastic wrap and let rest about 15 minutes.

3. Using just enough flour to keep dough from sticking to work surface or to your fingers, gently and quickly shape dough into a ball. Generously coat a cotton towel (not terry cloth) with flour, wheat bran or cornmeal; put dough seam side down on towel and dust with more flour, bran or cornmeal. Cover with another cotton towel and let rise for about 2 hours. When it is ready, dough will be more than double in size and will not readily spring back when poked with a finger.

4. At least a half-hour before dough is ready, heat oven to 450 degrees. Put a 6- to 8-quart heavy covered pot (cast iron, enamel, Pyrex or ceramic) in oven as it heats. When dough is ready, carefully remove pot from oven. Slide your hand under towel and turn dough over into pot, seam side up; it may look like a mess, but that is O.K. Shake pan once or twice if dough is unevenly distributed; it will straighten out as it bakes. Cover with lid and bake 30 minutes, then remove lid and bake another 15 to 30 minutes, until loaf is beautifully browned. Cool on a rack.

Yield: One 1½-pound loaf.